
This Baklava is flaky, crisp, and tender, and easier to make than you think. I share my authentic Greek Baklava Recipe below with step-by-step directions that are easy to follow. Make this dessert and be prepared for oo’s and ahh’s, because this is the BEST baklava recipe I have ever tried.

This post may contain affiliate links. Read my disclosure policy.
Helpful Reader Review
“Love this recipe. I am Greek, but my baklava never turned out this good. I made your recipe for my husband’s family reunion. They were so impressed by how delicious it was. They said the syrup wasn’t too sweet like other baklava recipes and it’s the best they ever tasted.” – Tina ★★★★★
Baklava Video
Baklava can be a little tedious to make, but it’s truly simpler than you think. Watch my video, and you’ll be confidently buttering layers in no time! If you want a sneaky shortcut version, try my Baklava Cups.
Best Baklava Recipe
Store-bought baklava has nothing on this, and trust me, I’ve been around the block when shopping for baklava. This baklava recipe is well-loved wherever it goes, and with so many 5-star reviews, it is definitely a reader and family favorite! It’s also make-ahead and freezer-friendly, which is perfect for holiday baking.
My baklava recipe comes out beautifully flaky, buttery, and crisp. The flavor is incredible, since this one is not too sweet. You will love the hint of mellow lemony flavor, which offsets the sweetness and complements the cinnamon. It also keeps well for over a week on the counter, making it a great option to make ahead.

Baklava Ingredients
While this recipe is a Classic Greek Baklava, other varieties, such as Lebanese and Turkish recipes, swap the walnuts for pistachios and include rose water. My Baklava recipe calls for simple ingredients, most of which you can find in your pantry.
- Phyllo (fillo) dough – one 16oz package should have about 40 total paper-thin sheets. Do not use the thick sheets of fillo dough for this recipe. They are sold in the freezer section of the grocery store. Thaw according to the package instructions.
- Unsalted Butter – don’t skimp here! This keeps the fillo dough from peeling away.
- Walnuts – finely chop. You can swap them for almonds, pistachios, or a mix of nuts.
- Cinnamon – adds a great hint of flavor that’s traditional for Baklava
- Syrup ingredients – sugar, lemon juice, water, and honey
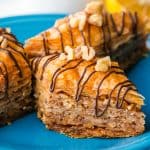
- Garnish – drizzle with melted chocolate or Chocolate Ganache, and chopped walnuts

How To Make Baklava
While it takes time to brush each layer, the result is worth every moment! Don’t skim on the butter, and you will be rewarded.
- Thaw phyllo dough in the refrigerator per the package instructions, then place it covered on the counter for 1 hour to bring to room temperature.
- Trim the phyllo dough to fit your 9×13 pan, covering it with a damp (not wet) towel to keep from drying out.

- Grease – use butter to coat the sides and bottom of a 13×9 non-stick baking pan. You can line it with parchment paper so you don’t damage it with your knife when slicing later.
- Make the honey syrup – heat the syrup ingredients in a medium saucepan while stirring until it boils, and then reduce the heat to medium-low and allow to cook for 4 more minutes without stirring. Set aside to cool.

- Chop Walnuts – pulse walnuts in a food processor until finely chopped, and then mix with cinnamon.

How to Assemble the Baklava
- 10 Layers – Preheat oven to 325°F. Start layering the phyllo dough, brushing each sheet with butter as you place it in the pan. Repeat this until you’ve added 10 layers. Then sprinkle 3/4 cup of walnuts over the top.
- 5 Layers – add 5 more sheets, buttering between each one, and then another layer of walnuts. Repeat this 3 more times. Finally, add 10 more layers of buttered dough on top.

- Cut the dessert into strips using a sharp knife, and then cut across to make diamonds. Bake for 1 hour and 15 minutes.

- Add syrup – spoon cooled syrup over the Baklava right after removing it from the oven. It should sizzle. Leave it uncovered on the counter to cool completely (4 hours or overnight). Then store covered with a tea towel for up to a week.

Tips for Making the Best Baklava
Follow these simple tips to make homemade baklava easy.
- Use a 13×9 pan with straight corners that fits the pastry to the edges. Avoid pans with angled corners that fan out, as they can cause the syrup to pool at the edges and make the top of the baklava dry. If you choose a larger pan, increase the syrup amount by 25% so you don’t run out. You can also cut the recipe in half using an 8×8 pan.
- Don’t skimp on the butter, especially on the top layers, since that can cause them to flake off. You can melt a few more tablespoons if you run out.
- Sizzle – the sound you’ll hear when you spoon the syrup over the hot pastry. This keeps it from getting soggy.

My Baklava recipe has so many layers of irresistible textures and flavors! The crispy layers of dough are perfectly complemented by the honey syrup and crunchy nuts. I hope it becomes your new favorite dessert.

Baklava Recipe
Ingredients
- 16 oz phyllo dough, thawed by package instructions
- 1 1/4 cups unsalted butter, 10 oz or 2 1/2 sticks, melted
- 1 lb walnuts, finely chopped, about 4 1/4 cups unprocessed
- 1 tsp ground cinnamon
- 1 cup granulated sugar
- 2 Tbsp lemon juice, juice of 1/2 lemon
- 3/4 cup water
- 1/2 cup honey
- Melted chocolate chips & chopped walnuts for garnish, optional
Instructions
Preparation
- Thaw phyllo dough by package instructions (this is best done overnight in the fridge, then place it on the counter for 1 hr before starting your recipe to bring it to room temperature).
- Trim phyllo dough to fit your baking dish. My phyllo package had 2 rolls with a total of 40 sheets that measured 9×14, so I had to trim them slightly. You can trim one stack at a time, then cover with a damp towel to keep from drying out.
- Grease – Butter the bottom and sides of a 13×9 non-stick baking pan. Line the bottom with parchment if desired to protect the pan when cutting later.
- Make the honey syrup – In a medium saucepan, combine 1 cup sugar, 1/2 cup honey, 2 Tbsp lemon juice, and 3/4 cup water. Bring to a boil over medium/high heat, stirring until sugar is dissolved, then reduce the heat to medium/low and boil an additional 4 min without stirring. Remove from heat and let the syrup cool while preparing baklava.
- Chop walnuts – Pulse walnuts 10 times in a food processor until coarsely ground/ finely chopped. In a medium bowl, stir together: 4 cups finely chopped walnuts and 1 tsp cinnamon.
Assemble the Baklava
- 10 layers – Preheat the oven to 325°F. Place 10 phyllo sheets into a baking pan one at a time, brushing each sheet with butter once it's in the pan before adding the next (i.e., place phyllo sheet into pan, brush the top with butter, place next phyllo sheet in pan, butter the top, etc.). Keep the remaining phyllo covered with a damp towel at all times. Spread about 1/5 of the nut mixture (about 3/4 cup) over the phyllo dough.
- 5 layers – Add 5 buttered sheets of phyllo, then another layer of nuts. Repeat four times with the remaining layers of fillo, butter and nuts. Finish off with 10 layers of buttered phyllo sheets. Brush the very top with butter.
- Cut pastry into 1 1/2" wide strips, then cut diagonally to form diamond shapes. Bake at 325˚F for 1 hour and 15 min or until tops are golden brown.
- Add syrup – Remove from oven and immediately spoon cooled syrup evenly over the hot baklava (you'll hear it sizzle). This will ensure that it stays crisp rather than soggy. Let baklava cool and rest uncovered at room temperature 4-6 hours or overnight for the syrup to penetrate and soften the layers. Garnish with chocolate and nuts if desired.
Notes
- 10 buttered sheets, 3/4 cup nuts,
- 5 buttered sheets, 3/4 cup nuts,
- 5 buttered sheets, 3/4 cup nuts,
- 5 buttered sheets, 3/4 cup nuts,
- 5 buttered sheets, 3/4 cup nuts,
- 10 buttered sheets and butter the top.
Nutrition Per Serving
Filed Under

More Pastry Recipes
Homemade pastries always turn heads, so once you try this Baklava, don’t miss these other classic dessert recipes:
- Eclairs
- Croissants
- Cream Puffs
- Apple Turnovers
- Churros
- Fruit Tart
- Rugelach
- Palmiers
- Cheese Danish
- Apple Danish
- Apple Roses


Hi Natasha first of all thanks for this amazagin recipe.
I would like to do it but i have some questions.
1º Is it possible to do it and eat it in the same day?
2º If i let it stay overnight , can it be in the fridge or outside the fridge?
3º The filo.. i didnt understand that part, first i let him stay outside for 1h and only then i put a blanket?
Hi there, you could enjoy it the same day, but you will want to give it a minimum of 4-6 hours or it will be dry. The syrup softens the layers as it stand. Also, overnight, cover with a tea towel or plastic wrap and let it sit on the counter at room temperature. It is not necessary to refrigerate. For the filo, it is important to let it thaw for an hour at room temperature and then once you open the package and trim the sheets to fit your pan size, you need to keep the stack of filo sheets covered with a lightly damp towel to keep them from drying out and crumbing apart. Filo sheets are very very thin and dry out easily. I hope you love the recipe!
As tedious as it was to make it was worth it. I made your baklava this past weekend for a picnic dessert and it was a big hit!
I’m glad everyone enjoyed your labor of love and recipe! Thanks for sharing your great review Joyce!
Once in a while I treat myself to Baklava but my mother and I are diabetic. Do you think instead of honey I can use some sort of concoction with Splenda?
Hi Rebecaa, I honestly have not tried that so I can’t say for sure. I searched through all of the reader comments and couldn’t find any reviews with that kind of substitution. You might google online to see if anyone else has tried and apply a similar substitution that you find. Sorry I can’t be more helpful!
Rebecca, I have been making baklava at home for 40 years, and I don’t believe that there is any acceptable way to adapt this recipe for Diabetics. I am speaking up because your question seems to suggest that honey is an acceptable sweetener for Diabetics, and it is not. Using honey as a sweetener can cause serious health problems for you if you have Diabetes. Please don’t risk your health for a sweet dessert!
I have tried using phyllo dough before and it hasn’t worked out well but since I decided to give it one more try and I’m glad I did. I made your Baklava and it was perfect. It was easier than I expected and it tasted wonderful. I received compliments from my family and friends. Thank You
You’re welcome Roberta! I’m glad to hear you love the recipe! Thank YOU for following and sharing your excellent review!
I just finished cutting up my batch of baklava, definitely wished l would have followed other recipes & added sugar to the filling. It needs the sweetest to cut the cinnamon.
Hi Carolyn, once the syrup is on and has softened the baklava, it goes into every layer of the baklava, making it perfectly sweet from the sugar and honey. Also, this way the sugar is melted into the syrup which ensures you don’t have granules of sugar in your baklava.
I just made a batch about an hour ago, l’ve not had a lot of success with other recipes. I followed other tips regarding letting the syrup simmer for almost 20 mins & adding a tea of vanilla. l noticed the button isn’t as soggy as past attempts. Next time l’ll try other nuts. Thanks for a great recipe 😋
You’re welcome!! 🙂 I’m so glad you enjoyed it 🙂
I have made this recipe many, many times and it is always perfect. Thank you. I wondered if you have found any pans that are the same size as the dough so you don’t have to cut the dough down?
Hi Tammy, I haven’t found any that are just that right size – it sure would be nice though, except you would probably have to increase the nuts and syrup also 🙂
I’m living in a country which had a lot of Ottoman interference in its internal affairs for more than half, almost an entire millennia. Still, mostly all remaining traces of the Turks in our culture are culinary ones. As such, I’d say we know a thing or two about Ottoman recipes. We never make baklava exclusively with walnuts – half of them are replaced with pistachio.
We also regularly take it out of the oven, while it bakes, and sprinkle the hobey syrup over it. Since it’s just sprinkled, not soaked, it evaporates as the baklava bakes, but still makes it to its inside. This makes the final product sweet throughout, not just on the surface, while not leaving it soggy. You have to do the sprinkling often, and fast, so that the baklava doesn’t get to cool too much during sprinkling but you also finish all syrup until the baklava is fully baked. You’ll notice it’s baked when in spite of the sprinkling it turns golden at the surface – don’t let it get brown, and don’t fear sprinkling just enough syrup in one go for some to seep through to the bottom of the tray – the bottom will be burned otherwise.
What we also do is thinner layers. We only put four sheets of dough at the top and at the bottom, and use just one sheet between layers, spreading the filling very thinly, so it’s enough for all sheets. This gives it a much nicer, crunchier and somehow finer textured consistency than thicker layers of dough. (You still need to brush each sheet with melted butter.)
This is great to know! Thank you for sharing with other readers!
Excellent tip about using a glass dish, I worried about using a metal one.
I have just made 2 batches of this recipe and they came out PERFECT!!! The only thing I changed was I added a small amount of Penzeys Spices powdered lemon peel, this gives a wee bit more lemon flavor but without the grit of regular minced lemon peel. I have been proclaimed the “Best Cook Ever” by the folks who have had some of these wonderful little diamond shaped treats.
Awww! That is just wonderful and thank you for sharing your amazing review 🙂
Any changes to be made if using a glass baking dish of the same size? Thanks!
Hi SJ, I use my metal pan only because it is more squared off on the edges but I think it would work fine in a buttered rectangular glass baking dish.
I just made two batches of baklava using a glass 13 x 9 inch Pyrex dish. I lowered the heat by 15 degrees. I also used the glass dish because I could cut the dough without scratching the bottom of my Teflon pan.
Thank you so much for sharing!!
Thank you for sharing. I lowered the heat by 25 degrees (before I saw this response), and baking time was 1 hour. Turned out great!
My pleasure SJ! I’m glad to hear it turned out well!
You _should_ use a thin iron metal tray. It conducts heat in a different way than a glass dish. The thicker the material, the more heat gets into the baklava via radiation, heating the inside more than it should. A thin iron tray catches most of the radiation from the oven walls and emits almost none of itself, so that heat goes into the baklava almost exclusively by contact heating. It makes a difference.
We just got back from our first “real” family vacation. We went to Michigan and bought some baklava from a deli in St. Joe. I decided I was going to make this stuff and found your recipe. Mostly, I have had Turkish or Syrian baklava. We fell in love with Syrian food living in Terre Haute before we got married. I know this is a Ukrainian and Slavic food site, anyway….I LOVE THE BAKLAVA. My daughter buttered the filo and I set the layers. We used 1 lb bag of walnuts that I chopped with this chopper thing I got at Aldis. I added the cinnamon and for fun I sprinkled in a little bit of clove dust. I was a little low on walnuts for the last layer, so I chopped up some pecans! After pouring the syrup (we used local honey, Florida raw cane, and 1/2 a lemon’s juice) on the hot baklava, we topped it with super fine chopped pecans and almonds. We were so excited when we pulled it out of the oven, because it looked perfect. My husband comes home with our son from camp tomorrow, and he will be so excited. It was delicious; we had to actually leave the house to let it set before tasting it. I will definitely make it again. We watched the video, too. We appreciated it! We posted a picture on fb and tagged this page!
That’s fantastic Wendi! Thanks for sharing your thoughtful comments and excellent review! 😀
I made the baklava this afternoon for my daughter in law’s baby shower, tomorrow. I had a terrible time with the phyllo sheets sticking together and ripping so I used an additional roll of dough to replace the messed up sheets. Even with the extra roll I ended up piecing some layers together. One thing about phyllo dough and baklava, it’s forgiving. I mean you can’t go wrong with phyllo, sugar, cinnamon, butter and nuts!! The only thing I would say is maybe the syrup could have been a little more as I am not seeing any excess as I usually do in-between the pieces. Took a smidgen and it does taste amazing. Hope everyone likes it tomorrow.
Hi Molly, I have had a “bad” package before where they just stuck badly, but otherwise, the very best way to combat that is to keep a damp cloth over the phyllo sheets the entire time replacing it over the phyllo with every layer you pick up – this is critically important so they don’t dry out since they dry out quickly and then flake like crazy. I sure hope that helps for next time!
I made this recipe tonight and it is absolutely delicious! My only problem is that the top 10 layers literally fall off every piece ( all 10 are stuck together but they don’t stick to the nut mixture underneath) so not sure where I went wrong. I followed the video step by step, buttered all 40 layers etc . I only baked it for 1 hr 5 min as it was quite well done , especially on the bottom , other than that it was exactly as directed. Any advice on why that would happen?
Hi Cheryl, were you possibly using a larger dish where the baklava was more spread out? Also, did you drizzle the syrup evenly over the top and give it time to rest before enjoying it? I hope that helps!
I just made it for the first time and my tops fell off as well. I’m going to use a dab of honey secure them for the party.
Also, I used a lot of butter on the early layers and had to melt more. I’m not sure if that was part of the problem or not.
Otherwise, delicious!!!
I’m so glad you enjoyed the recipe 🙂 That could be with using too much butter earlier and not having enough for the top, or using a dish that is larger in size could cause this as well.
I used a 9×13 pyrex and had to cut the phyllo down. I think it was the butter. Making it again right now with less butter on the bottom. I’ll let you know. It was a huge hit and “the best I’ve ever had” according to a coworker.
I’m so glad to hear that it was well loved 🙂
Just made this very time consuming but oh it is so worth the time
Thank you for your wonderful recipe!!!
You are very welcome Mary, I’m glad yo like it 😀.
Made this recipe tonight, delicious .Thanks again .ALL YOUR RECIPES ARE GREAT, always perfect
You’re welcome! I’m glad you hear you love my recipes! Thanks for sharing your fantastic review 😀
This turned out perfectly. I’m obsessed with it …. that’s why i can’t make it again, I ate so much of it – couldn’t leave it alone. Absolutely delicious! Thanks for the recipe!
LOL! It is delicious! I’m happy to hear you love the recipe Shawna, thanks for sharing! 😀
I can not eat walnuts can you recommend a different nut to use? Would raw Almonds work?
Hi Lynn, I haven’t tried that but others have reported good results with almonds and there are several recipes online with almonds.
My recipe calls for pistachio nuts but I use chopped pecans instead. I think you can use any nut you like.
Don’t be intimidated – beginners can make this too!
Made this recipe last night – YUM! My son said, “Sorry Mom, tomorrow is International Food Day at school and I picked Greece.” WHAT?!! After he shot down my idea of buying pre-made baklava, we started looking at recipes. The video tutorial sold me, because, well, I’m awful in the kitchen. But, thanks to Natasha, my son and I had a great evening/night in the kitchen making this tasty treat. He went to school with amazing, yummy, HOMEMADE baklava, and I even got a few pieces to take to work.
He was supposed to do recipe cards, so he wrote the ingredients and then a note to visit your website for complete instructions and a video tutorial.
Thanks Natasha and hope you get lots of visitors from San Antonio!!!
OH WOW Lori! This puts a huge smile on my face! I’m so happy to hear that you both enjoyed making and serving this recipe. Thanks for sharing your amazing review!! 😀 <3
Love the easy recipe! My family has strong roots in Ukraine, and I will definitely be making this for my grandmother’s birthday! Any tips on storing the leftovers?
Hi Brianne, It does keep really well at room temperature and I have even frozen the entire batch for more than a month and thawed and enjoyed after – just as good! I have a note in the recipe (although I admit it is a little hidden lol): Store at room temp, covered with a tea towel for 1 to 2 weeks.
Hi Natasha, thanks for your recipe .
beautifully presented. As e Mediterranean I grow up , my question is to sit the baklava 4-6 hours overnight should be covered or not.
Thanks in advance
Antonio
Antonio, Store at room temperature covered with the tea towel or a plastic wrap.
Grazie
After this recipe I start following you.
well done and congrats.
My husband and I made this and it was AWESOME! Labor intense, but worth every buttered layer of DELISH
YES! I’m happy to hear you both enjoy the recipe! Thanks for sharing your review! 🙂