
This Baklava is flaky, crisp, and tender, and easier to make than you think. I share my authentic Greek Baklava Recipe below with step-by-step directions that are easy to follow. Make this dessert and be prepared for oo’s and ahh’s, because this is the BEST baklava recipe I have ever tried.

This post may contain affiliate links. Read my disclosure policy.
Helpful Reader Review
“Love this recipe. I am Greek, but my baklava never turned out this good. I made your recipe for my husband’s family reunion. They were so impressed by how delicious it was. They said the syrup wasn’t too sweet like other baklava recipes and it’s the best they ever tasted.” – Tina ★★★★★
Baklava Video
Baklava can be a little tedious to make, but it’s truly simpler than you think. Watch my video, and you’ll be confidently buttering layers in no time! If you want a sneaky shortcut version, try my Baklava Cups.
Best Baklava Recipe
Store-bought baklava has nothing on this, and trust me, I’ve been around the block when shopping for baklava. This baklava recipe is well-loved wherever it goes, and with so many 5-star reviews, it is definitely a reader and family favorite! It’s also make-ahead and freezer-friendly, which is perfect for holiday baking.
My baklava recipe comes out beautifully flaky, buttery, and crisp. The flavor is incredible, since this one is not too sweet. You will love the hint of mellow lemony flavor, which offsets the sweetness and complements the cinnamon. It also keeps well for over a week on the counter, making it a great option to make ahead.

Baklava Ingredients
While this recipe is a Classic Greek Baklava, other varieties, such as Lebanese and Turkish recipes, swap the walnuts for pistachios and include rose water. My Baklava recipe calls for simple ingredients, most of which you can find in your pantry.
- Phyllo (fillo) dough – one 16oz package should have about 40 total paper-thin sheets. Do not use the thick sheets of fillo dough for this recipe. They are sold in the freezer section of the grocery store. Thaw according to the package instructions.
- Unsalted Butter – don’t skimp here! This keeps the fillo dough from peeling away.
- Walnuts – finely chop. You can swap them for almonds, pistachios, or a mix of nuts.
- Cinnamon – adds a great hint of flavor that’s traditional for Baklava
- Syrup ingredients – sugar, lemon juice, water, and honey
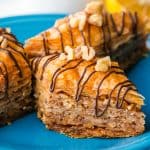
- Garnish – drizzle with melted chocolate or Chocolate Ganache, and chopped walnuts

How To Make Baklava
While it takes time to brush each layer, the result is worth every moment! Don’t skim on the butter, and you will be rewarded.
- Thaw phyllo dough in the refrigerator per the package instructions, then place it covered on the counter for 1 hour to bring to room temperature.
- Trim the phyllo dough to fit your 9×13 pan, covering it with a damp (not wet) towel to keep from drying out.

- Grease – use butter to coat the sides and bottom of a 13×9 non-stick baking pan. You can line it with parchment paper so you don’t damage it with your knife when slicing later.
- Make the honey syrup – heat the syrup ingredients in a medium saucepan while stirring until it boils, and then reduce the heat to medium-low and allow to cook for 4 more minutes without stirring. Set aside to cool.

- Chop Walnuts – pulse walnuts in a food processor until finely chopped, and then mix with cinnamon.

How to Assemble the Baklava
- 10 Layers – Preheat oven to 325°F. Start layering the phyllo dough, brushing each sheet with butter as you place it in the pan. Repeat this until you’ve added 10 layers. Then sprinkle 3/4 cup of walnuts over the top.
- 5 Layers – add 5 more sheets, buttering between each one, and then another layer of walnuts. Repeat this 3 more times. Finally, add 10 more layers of buttered dough on top.

- Cut the dessert into strips using a sharp knife, and then cut across to make diamonds. Bake for 1 hour and 15 minutes.

- Add syrup – spoon cooled syrup over the Baklava right after removing it from the oven. It should sizzle. Leave it uncovered on the counter to cool completely (4 hours or overnight). Then store covered with a tea towel for up to a week.

Tips for Making the Best Baklava
Follow these simple tips to make homemade baklava easy.
- Use a 13×9 pan with straight corners that fits the pastry to the edges. Avoid pans with angled corners that fan out, as they can cause the syrup to pool at the edges and make the top of the baklava dry. If you choose a larger pan, increase the syrup amount by 25% so you don’t run out. You can also cut the recipe in half using an 8×8 pan.
- Don’t skimp on the butter, especially on the top layers, since that can cause them to flake off. You can melt a few more tablespoons if you run out.
- Sizzle – the sound you’ll hear when you spoon the syrup over the hot pastry. This keeps it from getting soggy.

My Baklava recipe has so many layers of irresistible textures and flavors! The crispy layers of dough are perfectly complemented by the honey syrup and crunchy nuts. I hope it becomes your new favorite dessert.

Baklava Recipe
Ingredients
- 16 oz phyllo dough, thawed by package instructions
- 1 1/4 cups unsalted butter, 10 oz or 2 1/2 sticks, melted
- 1 lb walnuts, finely chopped, about 4 1/4 cups unprocessed
- 1 tsp ground cinnamon
- 1 cup granulated sugar
- 2 Tbsp lemon juice, juice of 1/2 lemon
- 3/4 cup water
- 1/2 cup honey
- Melted chocolate chips & chopped walnuts for garnish, optional
Instructions
Preparation
- Thaw phyllo dough by package instructions (this is best done overnight in the fridge, then place it on the counter for 1 hr before starting your recipe to bring it to room temperature).
- Trim phyllo dough to fit your baking dish. My phyllo package had 2 rolls with a total of 40 sheets that measured 9×14, so I had to trim them slightly. You can trim one stack at a time, then cover with a damp towel to keep from drying out.
- Grease – Butter the bottom and sides of a 13×9 non-stick baking pan. Line the bottom with parchment if desired to protect the pan when cutting later.
- Make the honey syrup – In a medium saucepan, combine 1 cup sugar, 1/2 cup honey, 2 Tbsp lemon juice, and 3/4 cup water. Bring to a boil over medium/high heat, stirring until sugar is dissolved, then reduce the heat to medium/low and boil an additional 4 min without stirring. Remove from heat and let the syrup cool while preparing baklava.
- Chop walnuts – Pulse walnuts 10 times in a food processor until coarsely ground/ finely chopped. In a medium bowl, stir together: 4 cups finely chopped walnuts and 1 tsp cinnamon.
Assemble the Baklava
- 10 layers – Preheat the oven to 325°F. Place 10 phyllo sheets into a baking pan one at a time, brushing each sheet with butter once it's in the pan before adding the next (i.e., place phyllo sheet into pan, brush the top with butter, place next phyllo sheet in pan, butter the top, etc.). Keep the remaining phyllo covered with a damp towel at all times. Spread about 1/5 of the nut mixture (about 3/4 cup) over the phyllo dough.
- 5 layers – Add 5 buttered sheets of phyllo, then another layer of nuts. Repeat four times with the remaining layers of fillo, butter and nuts. Finish off with 10 layers of buttered phyllo sheets. Brush the very top with butter.
- Cut pastry into 1 1/2" wide strips, then cut diagonally to form diamond shapes. Bake at 325˚F for 1 hour and 15 min or until tops are golden brown.
- Add syrup – Remove from oven and immediately spoon cooled syrup evenly over the hot baklava (you'll hear it sizzle). This will ensure that it stays crisp rather than soggy. Let baklava cool and rest uncovered at room temperature 4-6 hours or overnight for the syrup to penetrate and soften the layers. Garnish with chocolate and nuts if desired.
Notes
- 10 buttered sheets, 3/4 cup nuts,
- 5 buttered sheets, 3/4 cup nuts,
- 5 buttered sheets, 3/4 cup nuts,
- 5 buttered sheets, 3/4 cup nuts,
- 5 buttered sheets, 3/4 cup nuts,
- 10 buttered sheets and butter the top.
Nutrition Per Serving
Filed Under

More Pastry Recipes
Homemade pastries always turn heads, so once you try this Baklava, don’t miss these other classic dessert recipes:
- Eclairs
- Croissants
- Cream Puffs
- Apple Turnovers
- Churros
- Fruit Tart
- Rugelach
- Palmiers
- Cheese Danish
- Apple Danish
- Apple Roses


I’ve made baklava before and it was a disaster. Your recipe and instructions were so easy to follow. I enjoyed making it. Thank you
My pleasure Dee! I’m glad you recipe and find the instructions helpful. Thanks for sharing your excellent review!
Wow! This is amazing!
I am not well versed in cooking pastries and my wife thought it might be a good idea to start with a baklava. I wasn’t too keen but found your recipe online.
My initial thoughts were that it seemed simple without too many ingredients. I went to the shops and bought some walnuts and, for the first time ever, filo pastry. I’ve never used it before nor had I ever seen it used.
I spent in excess of 3 hours, maybe even 4, getting it together making a few mistakes along the way. In the end, it went into the oven and I crossed my fingers that it would end up eaten rather than in the bin.
It came out perfect! I poured the sauce last and half of the baklava has already been eaten with a few hours!
Thank you for this recipe! It was awesome even for a first timer!
My pleasure Jeffrey! I’m glad to hear the recipe is an absolute success. Thanks for sharing your excellent review with other readers!
I love baklava . Looking forward with great anticipation in using your recipe soon.
I hope you enjoy the recipe Zelina! Please let me know what you think when you decide to try it!
This is a delicious dessert! A bit time consuming but so well worth it! My fiancee said its better than the store bought version! Imagine my giddiness 🙂
That’s awesome, great job Elaine! I’m happy to hear how much you both enjoy the recipe. Thanks for sharing your fantastic review!
was introduced to baklava while working for an airline and it’s absolutely sinful it’s so good!!
It’s a delicious treat for sure! 🙂
This looks amazing, and I love baking, but I have two questions: 1) How do you not ruin your baking pan when you cut into them with the knife? and 2) do you have a companion recipe for the filo dough? I am allergic to corn (thus corn starch) which is in all the commercially available packages I’ve seen. This is usually the problem I run into, so I make many things at home. TIA!
Hi Eileen, If you want to be sure to preserve your pan, you can line the bottom of it with parchment paper. I don’t have a recipe for homemade filo dough yet. That is really tough about the corn allergy. GMO Corn products are hidden in so many things unfortunately. We are trying to avoid soy for our son which has forced us to really take a closer look at labels and soy is in everything also. I wish I could help more with that question. The grocery stores I frequent really only have 1 brand of filo dough.
I use a glass pan they are pretty sturdy
I drew around my tray cut the parchment out, then made it on the paper, much easier than in the tin also as the butter dribbles out you can mop this up for other layers. Then I listen into tin refrigerated fir 10 mins until butter had set lifted it out again on the paper cut into diamonds much easier than in the tin and then dropped back in tin perfect diamonds thus way.
I made this recipe a few years ago and it was wonderful. It popped up on my Facebook page this morning so I decided to make it tonight for our Easter dinner tomorrow. More people means I won’t eat the whole pan myself 😉 It’s in the oven as I type. I’m obsessed with cardamom so I added it to the nut mixture (I used walnuts, pistachios and cinnamon). Keeping my fingers crossed I didn’t screw up a great recipe.
Please let me know how it turns out Kelly!
Hi , I also use cardamom, pistachio, and walnnuts, and ground saffron in the syrup and it turns out great.
mmm That sounds tasty! Thanks for sharing that with us, Kelly!
Hi, will the baklava turn out correctly if sweet leaf is used instead of sugar?
Hi Lisa, I honestly haven’t tried that so I can’t recommend it. Maybe try a google search for “sweet leaf baklava” and see if anyone else has tried?
Okay, thank you.
You’re welcome Lisa!
Hi Natasha,
I’m looking forward to trying this recipe. Would you consider this to be to dryer or moister version of baklava? The family I’m making it for prefer baklava with a fair amount of syrup.
Thanks,
Sheila
Hi Sheila, I would put the moistness level somewhere in the middle in this recipe. You can increase the syrup level by 25% to make it more moist.
I just made this and it is delicious! Your recipe was so clear and easy to follow. I have one question: Do you store this in the pan covered with a tea cloth or do you remove the pieces to another container? I was concerned that storing in the pan might make it soggy since so much of the syrup goes to the bottom. Thanks again for a great and easy to follow recipe!
Hi Darlene, store at room temp in the same pan, covered with a tea towel for 1 to 2 weeks. You can freeze it up to 3 months by tightly wrapping the dish in several layers of plastic wrap and placing into the freezer. Thaw at room temperature and serve – it will be just as good as fresh 🙂
I use a mix of pistachios and almonds
Cover with aluminium foil to store. In Libya we make huge trays for parties and once covered with foil ‘leftover ‘ pieces keeps its crispness perfectly for a good while .
Your recipe is so amazing and always a huge hit, thank you for giving such clear directions to follow, it never fails to impress a crowd! 🙂
I also add in the zest of 1/2 orange and 1 lemon into the walnut mix and it makes it so superb and tasty!!
I’m happy to hear how much you’re enjoying the recipes Emma! Thanks for following and sharing your excellent review with other readers!
I really don’t see how this could be confusing unless you make it so. Since I don’t measure in grams as someone from another country might do I used the cups measurement and it turned out great. Natasha the recipe was fine.
I’m happy to hear that Diana, thanks!
Thanks for the confusing weight measures!!!
If one cup of sugar is 210 grams, how can four cups of walnuts be around 450 grams???
Thanks, I shall find a less confusing place to learn recipes!
Hi Wally, when I share grams, I actually manually go in and weigh them on a digital scale. You can do a google search to double check if you are ever questioning something because human error does occur. According to google, 1 lb of walnuts is 453 grams by weight (walnuts are not as condensed as sugar so it’s not cup for cup with sugar). 1 Cup of sugar is 200-220 grams depending on which site you are looking at. I would definitely suggest investing in a digital scale to double check if you are concerned.
I agree with Diana – clearly Wally is not a cook!!! I have made this recipe before and am about to make it again for work function. Its SPOT ON. I grew up with this (Egyptian father) and we did not use orange or lemon zest – so can’t speak to that – just will say this is the best recipe we’ve found! Thanks!
I’m so happy you love the baklava recipe!! Thank you for the amazing review 🙂
That’s pretty rude…
Thank you for your support Anne 🙂 I sure appreciate you! 🙂
How is that rude? Natasha replied with a lot of grace and she was simply explaining what could have happened to cause the confusion…
Hi Olya, you are so sweet 🙂 I think Anne was replying to Wally in that comment. The way the comments are threaded, it’s difficult to tell. You both are so thoughtful. 🙂 I hope you had a lovely Easter!
I made this ahead and it was great for 2 weeks. I also froze a few pieces to see how it worked and it was still wonderful! Although I have to admit I ate most of it before it was all the way defrosted and it is amazing frozen! I love this recipe!
That’s great to hear Diana! I’m glad you enjoy the recipe as much as I do. Thanks for sharing your excellent review!
Natasha,
This recipe is delicious. I am using it to make for my daughter’s wedding reception this weekend. Initially, I planned on making it Friday to allow the syrup to absorb and be ready to serve on Saturday evening. If I make it on Thursday it would certainly be easier because of my schedule, but I am concerned it may get a little soggy. Or do you think that it will be okay to assemble on Thursday, then store it in the refrigerator overnight and bake it on Friday morning? I would be so very grateful if you would share your thoughts about this. Many thanks! I love your blog 🙂
Hi Ruchik, I’m so glad you love the recipe! Congratulations to your daughter! 🙂 I would make it Thursday if that works better with your schedule. You can keep it at room temperature 1 to 2 weeks and I have frozen it for several months also. I haven’t had it get soggy on me 🙂
Yum, that sounds delicious! Thanks for sharing your great review Dale!
Hi, I am an over the road driver who likes to cook and bake on my time off. I absolutely have to try this for my lady Bianca and myself. Thank you so much for sharing the recipe
You’re welcome Dave! I hope you both enjoy it, please let me know what you two think when you get around to making it!
We plan on making this for Easter like we did last year. It is a wonderful recipe. Thank you for it!
You’re welcome Magdalena! I’m glad to hear that, thanks for sharing!
This was such an easy recipe to follow and turned out beautifully. I’m actually making it again now. added cardamon seeds to the syrup when boiling adds a nice flavour.
I’m glad you enjoy the recipe so much Casey! Thanks for sharing your great review!
I really like this recipe, but some people thought that it was on the sweet side. Is there any way to cut the sweetness besides the lemon? Should I just add less sugar? More lemon?
Hi Christina, you could cut down the sugar slightly or add a little more lemon or both 🙂
This recipe was so delicious! The only changes I made were to sprinkle 1 tbl of caster sugar to the middle layer, and I added 2 tbl rose water to the syrup recipe. So delicious! I got so many compliments. Sorry – I made this ages ago (Christmas 2016!), but only just saw the photo to remind me. Thank you 🙂
You’re welcome Melanie! I’m happy to hear how much everyone enjoys the recipe. Thanks for sharing your great review with other readers!