
This Baklava is flaky, crisp, and tender, and easier to make than you think. I share my authentic Greek Baklava Recipe below with step-by-step directions that are easy to follow. Make this dessert and be prepared for oo’s and ahh’s, because this is the BEST baklava recipe I have ever tried.

This post may contain affiliate links. Read my disclosure policy.
Helpful Reader Review
“Love this recipe. I am Greek, but my baklava never turned out this good. I made your recipe for my husband’s family reunion. They were so impressed by how delicious it was. They said the syrup wasn’t too sweet like other baklava recipes and it’s the best they ever tasted.” – Tina ★★★★★
Baklava Video
Baklava can be a little tedious to make, but it’s truly simpler than you think. Watch my video, and you’ll be confidently buttering layers in no time! If you want a sneaky shortcut version, try my Baklava Cups.
Best Baklava Recipe
Store-bought baklava has nothing on this, and trust me, I’ve been around the block when shopping for baklava. This baklava recipe is well-loved wherever it goes, and with so many 5-star reviews, it is definitely a reader and family favorite! It’s also make-ahead and freezer-friendly, which is perfect for holiday baking.
My baklava recipe comes out beautifully flaky, buttery, and crisp. The flavor is incredible, since this one is not too sweet. You will love the hint of mellow lemony flavor, which offsets the sweetness and complements the cinnamon. It also keeps well for over a week on the counter, making it a great option to make ahead.

Baklava Ingredients
While this recipe is a Classic Greek Baklava, other varieties, such as Lebanese and Turkish recipes, swap the walnuts for pistachios and include rose water. My Baklava recipe calls for simple ingredients, most of which you can find in your pantry.
- Phyllo (fillo) dough – one 16oz package should have about 40 total paper-thin sheets. Do not use the thick sheets of fillo dough for this recipe. They are sold in the freezer section of the grocery store. Thaw according to the package instructions.
- Unsalted Butter – don’t skimp here! This keeps the fillo dough from peeling away.
- Walnuts – finely chop. You can swap them for almonds, pistachios, or a mix of nuts.
- Cinnamon – adds a great hint of flavor that’s traditional for Baklava
- Syrup ingredients – sugar, lemon juice, water, and honey
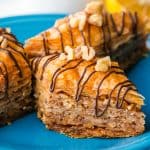
- Garnish – drizzle with melted chocolate or Chocolate Ganache, and chopped walnuts

How To Make Baklava
While it takes time to brush each layer, the result is worth every moment! Don’t skim on the butter, and you will be rewarded.
- Thaw phyllo dough in the refrigerator per the package instructions, then place it covered on the counter for 1 hour to bring to room temperature.
- Trim the phyllo dough to fit your 9×13 pan, covering it with a damp (not wet) towel to keep from drying out.

- Grease – use butter to coat the sides and bottom of a 13×9 non-stick baking pan. You can line it with parchment paper so you don’t damage it with your knife when slicing later.
- Make the honey syrup – heat the syrup ingredients in a medium saucepan while stirring until it boils, and then reduce the heat to medium-low and allow to cook for 4 more minutes without stirring. Set aside to cool.

- Chop Walnuts – pulse walnuts in a food processor until finely chopped, and then mix with cinnamon.

How to Assemble the Baklava
- 10 Layers – Preheat oven to 325°F. Start layering the phyllo dough, brushing each sheet with butter as you place it in the pan. Repeat this until you’ve added 10 layers. Then sprinkle 3/4 cup of walnuts over the top.
- 5 Layers – add 5 more sheets, buttering between each one, and then another layer of walnuts. Repeat this 3 more times. Finally, add 10 more layers of buttered dough on top.

- Cut the dessert into strips using a sharp knife, and then cut across to make diamonds. Bake for 1 hour and 15 minutes.

- Add syrup – spoon cooled syrup over the Baklava right after removing it from the oven. It should sizzle. Leave it uncovered on the counter to cool completely (4 hours or overnight). Then store covered with a tea towel for up to a week.

Tips for Making the Best Baklava
Follow these simple tips to make homemade baklava easy.
- Use a 13×9 pan with straight corners that fits the pastry to the edges. Avoid pans with angled corners that fan out, as they can cause the syrup to pool at the edges and make the top of the baklava dry. If you choose a larger pan, increase the syrup amount by 25% so you don’t run out. You can also cut the recipe in half using an 8×8 pan.
- Don’t skimp on the butter, especially on the top layers, since that can cause them to flake off. You can melt a few more tablespoons if you run out.
- Sizzle – the sound you’ll hear when you spoon the syrup over the hot pastry. This keeps it from getting soggy.

My Baklava recipe has so many layers of irresistible textures and flavors! The crispy layers of dough are perfectly complemented by the honey syrup and crunchy nuts. I hope it becomes your new favorite dessert.

Baklava Recipe
Ingredients
- 16 oz phyllo dough, thawed by package instructions
- 1 1/4 cups unsalted butter, 10 oz or 2 1/2 sticks, melted
- 1 lb walnuts, finely chopped, about 4 1/4 cups unprocessed
- 1 tsp ground cinnamon
- 1 cup granulated sugar
- 2 Tbsp lemon juice, juice of 1/2 lemon
- 3/4 cup water
- 1/2 cup honey
- Melted chocolate chips & chopped walnuts for garnish, optional
Instructions
Preparation
- Thaw phyllo dough by package instructions (this is best done overnight in the fridge, then place it on the counter for 1 hr before starting your recipe to bring it to room temperature).
- Trim phyllo dough to fit your baking dish. My phyllo package had 2 rolls with a total of 40 sheets that measured 9×14, so I had to trim them slightly. You can trim one stack at a time, then cover with a damp towel to keep from drying out.
- Grease – Butter the bottom and sides of a 13×9 non-stick baking pan. Line the bottom with parchment if desired to protect the pan when cutting later.
- Make the honey syrup – In a medium saucepan, combine 1 cup sugar, 1/2 cup honey, 2 Tbsp lemon juice, and 3/4 cup water. Bring to a boil over medium/high heat, stirring until sugar is dissolved, then reduce the heat to medium/low and boil an additional 4 min without stirring. Remove from heat and let the syrup cool while preparing baklava.
- Chop walnuts – Pulse walnuts 10 times in a food processor until coarsely ground/ finely chopped. In a medium bowl, stir together: 4 cups finely chopped walnuts and 1 tsp cinnamon.
Assemble the Baklava
- 10 layers – Preheat the oven to 325°F. Place 10 phyllo sheets into a baking pan one at a time, brushing each sheet with butter once it's in the pan before adding the next (i.e., place phyllo sheet into pan, brush the top with butter, place next phyllo sheet in pan, butter the top, etc.). Keep the remaining phyllo covered with a damp towel at all times. Spread about 1/5 of the nut mixture (about 3/4 cup) over the phyllo dough.
- 5 layers – Add 5 buttered sheets of phyllo, then another layer of nuts. Repeat four times with the remaining layers of fillo, butter and nuts. Finish off with 10 layers of buttered phyllo sheets. Brush the very top with butter.
- Cut pastry into 1 1/2" wide strips, then cut diagonally to form diamond shapes. Bake at 325˚F for 1 hour and 15 min or until tops are golden brown.
- Add syrup – Remove from oven and immediately spoon cooled syrup evenly over the hot baklava (you'll hear it sizzle). This will ensure that it stays crisp rather than soggy. Let baklava cool and rest uncovered at room temperature 4-6 hours or overnight for the syrup to penetrate and soften the layers. Garnish with chocolate and nuts if desired.
Notes
- 10 buttered sheets, 3/4 cup nuts,
- 5 buttered sheets, 3/4 cup nuts,
- 5 buttered sheets, 3/4 cup nuts,
- 5 buttered sheets, 3/4 cup nuts,
- 5 buttered sheets, 3/4 cup nuts,
- 10 buttered sheets and butter the top.
Nutrition Per Serving
Filed Under

More Pastry Recipes
Homemade pastries always turn heads, so once you try this Baklava, don’t miss these other classic dessert recipes:
- Eclairs
- Croissants
- Cream Puffs
- Apple Turnovers
- Churros
- Fruit Tart
- Rugelach
- Palmiers
- Cheese Danish
- Apple Danish
- Apple Roses


I do not have a non-stick 9x 13 pan. Can I use a regular 9 x 13 pan that does not have the non-stick on it??
Hi Jolene, The non stick will help with the sticking & removing the baklava from the pan.
Hi. Natasha the way of presentation is simply super.
I appreciate that feedback! Thank you!
Can you tell us more about this? I’d like to find out some additional
information.
You’d like more information about the baklava recipe? How can I help?
Hey I am so thrilled I found your blog page,
I really found you by error, while I was searching on Askjeeve for something
else, Anyhw I am here now and would just like to say kudos for a remnarkable post and a all round exciting blog
(I akso love the theme/design), I don’t have time to read it all at the minute but I have saved it and also added in your
RSS feeds, so when I have time I will be back to read a gfeat deal more,
Please do keep up the awesome work.
I’m so happy you discovered out blog! Welcome!
Hi, Thank you!!! for the Recipe! I Love!!! Baklava, but have Always Bought it!, as I was Told it was Difficult to Make! I must admit I Prefer when it is Really Moist!, So when you Mentioned, to “Pour the Syrup Over ‘Straight away’, to Keep it Crisp! So it won’t go Soggy”!…What would I need to do So it Does!!! ‘Go Soggy’!?!….Sorry! but I just Love it, when it is Soft & Chewy!!! Thank you! Sincerely! Marian 💕
Hi Marian, make sure to try it the following day after you have given the layers a chance to rest and absorb all of that moisture. Pouring the syrup on right away keeps it from getting soggy but at the same time it is very moist. Hard to describe – you must try it the next day 🙂
Love this recipe!! Thank you!!
My pleasure Jessica!
Love Baklava never made it myself but had my husband help me with the filo dough GUESS WHAT we did a great job (with your help) recipe tips etc.Thank You so much!! Can’t wait to try it.
You’re so welcome Kathy!
The only problem I had was I believe I put too much butter on the bottom other than that it was GREAT but like I said too much butter on the bottom …. will be making again.
That may have done it! I hope it goes better for you next time!
what kind of brush is best to use? I have a ‘silicone brush and a bristle one —- I don’t want to tear the filo dough. Thanks
Hi Kathy, either will work. Most bristle brushes are fairly soft. I use a silicone brush since that is what I had on hand 🙂
How do you serve it, do you transport into cupcake holders? Thanks!
Hi Jay, we serve it in the pan or plated. But you can definitely serve them in cupcake holders.
Made the baklava….recipe was well explained, easy to follow and the baklava is spectacular!
That’s so great, Melinda! I’m so happy you enjoyed that!
My cousin’s wife is Greek and her mother is an amazing cook and Baker. She made baklava for a party and I been in love ever since! They live 10 hours away from me so I don’t get it often. I can’t seem to get my hands on the recipe so I turned to pintrest. Your step by step instructions were great. I made it a few months ago and it was so so good!! Just as good as my cousin’s mother in Iaw if not better. Haven’t made it again cause I’m pretty sure I ate most of it. Went to a Greek festival this weekend and was on a mission to try there baklava well let me tell you something ur recipe was better way better. So thank you very much for your wonderful recipe. I’ll be making it again soon!!8‹
Wow! Thank you so much for the amazing compliment and feedback! I’m so happy you discovered our blog and found our recipe!! Thanks, Louise!
I make this recipe for various special occasions throughout the year, and people often tell me that it is the best baklava they have ever had. I use pistachios instead of walnuts because I just like pistachios, and I add a little rosewater to the syrup, and a little cardamom in addition to the cinnamon. I’m a teacher, and I brought it to our Christmas luncheon before winter break one year, and one of the assistant principals, who immigrated to the USA with her family from Turkey when she was an infant, asked me for this recipe, because she said it was better than what her grandma makes. This is a fantastic recipe.
Thank you so much Scott! We appreciate the thoughtful feedback and amazing review!
I *hate* when people do this, but…. Do you have any advice for cooking in a convection oven? We recently got a new oven and trying to figure out how to do things like this is totally defeating me. 🙁 I would LOVE to do this for hubby’s bday, which is coming up soon, but it’s tough to convert something you’ve never made before. Thanks for ANY help!
Hi Mari! We welcome all questions so thank you for reaching out! I haven’t tested this in a convection oven but typically in a convection, you would have to reduce the temp or time since it bakes faster.
I always use convection when baking and yes you do lower the temperature by 25 degrees. My baklava always turns out very good. I just love this recipe!
Mari, I always use my convection oven especially for baking because is distributes the heat more evenly and you get a more uniform browning on top. My oven bakes both ways and I just hit the button that automatically switches the heat to convection which is 25 degrees lower and my Baklava always turns out great.
Thanks! I was afraid of burning, but now you’ve given me enough confidence to try it. 🙂
I look forward to hearing how it turned out, Mari! 🙂
Well, I didn’t burn it! Used the convection oven, and I think I could have pulled it 15 minutes earlier, but it was still very good! I felt like it didn’t soften as much as ones I’ve had previously, so maybe that was it? I’ve also never had it with lemon – that was an unexpected brightness which I really appreciated. Especially since I don’t usually like it since it can be almost cloying. I’m grateful to your commenters too, since they gave lots of ideas for nut subs when I suddenly ran out of walnuts. All told, I think I’ll make this again for me too, not just the hubby!
I’m so happy it worked out better for you!
WOW! My wife and I have been buying baklava to satisfy our craving/addiction, but decided to try making it and stumbled upon your amazing recipe. We used finely-ground cashews instead of pistachios/walnuts, and it tastes just as good. I forgot to add the chocolate, but it’s OK since it would be almost too rich. Also, my syrup seems to be thicker than the photo, but it turned out great anyway. Finally we used only 2.5 cups of cashews (1/2 cup per layer instead of 3/4) as I prefer more doughy/sweetness. Again, wow! Thanks 🙂
You’re so welcome Chi! I’m so happy you enjoyed that!!
Nice video on Baklava, but you REALLY need to tone down the ridiculous and very irritating LOUD music on your video! I could hardly hear you, over the music.
Thank you for the feedback, Beth!
Natasha, I have made baklava for 50 years–dated and almost married a fella who was half Greek. Your baklava recipe is almost identical to mine. My nuts are an equal mix of coarsely ground pistachios and English walnuts. I garnish the finished, baked, glazed and cut baklava pieces first with a thin zigzag stream of piped semisweet chocolate and top it off with chopped pistachios. Making a batch this Saturday night for a Monday luncheon. The cut pieces are placed in the oval accordion-pleated confection papers and set on a napkin lined baking sheet for presentation. It’s one of my fave desserts to make and share.
Hi Joyce. That’s amazing! I appreciate your thoughtful review and feedback! Thank you for sharing this with me! 🙂
My father emigrated from Palestine to Montreal, Canada, at a very young age (in 1907) The aunts and others made their own phylo dough. In those days, not many people knew baklawa. Of course no question of buying it. Very delicate to make. They let dry on clothes line covered with bed sheets in the house,
Thank you for sharing this history with us, Lily! I love hearing how these recipes were made from the start
Good evening! This recipe looks wonderful and I can’t wait to try it.
However, I cannot have lemon. I understand that the recipe needs the moisture. Is there anything else that I can use or substitute for the lemon – NO CITRUS. I would really like to know so that I can make this as soon as possible. Thank you so much in advance for answering my question.
Hi Laura, the lemon helps balance the sweetness but it would still work if you replaced the extra lemon juice with water.
My Question is:
Can this be frozen?
And if so, what would be the longest it can be frozen for?
thank-you in advance
Hi JJ, You can freeze it up to 3 months by tightly wrapping the dish in several layers of plastic wrap and placing into the freezer. Thaw at room temperature and serve – it will be just as good as fresh
Beautifully delicious recipe. Thank you for sharing
I’m so happy you enjoyed that Michele!
I brought it to work and everyone said it was the best baklava they have ever had! Thank you
That’s so great! I’m happy everyone at work enjoyed it Michele
Didn’t see where to give you a thumbs up below as you said at the end of the video, but I just wanted to let you know that I think it is very thorough and I tknow I can go ahead now and start the process. It’s all laid out I. Front of me, honey sauce cooling, dough room temperature, so here I go. Will come back kater with the results!
Hi James! Thank you so much for the great review! The thumbs up icon is usually directly under the video in Youtube. Thank you for trying though 🙂 We would love to hear your follow up review! Enjoy!
Delicious!! This was so much easier to make than I ever imagined. Thank you for such a great recipe and easy instructions to follow. This is definitely going on my list of top dessert recipes.
I’m so glad you enjoyed it! Thank you for the wonderful review!