

This post may contain affiliate links. Read my disclosure policy.
This raspberry Charlotte Cake was my baby girls first birthday cake. She loved every part of it, the cake, the lady fingers and especially the raspberry mousse! This cake is as yummy as it is beautiful.
Of course this is our version of the classic French Charlotte Russe cake. Everyone seems to take their own spin on it. I love how the sweet/tart mouse and raspberry preserves complements the soft cake and lady fingers. European cakes are my favorite because they typically aren’t overly sweet but rather enjoyable. P.S. I was very detailed with my photos and instructions so you would succeed but this recipe really is not overly complicated. I hope you love this fantastic Charlotte dessert!

Ingredients for the Sponge Cake:
4 large eggs, room temperature
2/3 cup granulated sugar
2/3 cup cake flour (make your own with 2 ingredients!) *measured correctly
1/4 tsp baking powder
(7 oz pkg) Lady Fingers
3-4 Tbsp raspberry preserves or jam

Ingredients for Raspberry Mousse:
10 oz (2 1/2 cups) frozen raspberries
1/2 cup granulated sugar
Juice from 1 medium lemon (2 Tbsp for mousse + 1 Tbsp for simple syrup below)
1 Tbsp Knox unflavored Gelatin (from 1 1/4 packets)
3 cups heavy whipping cream
6 Tbsp confectioners (powdered) sugar
For the Simple Syrup, stir together:
1 cup warm water
1 Tbsp fresh lemon juice
1 Tbsp sugar
Topping/ Cake Decor for Charlotte Cake:
1 cup fresh raspberries and mint leaves for garnish

How To Make Charlotte Cake:
If you never made a European Sponge Cake, watch the video before you get started:
Make the raspberry syrup first:
1. In medium sauce pan, combine: 10 oz frozen raspberries and 1/2 cup sugar. Cook stirring occasionally until jam consistency. Remove from heat and strain through a sieve, pressing on the fruit with a spoon to extract as much raspberry juice as possible (you should get 2/3 cup syrup).

2. Into the raspberry syrup, stir in 2 Tbsp lemon juice and 1 Tbsp gelatin. Pour syrup back into sauce pan and place back over medium heat, whisk until gelatin is dissolved. Do not boil. Remove from heat and cool to room temp.

Make the Sponge Cake:
1. Line a 9″ springform pan with parchment paper. Preheat oven to 350˚F. In the bowl of your mixer with the whisk attachment on high speed, beat 4 eggs for 1 minute. Gradually add 2/3 cup sugar and continue beating on high 7 min until thick and 3 to 4 times in volume.
Tip: European sponge cakes really rely on the volume of the eggs to rise properly. Make sure to beat it long enough and don’t over mix after adding flour!

2. Stir together cake flour and baking powder then sift flour into whipped eggs in 2 additions, folding to incorporate between each addition. Scrape from the bottom to catch any hidden pockets of flour and fold just until incorporated – don’t overmix. Bake at 350˚F for 23-25 minutes or until top is golden and springs back when poked lightly.

3. Once it’s out of the oven, remove cake from pan by sliding a thin edged spatula around the edges. Transfer to wire rack, peel back parchment and cool to room temp. Then slice cake layers in half horizontally.

Assembling the Charlotte Cake:
Tip: If you want to serve it on something besides the bottom of the springform, place a 9″ cake circle on the bottom of your springform pan for easier transferring.
1. Cover springform walls with plastic wrap. Trim off 1/2″ all around the edges of both cake layers (I used kitchen scissors) and place the first layer into the bottom of your springform pan. Trim about 1/2″ off one end of all lady fingers. Place lady fingers in a tight ring, cut-side-down, around the cake base then brush cake with 1/3 of the simple syrup. Brush backs of lady fingers with 1/3 of syrup as well. Spread 1 1/2 Tbsp raspberry preserves over cake. Set aside.
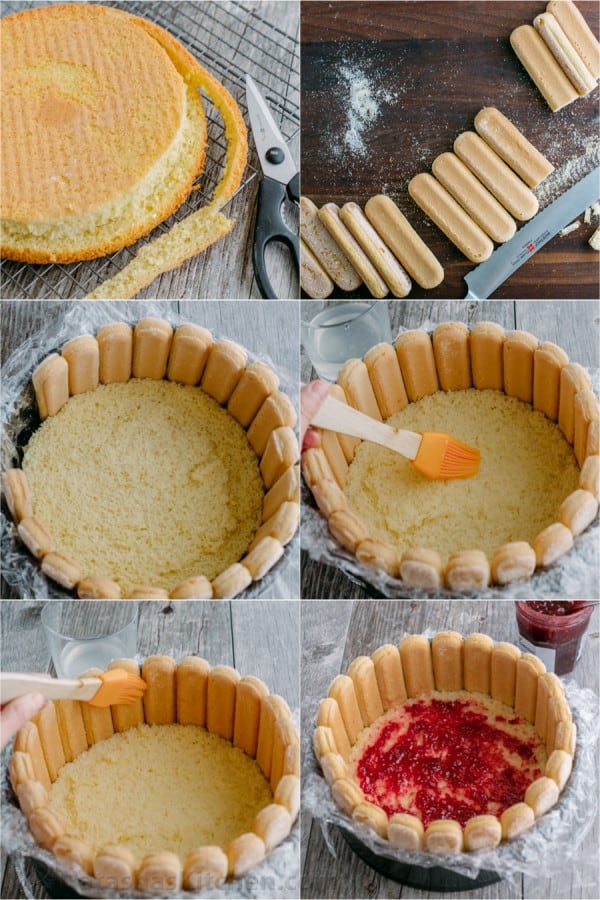
2. With the whisk attachment, beat 3 cups heavy cream with 6 Tbsp powdered sugar on high speed until thick and spreadable. Remove 1 1/2 cups of whipped cream to a piping bag fitted with a star attachment and refrigerate to use as topping later.

3. Once raspberry syrup is completely at room temp (don’t wait way too long or it will thicken and become difficult to blend), fold it into remaining big batch of whipped cream adding 1/4 syrup at a time and folding between each addition. This is your mousse.

4. Spread 1/2 of the mousse over cake layer inside the springform. Top with second cake layer, brush with remaining simple syrup and spread with 1 1/2 Tbsp raspberry preserves. Add remaining mousse. Pipe whipped cream and top with fresh raspberries and mint leaves if using. Cover with plastic wrap and refrigerate until set (3 hours or overnight). To serve, remove springform walls and plastic wrap.


Charlotte Cake Recipe with Raspberries

Ingredients
For the Raspberry Mousse:
- 10 oz 2 1/2 cups frozen raspberries
- 1/2 cup granulated sugar
- Juice from 1 medium lemon, 2 Tbsp for mousse + 1 Tbsp for simple syrup below
- 1 Tbsp Knox unflavored Gelatin, from 1 1/4 packets
- 3 cups heavy whipping cream
- 6 Tbsp confectioners, powdered sugar
For the Sponge Cake:
- 4 large eggs, room temperature
- 2/3 cup granulated sugar
- 2/3 cup cake flour, make your own with 2 ingredients!
- 1/4 tsp baking powder
- 7 oz pkg Lady Fingers
- 3-4 Tbsp raspberry preserves or jam
For the Simple Syrup, stir together:
- 1 cup warm water
- 1 Tbsp fresh lemon juice
- 1 Tbsp sugar
Topping/ Cake Decor for Charlotte Cake:
- 1 cup fresh raspberries and mint leaves for garnish
Instructions
Make the raspberry syrup first:
- In medium sauce pan, combine: 10 oz frozen raspberries and 1/2 cup sugar. Cook stirring occasionally until jam consistency. Remove from heat and strain through a sieve, pressing on the fruit with a spoon to extract as much raspberry juice as possible (you should get 2/3 cup syrup).
- Into the raspberry syrup, stir in 2 Tbsp lemon juice and 1 Tbsp gelatin. Pour syrup back into sauce pan and place back over medium heat, whisk until gelatin is dissolved. Do not boil. Remove from heat and cool to room temp.
Make the Sponge Cake:
- Line a 9" springform pan with parchment paper. Preheat oven to 350˚F. In the bowl of your mixer with the whisk attachment on high speed, beat 4 eggs for 1 minute. Gradually add 2/3 cup sugar and continue beating on high 7 min until thick and 3 to 4 times in volume.
- Stir together cake flour and baking powder then sift flour into whipped eggs in 2 additions, folding to incorporate between each addition. Scrape from the bottom to catch any hidden pockets of flour and fold just until incorporated - don't overmix. Bake at 350˚F for 23-25 minutes or until top is golden and springs back when poked lightly.
- Once it's out of the oven, remove cake from pan by sliding a thin edged spatula around the edges. Transfer to wire rack, peel back parchment and cool to room temp. Then slice cake layers in half horizontally.
Assembling the Charlotte Cake:
- Cover springform walls with plastic wrap. Trim off 1/2" all around the edges of both cake layers (I used kitchen scissors) and place the first layer into the bottom of your springform pan. Trim about 1/2" off one end of all lady fingers. Place lady fingers in a tight ring, cut-side-down, around the cake base then brush cake with 1/3 of the simple syrup. Brush backs of lady fingers with 1/3 of syrup as well. Spread 1 1/2 Tbsp raspberry preserves over cake. Set aside.
- With the whisk attachment, beat 3 cups heavy cream with 6 Tbsp powdered sugar on high speed until thick and spreadable. Remove 1 1/2 cups of whipped cream to a piping bag fitted with a star attachment and refrigerate to use as topping later.
- Once raspberry syrup is completely at room temp (don't wait way too long or it will thicken and become difficult to blend), fold it into remaining big batch of whipped cream adding 1/4 syrup at a time and folding between each addition. This is your mousse.
- Spread 1/2 of the mousse over cake layer inside the springform. Top with second cake layer, brush with remaining simple syrup and spread with 1 1/2 Tbsp raspberry preserves. Add remaining mousse. Pipe whipped cream and top with fresh raspberries and mint leaves if using. Cover with plastic wrap and refrigerate until set (3 hours or overnight). To serve, remove springform walls and plastic wrap.

If you make this recipe, I’d love to see pics of your creations on Instagram, Facebook and Twitter! Hashtag them #natashaskitchen

Seriously delicious! Enjoy this my friends 🙂


Could you us the soft lady fingers around the cake and not brush them with syrup?
Hello Anna! In this recipe, it’s done to soften them slightly and help them stick together and to the filling. It might stay dry and firm/crisp instead of soft if you don’t brush them with syrup.
Yum! This is delicious. Can I use pineapple curd to make it pineapple cake?
Hi Diane! Possibly, but I haven’t tested it so it would require some experimenting.
Made this for Christmas dinner and it was fantastic! And beautiful! Thank you for the recipe .
You’re welcome! Super glad you enjoyed it!
It was almost all amazing but I don’t love the cake recipe. I’m planning on remaking the exact same just with a different cake.
Hi Daisy! I’m sorry to hear that. I would love to help troubleshoot if there was an issue.
Looking forward to making this, but I’m confused about the plastic wrap. Does it go on the bottom of the spring form so that it is in between the base and the first cake layer, or is it underneath the base and then up the sides, or something else entirely? Also planning on doing one layer of blackberry mousse and one of raspberry. Thanks so much for the recipe and great pictures!
Hi Greg! The plastic wrap only goes around the sides is the pan, not the bottom. I hope you more the recipe!
This turned out great!! I made adjustments as I was creating this masterpiece in the mountains of Colorado. But the bright flavor of raspberry and the rich, creaminess of the mousse. Excellent!!
I have been making raspberry mousse cakes for many years (decades) it’s a family and friends favorite. Love your recipe, the ingredients and the ease of its preparation. Now I’m just waiting for the next opportunity to make yours. Thanks for giving me another option.
Hi Natasha! Can you freeze this once assembled? If not is there a stage at which you can? X
I have not tried freezing it. I have tried assembling the whole cake a day or even 2 days ahead. For the decor to look it’s best, I would suggest adding the whipped cream and raspberries to the top closer to serving time.
Hi Natasha,
I’d like to make this for Christmas – it looks wonderful. My question is this; how do I cut the Savoiardi Biscuits without them chipping away? They’re very crisp and crumbly.
It can be tricky but I recommend using a sharp serrated knife, the kind used for slicing bread as that works best!
Delicious and beautiful!! I love all of your recipes, Natasha! You’re my go to for all things food!
Loved the beautiful and flavor of this cake! Everything turned out great, except my sponge cake collapsed 🙁 I also noticed when I cut it horizontally there were small pockets of flour. It seems like I didn’t incorporate the dry ingredients well enough. Could this also be why my cake’s center sunk?
I’m also curious as to why the simple syrup is used (and so much) on the cake layers themselves. I get the lady fingers but can you clarify why it’s important to use on the cake layers under the jam and why so much?
Thank you!
It coule be because of several reasons. It can be that it was overbaked or underbaked. Make sure that your over is preheated. You can test for doneness by inserting a toothpick into the center of the cake. Cool the cake gradually and make sure that all the ingredients are measured accurately.
Hi – I am confused about the use of the simple syrup. You use 1/3 of it and brush it on the 1st layer and the lady fingers. Then is it another 1/3 into the whipping cream for the mousse and the last 1/3 brushed onto the second layer? And when folding I to the whipping cream you use 1/4 of the 1/3 each time and fold in?
Thanks for any clarification.
Hi Andrea. See step 1- you use 1/3 of the simple syrup on the first cake layer and 1/3 on the lady fingers. In step 4- you use the remaining 1/3 on the second cake layer.
What you are referring to (in step 3) is the raspberry syrup, not the simple syrup. I hope that helps clarify.
I don’t like the taste of lemon or citrus in my baked goods. Can I substitute vanilla extract in this recipe for the lemon juice or is there a better option? Thank you.
Hi Virginia! Lemon juice enhances the flavor of the raspberries without adding a lemony flavor to the mousse. You can skip it if you prefer.
For the sugar syrup- it’s used to balance the sweetness so it’s not too sugary and it prevents crystallization to keep the sugar smooth and clear because of the citric acidic. You can leave it out or reduce it to a teaspoon which should be enough to get the benefits without altering the taste.
Hello Natasha,
I will be trying this recipe out soon. I hope that it will turn out well – will keep you posted. Do you buy frozen raspberries from the store, or are freezing raspberries recommended for a few days before making the cake? Also, if I were to use strawberries instead of raspberries, would you recommend I omit any of the other ingredients, or do I simply measure out the same amount of strawberries as the raspberries in the recipe (maybe some more since you said raspberries have more flavor than strawberries in the comments below)
Hi Jibraan! I used frozen raspberries purchased at the store but if you were freezing your own berries, that would be fine too. I haven’t personally made this with strawberries, but we do prefer to make it with raspberries. Some of my readers have reported making it with strawberries in equal amounts and they enjoyed it. Let us know what you think, if you try.
Hello, Natasha,
Your recipes are amazing! I am thinking of making this Charlotte for a friend’s birthday. I was wondering if it would be advisable or not to dip the ladyfingers in the syrup or something moist before leaning them up against the springform pan? It seems that perhaps without dipping they would be a bit dry. I make regular tiramisu with dipped ladyfingers.
Hi Karen! I have not tested that but I worry they will be too soft and won’t hold to the edge of the cake. You can also make the cake without them if you prefer.
There are two types of ladyfingers that I am aware of (I buy mine). The harder, drier ones that are normally used for Tiramisu and then the “soft” ladyfingers used when making a Charlotte.
Thanks for the advice Nathasha 🙂
Will let you know how it turns out!
Hi Natasha,
Thank you for this beautiful recipe. I haven’t tried it yet but the instructions are clear and very helpful.
I’m trying it this weekend. It’s my husband’s 40th birthday and he absolutely adores charlottes! Can’t wait 🙂
I have a question though, is it possible for me to bake the sponge in advance and store it in the fridge? Im a bit stressed out by the raspberry syrup to be honest. I read the comments that said there’s not a lot of window between cool and set 😅
Anyways thank you for your blog. I find your videos very useful and cheerful 🙂
M.
Hi M, you can definitely make the sponge ahead. You could also assemble the whole cake a day or even 2 days ahead. For the decor to look it’s best, I would suggest adding the whipped cream and raspberries to the top closer to serving time.
It was a real hit Natasha! Thanks again for the advice.
I think I might have overbeat the egg mixture (too meringue-y?) the sponge was fluffy but was not as consistent as in the video you posted. It still worked really well. And the mousse! Omg! That raspberry mousse! Amazing!
Hi Natasha. Can you please give me a ballpark number for calories for the Raspberry Charlotte Cake?? I can’t seem to find it anywhere. Thanks so very much.
Hello! You can try this free Recipe Calorie and Nutrition calculator.
hello, this cake is amazing, im planning to make it for friend’s birthday, how long can this cake stay in the room temperature?
Hi Ela, for about 2hrs room temperature. If ore than that, you have to refrigerate it in an airtight container.
Hi Natasha , do you drain the frozen berries or not ? Thank you
Hi Donna, no, that creates the juice. See step one & two. I hope that mixed with the gelatin will give it the perfect balance
I am utilizing this cake for a Thanksgiving cooking contest! But I need to incorporate chocolate too, was thinking of dipping LF’s in melted chocolate and having them stick to the cake that way. Anyone ever try?? Need to bring home the trophy!
Hi Erin, I haven’t tried that yet but we’d love to know how it goes if you give that a try!