

This post may contain affiliate links. Read my disclosure policy.
This raspberry Charlotte Cake was my baby girls first birthday cake. She loved every part of it, the cake, the lady fingers and especially the raspberry mousse! This cake is as yummy as it is beautiful.
Of course this is our version of the classic French Charlotte Russe cake. Everyone seems to take their own spin on it. I love how the sweet/tart mouse and raspberry preserves complements the soft cake and lady fingers. European cakes are my favorite because they typically aren’t overly sweet but rather enjoyable. P.S. I was very detailed with my photos and instructions so you would succeed but this recipe really is not overly complicated. I hope you love this fantastic Charlotte dessert!

Ingredients for the Sponge Cake:
4 large eggs, room temperature
2/3 cup granulated sugar
2/3 cup cake flour (make your own with 2 ingredients!) *measured correctly
1/4 tsp baking powder
(7 oz pkg) Lady Fingers
3-4 Tbsp raspberry preserves or jam

Ingredients for Raspberry Mousse:
10 oz (2 1/2 cups) frozen raspberries
1/2 cup granulated sugar
Juice from 1 medium lemon (2 Tbsp for mousse + 1 Tbsp for simple syrup below)
1 Tbsp Knox unflavored Gelatin (from 1 1/4 packets)
3 cups heavy whipping cream
6 Tbsp confectioners (powdered) sugar
For the Simple Syrup, stir together:
1 cup warm water
1 Tbsp fresh lemon juice
1 Tbsp sugar
Topping/ Cake Decor for Charlotte Cake:
1 cup fresh raspberries and mint leaves for garnish

How To Make Charlotte Cake:
If you never made a European Sponge Cake, watch the video before you get started:
Make the raspberry syrup first:
1. In medium sauce pan, combine: 10 oz frozen raspberries and 1/2 cup sugar. Cook stirring occasionally until jam consistency. Remove from heat and strain through a sieve, pressing on the fruit with a spoon to extract as much raspberry juice as possible (you should get 2/3 cup syrup).

2. Into the raspberry syrup, stir in 2 Tbsp lemon juice and 1 Tbsp gelatin. Pour syrup back into sauce pan and place back over medium heat, whisk until gelatin is dissolved. Do not boil. Remove from heat and cool to room temp.

Make the Sponge Cake:
1. Line a 9″ springform pan with parchment paper. Preheat oven to 350˚F. In the bowl of your mixer with the whisk attachment on high speed, beat 4 eggs for 1 minute. Gradually add 2/3 cup sugar and continue beating on high 7 min until thick and 3 to 4 times in volume.
Tip: European sponge cakes really rely on the volume of the eggs to rise properly. Make sure to beat it long enough and don’t over mix after adding flour!

2. Stir together cake flour and baking powder then sift flour into whipped eggs in 2 additions, folding to incorporate between each addition. Scrape from the bottom to catch any hidden pockets of flour and fold just until incorporated – don’t overmix. Bake at 350˚F for 23-25 minutes or until top is golden and springs back when poked lightly.

3. Once it’s out of the oven, remove cake from pan by sliding a thin edged spatula around the edges. Transfer to wire rack, peel back parchment and cool to room temp. Then slice cake layers in half horizontally.

Assembling the Charlotte Cake:
Tip: If you want to serve it on something besides the bottom of the springform, place a 9″ cake circle on the bottom of your springform pan for easier transferring.
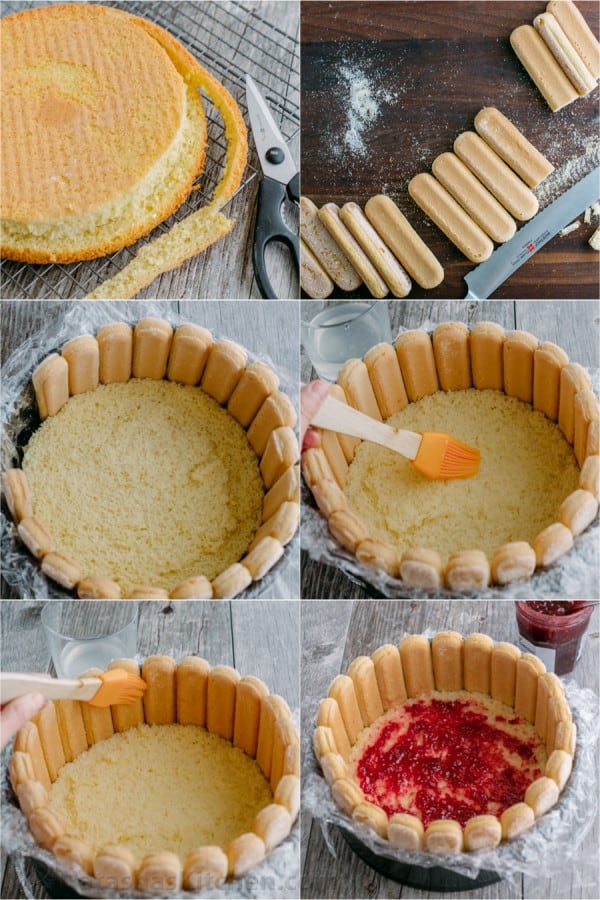
1. Cover springform walls with plastic wrap. Trim off 1/2″ all around the edges of both cake layers (I used kitchen scissors) and place the first layer into the bottom of your springform pan. Trim about 1/2″ off one end of all lady fingers. Place lady fingers in a tight ring, cut-side-down, around the cake base then brush cake with 1/3 of the simple syrup. Brush backs of lady fingers with 1/3 of syrup as well. Spread 1 1/2 Tbsp raspberry preserves over cake. Set aside.
2. With the whisk attachment, beat 3 cups heavy cream with 6 Tbsp powdered sugar on high speed until thick and spreadable. Remove 1 1/2 cups of whipped cream to a piping bag fitted with a star attachment and refrigerate to use as topping later.

3. Once raspberry syrup is completely at room temp (don’t wait way too long or it will thicken and become difficult to blend), fold it into remaining big batch of whipped cream adding 1/4 syrup at a time and folding between each addition. This is your mousse.

4. Spread 1/2 of the mousse over cake layer inside the springform. Top with second cake layer, brush with remaining simple syrup and spread with 1 1/2 Tbsp raspberry preserves. Add remaining mousse. Pipe whipped cream and top with fresh raspberries and mint leaves if using. Cover with plastic wrap and refrigerate until set (3 hours or overnight). To serve, remove springform walls and plastic wrap.


Charlotte Cake Recipe with Raspberries

Ingredients
For the Raspberry Mousse:
- 10 oz 2 1/2 cups frozen raspberries
- 1/2 cup granulated sugar
- Juice from 1 medium lemon, 2 Tbsp for mousse + 1 Tbsp for simple syrup below
- 1 Tbsp Knox unflavored Gelatin, from 1 1/4 packets
- 3 cups heavy whipping cream
- 6 Tbsp confectioners, powdered sugar
For the Sponge Cake:
- 4 large eggs, room temperature
- 2/3 cup granulated sugar
- 2/3 cup cake flour, make your own with 2 ingredients!
- 1/4 tsp baking powder
- 7 oz pkg Lady Fingers
- 3-4 Tbsp raspberry preserves or jam
For the Simple Syrup, stir together:
- 1 cup warm water
- 1 Tbsp fresh lemon juice
- 1 Tbsp sugar
Topping/ Cake Decor for Charlotte Cake:
- 1 cup fresh raspberries and mint leaves for garnish
Instructions
Make the raspberry syrup first:
- In medium sauce pan, combine: 10 oz frozen raspberries and 1/2 cup sugar. Cook stirring occasionally until jam consistency. Remove from heat and strain through a sieve, pressing on the fruit with a spoon to extract as much raspberry juice as possible (you should get 2/3 cup syrup).
- Into the raspberry syrup, stir in 2 Tbsp lemon juice and 1 Tbsp gelatin. Pour syrup back into sauce pan and place back over medium heat, whisk until gelatin is dissolved. Do not boil. Remove from heat and cool to room temp.
Make the Sponge Cake:
- Line a 9" springform pan with parchment paper. Preheat oven to 350˚F. In the bowl of your mixer with the whisk attachment on high speed, beat 4 eggs for 1 minute. Gradually add 2/3 cup sugar and continue beating on high 7 min until thick and 3 to 4 times in volume.
- Stir together cake flour and baking powder then sift flour into whipped eggs in 2 additions, folding to incorporate between each addition. Scrape from the bottom to catch any hidden pockets of flour and fold just until incorporated - don't overmix. Bake at 350˚F for 23-25 minutes or until top is golden and springs back when poked lightly.
- Once it's out of the oven, remove cake from pan by sliding a thin edged spatula around the edges. Transfer to wire rack, peel back parchment and cool to room temp. Then slice cake layers in half horizontally.
Assembling the Charlotte Cake:
- Cover springform walls with plastic wrap. Trim off 1/2" all around the edges of both cake layers (I used kitchen scissors) and place the first layer into the bottom of your springform pan. Trim about 1/2" off one end of all lady fingers. Place lady fingers in a tight ring, cut-side-down, around the cake base then brush cake with 1/3 of the simple syrup. Brush backs of lady fingers with 1/3 of syrup as well. Spread 1 1/2 Tbsp raspberry preserves over cake. Set aside.
- With the whisk attachment, beat 3 cups heavy cream with 6 Tbsp powdered sugar on high speed until thick and spreadable. Remove 1 1/2 cups of whipped cream to a piping bag fitted with a star attachment and refrigerate to use as topping later.
- Once raspberry syrup is completely at room temp (don't wait way too long or it will thicken and become difficult to blend), fold it into remaining big batch of whipped cream adding 1/4 syrup at a time and folding between each addition. This is your mousse.
- Spread 1/2 of the mousse over cake layer inside the springform. Top with second cake layer, brush with remaining simple syrup and spread with 1 1/2 Tbsp raspberry preserves. Add remaining mousse. Pipe whipped cream and top with fresh raspberries and mint leaves if using. Cover with plastic wrap and refrigerate until set (3 hours or overnight). To serve, remove springform walls and plastic wrap.

If you make this recipe, I’d love to see pics of your creations on Instagram, Facebook and Twitter! Hashtag them #natashaskitchen

Seriously delicious! Enjoy this my friends 🙂


Hi Natasha, Could you use the soft ladyfinger from the bakery vs the hard cookie, or do you recommend usijng the hard cookie and letting it soften with the mousse?
Hi Michele, I haven’t tried that but I do think it would work to use a soft cookie 🙂
Great recipe. It’s very accurate and the result is awesome. I only made one minor adjustment, skipping the lemon juice and taking half of the amount of sugar for the raspberry syrup. It has been a big succes finishing our family Chrismass diner 🙂
Thank you for sharing your great review!! 🙂
Hi Natasha, I made this gorgeous and delicious cake for Christmas day. It was a hit!!
Thanks for the recipe!
I’m so glad you enjoyed it!! Have a happy New Year!! 🙂
Wow, your recipe is incredibly detailed and explained super clearly! i am really forward to making this cake!
Thank you Ally! 🙂 I am sure you will love it as much as I do!
Hi Natasha, I am very excited to try this recipe. I am making it for a Christmas neighbor party this Saturday. I have a question, why do you cut 1/2″ off the lady finger? I was thinking of making the actual cake in a 8″pan and then use an adjustable ring and expand it to about 8″1/2-9″ and put the whole lady finger arouns the 8″cake. (If that makes sense). Curious to know if the cutting of lady finger is more for a clean look at the bottom or if there is actual reason. Thanks agai ! Can’t wait to taste it 🙂
Hi Eleanor, I cut the lady fingers to give the cake a clean look at the bottom and it helps to create a better seal at the base for the cake to stay together. Great question!
Thanks again for your quick response the other day. I mad the cake yesterday for a neighborhood holiday party and I did NOT cut the lady fingers and it still came out amazing. So I baked the cake in an 8″ pan and then I used a Stainless Steel Adjustable Size Mousse Ring expandable cake ring. I adjusted so the cake and ladyfingers would fit snug. And I was able to set the cake on a cake stand. It was easy to unmold and no need for plastic wrap. The cake came out great and every loved. The only issue I did have was when it came to unmolding the cake , i cut it in half and set the top side on a cooling rack and then it stuck to the rack. Luckily the cake was not the main thing so I was able to put it back together and mousse covered the imperfections ;-). The best part of the recipe is how SIMPLE it was! I was originally going to make a Fraisier but had SO many steps and I was short on time. This was great. Thanks again :-*
I am so glad to hear that Eleonor! Merry Christmas 🙂
I love your cakes. You are amazing. I’m from Peru I used gelatin with flavor but now I learn with you recipe to use fruit purée. In my country have a cake named Torta Helada .
I’m so glad you’re enjoying my recipes! 🙂
Hi, so I wanted to make two cakes so I doubled the recipe for the sponge cake and baked both at the same time. They both sunk in the middle and were kind of falling apart when I took them out of the pans to cool. Did I over mix? They were baked thru. was it something else? Thanks!
Hi Mariya, if you want to make a bigger batch, follow this sponge cake recipe. It’s more likely that you may have undermixed the eggs and sugar. With 8 eggs in the mixer, you would probably have to beat the eggs and sugar about 12 minutes on high speed (you can’t really over beat the eggs for this recipe).
You don’t cook the simple syrup? Just stir together? Seems awfully watery, not syrupy.
Hi Amy, just stir together. It’s intended to moisten the cake. It’s not necessary that it be syrupy 🙂
Natasha, I will be making this cake tonight for my daughter’s birthday and have a question: after the cake sets in the fridge you said to remove the wall and plastic. What about the bottom circle? would it be possible to remove the circle and transfer the cake onto a regular plate?
It get’s a little tricky with the lady fingers on the sides and you run the risk of some of them getting dislodged but yes you can carefully remove it from the base. It may help to line the bottom with plastic wrap as well so it slides off more readily.
Natasha, just wanted to thank you for your quick response. I ended up just putting the cake on the cake circle without the bottom of the spring form. Also, this cake is amazing, it’s light and rich at the same time. It looks more complicated than it actually is so that was another great thing about it. Thank you!
I’m so happy you liked it and it’s always nice to be pleasantly surprised that it’s easier than it looks! I sometimes wonder if my photos do me in on that point – I try to be thorough so folks have the best success rate but then it looks long and complicated 😉 Thanks for the great review!
Hi Natasha,
I made this cake for my Baba for her birthday and it was such a hit! Thanks for sharing and the step by step was fantastic!
Question, do you think you could use the mousse as a piped frosting on a cupcake??
Hi Sammi, I haven’t tried it that way but I think it would be difficult to gauge when it’s just the right consistency for it to pipe well without sliding off the cupcake.
I did it! I let the mousse chill for about an hour and then I piped it onto the cupcakes just like usual! Turned out great and everyone was raving about them! Thanks for the great recipes!
Thank you so much for reporting back and sharing that with me! I will have to try that! What cupcake recipe did you use?
I’m a little embarrassed to admit this….but just a boxed chocolate cake mix using butter and a teaspoon of instant coffee granules. I put a little big of raspberry jam in the centers and topped them with edible glitter. Boxed cake mix glammed up! Haha
I wouldn’t judge that for a second! I’m all about shortcuts 🙂 Those cupcakes of yours sound pretty glamorous!! If you posted a pic somewhere, I’d love to see it! 🙂
My mom loves raspberries, so I made this cake for her B-day and she loved it. I am not much of a baker and was a little hesitant to try because of so many steps but it turned out great. Thank you, Natasha for your blog and great tasting recipes:).
Oksana, thank you for the nice review and I’m happy to hear that the cake turned out great 😀.
This cake looks divine!! I’d love to make it for my daughter’s birthday, but would it still be good if I made it on Saturday morning/afternoon and we didn’t eat it until Sunday night?
Hi Olya, yes that would work fine, just cover and refrigerate until ready to enjoy 🙂
Hello Natasha. I’m a fan of your recepies. Thank you for sharing so kindly.
I love this Charlotte recipe. If I use strawberries instead raspberries, do you think will work too?
Hi Sara, I’m so glad you enjoyed the recipe 🙂 I think you could make it work with equal amounts of the strawberry syrup but I do think raspberries have more flavor than strawberries.
This recipe is so good. The cake looks so pretty and tastes heavenly good! I was not a fan of mousse cakes. This cake totally changed my mind. Love it!
Vicky, I’m so happy you enjoyed the cake. Thank you for sharing that with us 😁.
Lovely cake! Do you top with whip cream & raspberry garnish prior to setting in the fridge or right before serving?
Hi Lena, I have done it both ways and it works both ways. What I like about piping the whipped cream on before it goes into the fridge, is it that it softens the lady fingers on top so they are uniformly softened.
Hello Natasha!
I love your blog! My husband is Russian born (I’m Canadian born) and I’ve made him many of your Eastern European recipes which he enjoys! I really want to make your Charlotte cake next. What kind of star tip did you use for piping? I have a Wilton 1M, is that ok? Cheers!
Hi Laura, thank you for sharing that with us :). Yes a Wilton 1M will work great. I believe I used the same one.
Awesome, thanks for the fast response! (^.^)/
What a stunning creation! It looks so beautiful and feminine too:). I love raspberries in cakes. I’ll have to make it for a special occasion.
Thank you Olga! All of my nieces loved it and thought it was a perfect princess cake 🙂
Gorgeous cake! I have a difficult time finding lady fingers.. I have tried 6 stores already lol. And whole foods and the cheeper stores, they say it’s seasonal. So where did you buy your lady fingers?
Yelena, I found them at local Co-op store. If you won’t find them, Amazon has them.
Such a beautiful cake! Made this today and it’s setting overnight in the fridge right now. Can’t wait to devour it tomorrow.. although I ran out of plastic wrap and omitted it completely.. do you think it’ll make much of a difference? What’s the reason for the wrap?
The wrap just keeps the cake from sticking to the walls of the springform. It’s not crucial to the success of the recipe and would still probably work fine without it. I hope you love the cake! 🙂
Sister brought this cake to Easter dinner, it was SOO delicious! I may have had a slice this morning for breakfast… One thing I’d recommend is to use stabilized whipped cream for the decor on top. My favorite way to make stabilized whipped cream is to beat 2 teaspoons cream cheese and add 1 cup heavy whipping cream gradually, add sugar, vanilla and beat until stiff peaks form. The cream cheese doesn’t alter the flavor of the finished product and your piped creations last a week refrigerated and stay put for hours outside the fridge.
I love the idea of making stabilized whipped cream naturally with a little cream cheese. Thank you for sharing that tip!!