

This post may contain affiliate links. Read my disclosure policy.
This raspberry Charlotte Cake was my baby girls first birthday cake. She loved every part of it, the cake, the lady fingers and especially the raspberry mousse! This cake is as yummy as it is beautiful.
Of course this is our version of the classic French Charlotte Russe cake. Everyone seems to take their own spin on it. I love how the sweet/tart mouse and raspberry preserves complements the soft cake and lady fingers. European cakes are my favorite because they typically aren’t overly sweet but rather enjoyable. P.S. I was very detailed with my photos and instructions so you would succeed but this recipe really is not overly complicated. I hope you love this fantastic Charlotte dessert!

Ingredients for the Sponge Cake:
4 large eggs, room temperature
2/3 cup granulated sugar
2/3 cup cake flour (make your own with 2 ingredients!) *measured correctly
1/4 tsp baking powder
(7 oz pkg) Lady Fingers
3-4 Tbsp raspberry preserves or jam

Ingredients for Raspberry Mousse:
10 oz (2 1/2 cups) frozen raspberries
1/2 cup granulated sugar
Juice from 1 medium lemon (2 Tbsp for mousse + 1 Tbsp for simple syrup below)
1 Tbsp Knox unflavored Gelatin (from 1 1/4 packets)
3 cups heavy whipping cream
6 Tbsp confectioners (powdered) sugar
For the Simple Syrup, stir together:
1 cup warm water
1 Tbsp fresh lemon juice
1 Tbsp sugar
Topping/ Cake Decor for Charlotte Cake:
1 cup fresh raspberries and mint leaves for garnish

How To Make Charlotte Cake:
If you never made a European Sponge Cake, watch the video before you get started:
Make the raspberry syrup first:
1. In medium sauce pan, combine: 10 oz frozen raspberries and 1/2 cup sugar. Cook stirring occasionally until jam consistency. Remove from heat and strain through a sieve, pressing on the fruit with a spoon to extract as much raspberry juice as possible (you should get 2/3 cup syrup).

2. Into the raspberry syrup, stir in 2 Tbsp lemon juice and 1 Tbsp gelatin. Pour syrup back into sauce pan and place back over medium heat, whisk until gelatin is dissolved. Do not boil. Remove from heat and cool to room temp.

Make the Sponge Cake:
1. Line a 9″ springform pan with parchment paper. Preheat oven to 350˚F. In the bowl of your mixer with the whisk attachment on high speed, beat 4 eggs for 1 minute. Gradually add 2/3 cup sugar and continue beating on high 7 min until thick and 3 to 4 times in volume.
Tip: European sponge cakes really rely on the volume of the eggs to rise properly. Make sure to beat it long enough and don’t over mix after adding flour!

2. Stir together cake flour and baking powder then sift flour into whipped eggs in 2 additions, folding to incorporate between each addition. Scrape from the bottom to catch any hidden pockets of flour and fold just until incorporated – don’t overmix. Bake at 350˚F for 23-25 minutes or until top is golden and springs back when poked lightly.

3. Once it’s out of the oven, remove cake from pan by sliding a thin edged spatula around the edges. Transfer to wire rack, peel back parchment and cool to room temp. Then slice cake layers in half horizontally.

Assembling the Charlotte Cake:
Tip: If you want to serve it on something besides the bottom of the springform, place a 9″ cake circle on the bottom of your springform pan for easier transferring.
1. Cover springform walls with plastic wrap. Trim off 1/2″ all around the edges of both cake layers (I used kitchen scissors) and place the first layer into the bottom of your springform pan. Trim about 1/2″ off one end of all lady fingers. Place lady fingers in a tight ring, cut-side-down, around the cake base then brush cake with 1/3 of the simple syrup. Brush backs of lady fingers with 1/3 of syrup as well. Spread 1 1/2 Tbsp raspberry preserves over cake. Set aside.
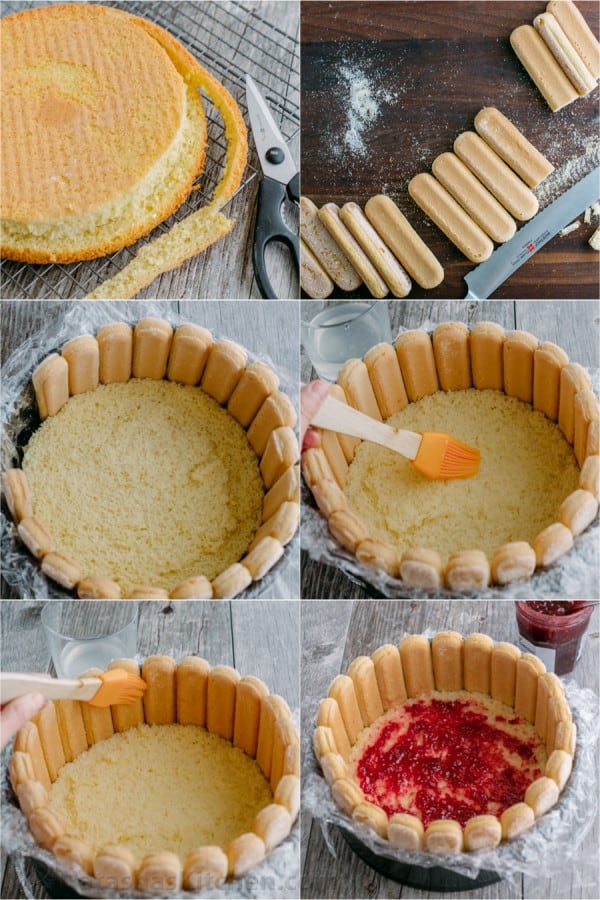
2. With the whisk attachment, beat 3 cups heavy cream with 6 Tbsp powdered sugar on high speed until thick and spreadable. Remove 1 1/2 cups of whipped cream to a piping bag fitted with a star attachment and refrigerate to use as topping later.

3. Once raspberry syrup is completely at room temp (don’t wait way too long or it will thicken and become difficult to blend), fold it into remaining big batch of whipped cream adding 1/4 syrup at a time and folding between each addition. This is your mousse.

4. Spread 1/2 of the mousse over cake layer inside the springform. Top with second cake layer, brush with remaining simple syrup and spread with 1 1/2 Tbsp raspberry preserves. Add remaining mousse. Pipe whipped cream and top with fresh raspberries and mint leaves if using. Cover with plastic wrap and refrigerate until set (3 hours or overnight). To serve, remove springform walls and plastic wrap.


Charlotte Cake Recipe with Raspberries

Ingredients
For the Raspberry Mousse:
- 10 oz 2 1/2 cups frozen raspberries
- 1/2 cup granulated sugar
- Juice from 1 medium lemon, 2 Tbsp for mousse + 1 Tbsp for simple syrup below
- 1 Tbsp Knox unflavored Gelatin, from 1 1/4 packets
- 3 cups heavy whipping cream
- 6 Tbsp confectioners, powdered sugar
For the Sponge Cake:
- 4 large eggs, room temperature
- 2/3 cup granulated sugar
- 2/3 cup cake flour, make your own with 2 ingredients!
- 1/4 tsp baking powder
- 7 oz pkg Lady Fingers
- 3-4 Tbsp raspberry preserves or jam
For the Simple Syrup, stir together:
- 1 cup warm water
- 1 Tbsp fresh lemon juice
- 1 Tbsp sugar
Topping/ Cake Decor for Charlotte Cake:
- 1 cup fresh raspberries and mint leaves for garnish
Instructions
Make the raspberry syrup first:
- In medium sauce pan, combine: 10 oz frozen raspberries and 1/2 cup sugar. Cook stirring occasionally until jam consistency. Remove from heat and strain through a sieve, pressing on the fruit with a spoon to extract as much raspberry juice as possible (you should get 2/3 cup syrup).
- Into the raspberry syrup, stir in 2 Tbsp lemon juice and 1 Tbsp gelatin. Pour syrup back into sauce pan and place back over medium heat, whisk until gelatin is dissolved. Do not boil. Remove from heat and cool to room temp.
Make the Sponge Cake:
- Line a 9" springform pan with parchment paper. Preheat oven to 350˚F. In the bowl of your mixer with the whisk attachment on high speed, beat 4 eggs for 1 minute. Gradually add 2/3 cup sugar and continue beating on high 7 min until thick and 3 to 4 times in volume.
- Stir together cake flour and baking powder then sift flour into whipped eggs in 2 additions, folding to incorporate between each addition. Scrape from the bottom to catch any hidden pockets of flour and fold just until incorporated - don't overmix. Bake at 350˚F for 23-25 minutes or until top is golden and springs back when poked lightly.
- Once it's out of the oven, remove cake from pan by sliding a thin edged spatula around the edges. Transfer to wire rack, peel back parchment and cool to room temp. Then slice cake layers in half horizontally.
Assembling the Charlotte Cake:
- Cover springform walls with plastic wrap. Trim off 1/2" all around the edges of both cake layers (I used kitchen scissors) and place the first layer into the bottom of your springform pan. Trim about 1/2" off one end of all lady fingers. Place lady fingers in a tight ring, cut-side-down, around the cake base then brush cake with 1/3 of the simple syrup. Brush backs of lady fingers with 1/3 of syrup as well. Spread 1 1/2 Tbsp raspberry preserves over cake. Set aside.
- With the whisk attachment, beat 3 cups heavy cream with 6 Tbsp powdered sugar on high speed until thick and spreadable. Remove 1 1/2 cups of whipped cream to a piping bag fitted with a star attachment and refrigerate to use as topping later.
- Once raspberry syrup is completely at room temp (don't wait way too long or it will thicken and become difficult to blend), fold it into remaining big batch of whipped cream adding 1/4 syrup at a time and folding between each addition. This is your mousse.
- Spread 1/2 of the mousse over cake layer inside the springform. Top with second cake layer, brush with remaining simple syrup and spread with 1 1/2 Tbsp raspberry preserves. Add remaining mousse. Pipe whipped cream and top with fresh raspberries and mint leaves if using. Cover with plastic wrap and refrigerate until set (3 hours or overnight). To serve, remove springform walls and plastic wrap.

If you make this recipe, I’d love to see pics of your creations on Instagram, Facebook and Twitter! Hashtag them #natashaskitchen

Seriously delicious! Enjoy this my friends 🙂


Hi Natasha
I want to make this with mango instead of raspberry. Can you please suggest me whether to use frozen mango or fresh mango to make syrup?
Hi Ananya! I haven’t tried this particular recipe with mango, however, the amount of puree that is called for in the recipe may not be enough of a flavor punch since mango flavor is generally more mild than raspberries. I think it could be a good experiment, but the raspberry version would probably have more flavor.
Hi Natasha! Absolutely love your recipes…a quick question though, what if I substituted agar agar powder instead of the gelatin? Would I still achieve the same results? Thanks in advance!
HI Nazish, I have not tested this recipe with agar agar so I can’t say for sure what other substitutions would have to be made in this recipe.
i’m wondering how you get a round cake to put in the springform pan when your directions say to ‘cut the cake in half and trim’. when cutting in half you have a straight side. so how does it become a round cake to put in the pan?
thanks for clarifying
Hi Nadia! When cutting it in half we mean cutting it horizontally into layers to make two cake layers. There is a photo for reference in the original recipe. 🙂 Hope this help, Enjoy!
maybe directions should include ‘horizontally’. thanks for clearing that up.
Updated and thank you for the suggestion!
Super easy and fun to make! Your instructions are so easy to follow! I enjoyed the video for the sponge cake it was very helpful! Thanks so much for sharing all the dads on Fathers Day loves it!!!
You are very welcome Cora and thank you for making our recipes 😀
I made this for my little girls 3rd birthday, it was delicious!!! Thank you so much Natasha! Everyone loved this cake!
You’re welcome Lena! I’m glad to hear the recipe is a hit. Thanks for sharing your wonderful review!
WOW!!! so grateful to find your site!
I made the Charlotte cake for my mom’s birthday. So far, it has prepared beautifully. Tonight’s taste will reveal all.
I am always asked to bring dessert and I have recently been challenged to make lactose free desserts. Thankfully there is lactose free whipping cream available.
Oh my!!!
I’m glad to hear how much you’re enjoying my site Shannon! Please let me know what everyone thinks of the recipe!
Everyone loved it…. I have multiple requests for future birthdays. One thing I am going to try is rather than brush with simple syrup I am going to brush with a raspberry liqueur (not Chambord too pricey…lol).
One question though…. my cake fell in the middle (saddle). Not sure if it’s because my oven isn’t right temp or I over folded.
Hi Shanon, I’m so happy you all loved it! 🙂 For the sponge cake, check out our post on how to make this classic sponge cake – that post covers most of the troubleshooting issues for sponge cakes. I hope that helps! 🙂
Hi Natasha,
I’m making the cake tonight for my daughter’s 2nd birthday 🙂
We are huge lemon fans. Can we kick up the lemon a notch, without disrespecting your well thought out and tested recipe?
Thanks!
Reagan
Hi Reagan, it should still work to add an extra Tbsp of lemon juice to the mousse and another one to the simple syrup to make it more pronounced. I hope you love it!
Thank you so much, can’t wait!
My pleasure Reagan!
Hi Natasha!
I made this for my boyfriend on Valentine’s Day and he loved it! It was so pretty to look at and the raspberry flavor was lovely! Best of all, it was a lot easier than it looked. 🙂
I had a bit of an ‘oops’ moment while cooking the raspberries–I misread the directions and ended up actually *making* jam, which didn’t exactly fold in well with the whipped cream. 😅 On the second attempt, however, it all came together wonderfully.
I’ll definitely be making this again. Thank you so much for sharing this recipe!
My pleasure Danielle! I’m glad the recipe was a success and that both you and your boyfriend enjoy the recipe. Thanks for sharing your fantastic review!
Awesome. Can’t wait to try it.
I hope you do! Please let me know what you think of the recipe Betty!
Hi Natasha, In the video you say all purpose flour and in the recipe it says cake flour, which one do I use?
Thanks
Hi Alex, for this particular one, I used cake flour for a softer crumb but if you only have all-purpose flour, it will work 🙂
Hi Natasha,
I just made this cake and it’s in the fridge until tomorrow. Can’t wait to try it! Question… When I was making the raspberry syrup and added the gelatin, stirring over medium heat for a few minutes, some of the gelatin never dissolved. I had a few pieces of gelatin floating that I later removed. I found a few pieces of gelatin in the mousse too. Do you know why is that and what can I do next time to make sure all gelatin fully dissolves? Thank you so much!
Hi Anna, I would suggest keeping it on lower heat so it can fully dissolve without boiling it. Also, was it a fresh packet of gelatin? I haven’t had that happen in this recipe so I hope that helps!
Hi Natasha, can any part of your wonderful cake be made ahead of the day that it is to be served? Thanks! Happy holidays, Sue
Hi Sue, the sponge cake can easily be made a day ahead, covered and left at room temperature then apply the syrup and assemble the next day 🙂
Hi Natasha,
If I wanted to make and assemble the entire cake ahead of time, how far in advance could I do that?
Thanks for your time!
~Lisa
Hi Lisa, You could assemble the whole cake a day or even 2 days ahead. For the decor to look it’s best, I would suggest adding the whipped cream and raspberries to the top closer to serving time.
Hi Natasha,
I’m really looking forward to make this cake but before I do that I just have one question, will the amount of sugar in the sponge affect it in some way? Because unfortunately I only have measuring cups with grams on them, I’ve converted all the rest of the ingredients except the sugar, different websites give me different results.
Hi Alexia, 1/2 cup of granulated sugar is about 100 grams and 2/3 cup of granulated sugar is about 133 grams. I hope you love it!
Natasha this looks amazing but I just want to verify that the simple syrup ingredients are not a typo – is it 1 cup water to only 1 tablespoon of sugar and lemon juice??? I’ve made lots of simple syrup in the past but it was always 1 cup to 1 cup so just wanted to make sure before I get myself in trouble.
Great question! That is correct and not a typo. We didn’t want the cake to get too sweet and found this to be the best balance 🙂
Can I make the sponge cakes gluten free? Will it still turn out the same?
Hi Kimberley, I haven’t tested it myself but I have had several readers report great results with making the sponge cake with gluten free flour.
Hi, this recipe looks amazing!!
I just have one question, would I be able to use agar agar instead of gelatine and if yes the same amount?
Thanks
Hi Alex, I have not tested this recipe with agar agar so I can’t say for sure what other substitutions would have to be made in this recipe.
Hello Natasha
I love your blog. I was reading up this recipe and wondering if I could use the same mousse recipe with mangoes instead.
Appreciate your response.
Thanks!
Hi Maria, I haven’t tried this particular recipe with mango, however, the amount of puree that is called for in the recipe may not be enough of a flavor punch since mango flavor is generally more mild than raspberries. I think it could be a good experiment, but the raspberry version would probably have more flavor.
Hi Natasha,
I just made this cake for my birthday tomorrow. It is now sitting in the refrigerator. Can’t wait to see the final product tomorrow. Wish me luck.
In fact, I’m a bit worrying about the cake layers, I’m afraid it would be too soggy after brushed the simple lemon syrup, 1/3 cup for each looks a lot to me. And my cake layers are very sticky. Not dry.
Thanks for your recipe.
P.S. I originally planned to make Black Forest Cake, but I did not find any fresh / frozen / canned cherries, so I made this Raspberry Charlotte Cake instead.
Hi Venus, the cake layers should be moist after adding the syrup but not sticky before adding it. That could be due to underbeating the eggs and sugar which is what would cause the cake not to rise and bake up properly. The cake relies on the volume of the whipped eggs and sugar for leavening so that step is critically important for the cake layers to work. I suggest watching our sponge cake tutorial so you can see exactly what the batter should look like. It’s difficult to say without being there, but I hope you love the recipe!
Hi Natasha, thanks for your prompt response. I also thought about this, however, maybe not underbeat?! Maybe underbake?! In fact, the eggs were beaten to about triple size, and the cake did rise up. The only difference is I am using 8″ springform pan instead of 9″. I only had 8″ size. And my baking time was around 35 mins. The toothpick came out a bit sticky but no batter on it.
Anyway, tomorrow will be the moment of truth. I will know. 🙂
Thanks & Cheers!
Finally, it turns out ok. The taste is good but a bit wet. If I will do it again, may not use all syrup. Thanks for the recipe.
Thank you for such an excellent recipe! I love that you include an estimated cost and great directions on how to make a sponge cake. I’m making this now for a family get-together.
You’re welcome Meredith! I’m glad you found it helpful! Please let me know what everyone thinks of the recipe!
HI Natasha
By using the hard Ladyfingers do they get soft after refrigeration once assembled>
Hi Sharilyn, yes they do absorb the syrup and soften 🙂