
This post may contain affiliate links. Read my disclosure policy.
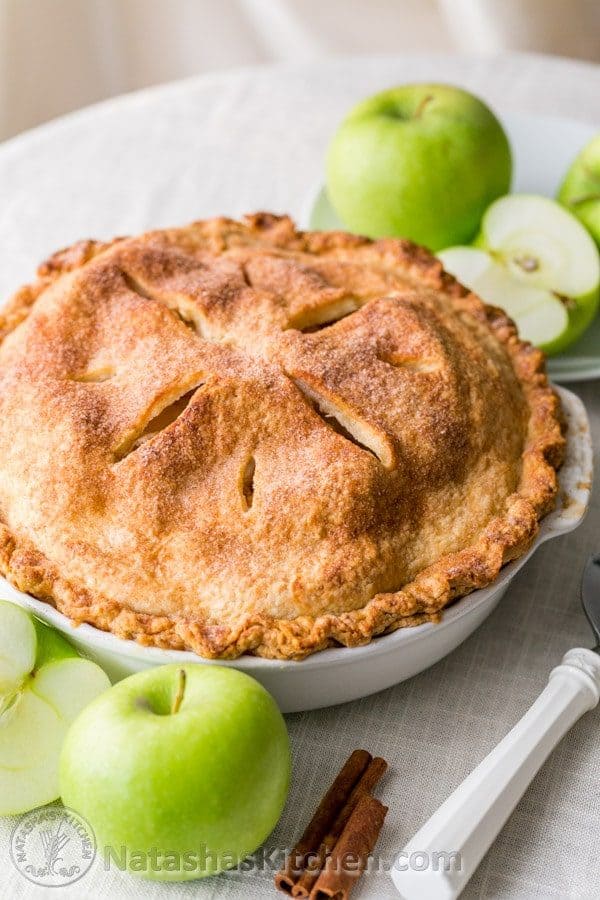
This Deep Dish Apple Pie turned out amazing; the best one I’ve tried! The flaky cream cheese crust seals in all the fantastic bubbly apple cinnamon juices; it’s just scrumptious.
I got the recipe for the pie crust from my good friend: “The JOY of cooking” cookbook. It’s always been a trusted reference for me. I was happy to find a pie crust that doesn’t use shortening, but is equal (if not better!) in flakiness, texture and flavor. Your home will smell amazing in the process!

Deep Dish Cinnamon Apple Pie Filling Ingredients:
10 cups (3 lbs or 7-8 apples) Granny Smith apples, peeled, cored and sliced 1/4-inch thick
3/4 cup sugar
1/3 cup all-purpose flour *measured correctly
2 Tbsp lemon juice
1 tsp ground cinnamon
1/8 tsp salt
2 Tbsp unsalted butter, cut into small pieces for the top

Flaky Cream Cheese Pastry Dough (for a deep dish pie):
makes 2 (9-inch) pie crusts (top & bottom for 1 pie)
2 1/4 cups all-purpose flour
2 Tbsp white sugar
1/2 tsp salt
1 1/2 sticks (12 Tbsp) COLD, unsalted butter
6 oz COLD cream cheese
3 Tbsp cold heavy whipping cream
For the topping:
2 tsp sugar
1/4 tsp ground cinnamon

How to make Deep Dish Cinnamon Apple Pie:
1. In a large bowl, whisk together 2 and 1/4 cups flour, 2 Tbsp of sugar and 1/2 tsp salt.

2. Cut 1 1/2 sticks of COLD butter and 6 oz of cream cheese into small cubes. Using a pastry blender or 2 knives, cut the butter and cream cheese into the flour mixture until it resembles coarse crumbs with pea-sized pieces.

3. Drizzle 3 Tbsp of cold heavy cream over the dough and cut into the dough with a spatula until the dough forms moist clumps.

4. Divide the dough into 2 pieces, press into flat disks, cover tightly in plastic wrap and refrigerate at least 1 hour or up to 2 days.

5. Once its fully cooled, remove 1 piece of dough from the refrigerator and on a clean surface, roll it out into a 13-inch circle. (Dough rolls out easier without flouring the surface, use pastry scraper to lift rolled out crust). Transfer the dough to a 9-inch deep dish pie plate and refrigerate it. Take the next piece of dough out of the fridge and roll it into a 12-inch circle, cover with plastic and refrigerate while you make the fruit filling.


Preheat the Oven to 425˚ F before you mix together your apple filling ingredients. Place oven rack in the bottom third of the oven (1 level below the center rack)
How to Make the Apple Filling:
1. Combine 10 cups of Granny Smith apples, peeled, cored and sliced 1/4-inch thick with 3/4 cup sugar, 1/3 cup of all-purpose flour, 2 Tbsp lemon juice, 1 tsp ground cinnamon and 1/8 tsp salt in a bowl. Mix well and let the filling stand for 15 minutes, stirring a few times in the process. (I used apple corer and divider to speed up the process).


Final Assembly Instructions:
1. Take your pie dish out of the refrigerator and pour the entire apple filling mixture (juices and all) into the bottom crust and scatter pieces of 2 Tbsp of butter over the top.

2. Just before putting on the top crust, brush the edge of the bottom crust with cold water. Trim any excess dough on the edge and fancy up the edge with a flute pattern. To flute, with your index finger and thumb, pinch your other index finger, now imagine there is dough in between both hands. Cut 6 to 8 slits in the top crust to vent the pie.
3. Sprinkle top with the mixture of 1/4 tsp of cinnamon and 2 tsp of sugar. Bake apple pie for 15 minutes at 425˚F. If you see your crust browning too quickly, cut a 3-inch hole in the center of a square piece of foil and loosely place over the top of your pie.

4. Reduce oven to 350˚F, slip a baking sheet under the pie (I like to line it with foil to catch any drips) and bake another 45-50 minutes. For the filling to thicken properly, you have to let it cool completely (2 to 3 hours). You can keep the pie for up to 3 days on the counter.

Deep Dish Apple Pie Recipe

Ingredients
Apple Filling Ingredients:
- 9 cups (3 lbs) Granny Smith apples, peeled, cored and sliced 1/4-inch thick
- 3/4 cup sugar
- 1/3 cup all-purpose flour
- 2 Tbsp lemon juice
- 1 tsp ground cinnamon
- 1/8 tsp salt
- 2 Tbsp unsalted butter, cut into small pieces for the top
Pie Dough Ingredients:
- 2 1/4 cups all-purpose flour
- 2 Tbsp granulated sugar
- 1/2 tsp salt
- 12 Tbsp COLD unsalted butter
- 6 oz COLD cream cheese
- 3 Tbsp cold heavy whipping cream
Topping Ingredients:
- 2 tsp sugar
- 1/4 tsp ground cinnamon
Instructions
How to make Cinnamon Apple Pie:
- In a large bowl, whisk together 2 and 1/4 cups flour, 2 Tbsp of sugar and 1/2 tsp salt.
- Cut 1 1/2 sticks of COLD butter and 6 oz of cream cheese into small cubes. Using a pastry blender or 2 knives, cut the butter and cream cheese into the flour mixture until it resembles coarse crumbs with pea-sized pieces.
- Drizzle 3 Tbsp of cold heavy cream over the dough and cut into the dough with a spatula until the dough forms moist clumps.
- Divide the dough into 2 pieces, press into flat disks, cover tightly in plastic wrap and refrigerate at least 1 hour or up to 2 days.
- Once its fully cooled, remove 1 piece of dough from the refrigerator and on a clean surface, roll it out into a 13-inch circle. (Dough rolls out easier without flouring the surface, use pastry scraper to lift rolled out crust). Transfer the dough to a deep dish 9-inch pie plate and refrigerate it. Take the next piece of dough out of the fridge and roll it into a 12-inch circle, cover with plastic and refrigerate while you make the fruit filling.
Preheat the Oven to 425˚ F before you mix together your apple filling ingredients. Place oven rack in the bottom third of the oven (1 level below the center rack).
How to Make the apple Filling:
- Combine 9 cups of Granny Smith apples, peeled, cored and sliced 1/4-inch thick with 3/4 cup sugar, 1/3 cup of all-purpose flour, 2 Tbsp lemon juice, 1 tsp ground cinnamon and 1/8 tsp salt in a bowl. Mix well and let the filling stand for 15 minutes, stirring a few times in the process.
Final Assembly Instructions:
- Take your pie dish out of the refrigerator and pour the entire apple filling mixture (juices and all) into the bottom crust and scatter pieces of 2 Tbsp of butter over the top.
- Just before putting on the top crust, brush the edge of the bottom crust with cold water. Trim any excess dough on the edge and fancy up the edge with a flute pattern. To flute, with your index finger and thumb, pinch your other index finger, now imagine there is dough in between both hands. Cut 6 to 8 slits in the top crust to vent the pie.
- Sprinkle top with the mixture of 1/4 tsp of cinnamon and 2 tsp of sugar. Bake apple pie for 15 minutes at 425˚F. If you see your crust browning too quickly, cut a 3-inch hole in the center of a square piece of foil and loosely place over the top of your pie.
- Reduce oven to 350˚F, slip a baking sheet under the pie (I like to line it with foil to catch any drips) and bake another 45 minutes. For the filling to thicken properly, you have to let it cool completely (2 to 3 hours). You can keep the pie for up to 3 days on the counter.


I made this today, kind of shaky about it because I wasn’t sure how it would turn out…and normally I don’t write reviews but this pie was BOMB. One word- AMAZING. I love it. Best pie I have ever eaten…the crust was sooooo perfect, a combination of sweet and caramel, juicy apples, yummy yummy yummy. Totally recommend to make, 5 starts all the day. Family already ordered more for tomorrow, thank you thank you thank Natasha, God Bless you and your beautiful and talented self, your wonderful family and baby to come.!
I just shared your wonderful comment with my husband. Thank you so much for such a great review! God bless you as well 🙂
Natasha, the dish you use seems deep than what I usually use for pies. How deep is it? I am concerned that those usual glass pie dishes I have too shallow, thank you
Mine was a deeper pie dish than the usual glass ones. You can still use a glass one, but you might cut down the apple filling to make it about 3/4 of what the recipe calls for.
Thank you so much for this wonderful recipe! I made this pie today and it turned out absolutely perfect thanks to your detailed instructions.
I’m so happy to hear that! I’ll let my hubby know. He worked very hard to update the recipe 🙂
Made this pie today and it came out absolutely delicious (but the top – not very pleasing to the eye) haha
I used brown sugar and cinnamon for the top and maybe that had something to do with it… But otherwise, I love it! Thank you 🙂
I’m so glad you loved the pie. Did it turn out dark? Yes, brown sugar does get darker as it bakes.
Hi,At what Temperature do we bake the pie for the first 35 minutes?(am using the marie callendars crust)Thanks so much!
The first 30 minutes, you bake at 425˚F. After you reduce the oven to 350˚F, you want to bake for 35 minutes if using the store-bought crust. 🙂
I LOOOOOVE this recipe. Usually whenever i make something i never eat it, but with apple pie i can always eat a lot! I didn’t have any heavy whipped cream so i just made some. You have to use 3/4 cup milk and 1/3 cup butter. You melt the butter and then boil the milk and the butter together. When i first put it into the dough- 3 tablespoons, it didn’t form, so i added a 4th and then it started to form! Thank goodness! I love this recipe 🙂 =)
That’s great to know that an alternative for heavy cream works if you’re in a pickle! 🙂 Thanks Monica!
🙂
I just made this pie. Man oh man, it’s good! Thank you for the crust recipe. I think it’s one of the best I’ve ever made so far. Crumbly, buttery, delish!
Thank you, I love to hear a good report :).
This looks great! I have a suggestion for you for a full-proof, works-every-time pie crust: it’s from Cook’s Illustrated (same guys as America’s Test Kitchen) and called the Foolproof Pie Dough. The secret ingredient is vodka which evaporates while the pie is baking. They go into a whole scientific explanation of why it works better than just ice-cold water. You have to pay for an online subscription to view the recipe at Cook’s Illustrated, but this place has it for free: http://www.seriouseats.com/recipes/2007/11/cooks-illustrated-foolproof-pie-dough-recipe.html. Hope that helps 🙂 My husband is American and quite the pie-lover. This recipe for the dough has worked every time! I use my food processor and it’s super easy.
Oh Thank you so much for sharing!! I’m going to print it!
It was in the oven for about 45-50 minutes, the top was already browned and so were the sides but the bottom of the crust wasn’t ready yet, maybe i rolled the dough out to much. Oh well it was still good, i’m going to try it again. thanks
Its ok if it’s moist on the bottom. I’ve never been able to get it really crisp because of all the juicy apples on top of it, but it should still be cooked through. If your top starts to brown too much, you can always put some foil over the top to keep it from burning. hope that helps 🙂
The thick juices bubbled out so i took the pie out of the oven and cooled it but th bottom of crust was still not ready in the middle?
How long was the pie baking in the oven?
how do you know when the bottom of pie is ready?
Do you mean after it is baked? It should be ready when thick juices bubble out from the top of the pie.
Thank you so much. 🙂
Natasha, on step 3 it says to drizzle heavy cream ? im kinda confused what kind and how much?
I want to say it was 4 tbsp but I will double check when I get back home. Sorry about that.
Ok, it was 3 tbsp cold heavy cream. I fixed it in the instructions. I’m so glad you asked!
My sister made your apple pie and it was delicious!!! Thanks for the recipe! I love apple pie:)
Hi Galina! Thank you for taking the time to let me know 🙂 I’m so glad you enjoyed it. You’re welcome 🙂
Natasha,
Your blog is great. I am so glad I found it. When I lived in Ukraine we ate a salad frequently and I thought maybe you could help me find the recipe or the name. It was made with eggplant, onions, tomatoes, and I am not sure what else. Have you ever heard of it?
Dyakuyu!
I have a recipe with similar ingredients, but the eggplant is sauteed and then baked. Does that sound right to you? It’s more like a casserole than a salad though.
Oh I love apple pie! This actually looks like my mums, except hers was a bit heavy with the pastry… yours is better : )
Hope to see more posts from you, perhaps a vareniye recipe? If you haven’t done that already… love your blog : )
Thank you Ulyana! I am planning to post various canned foods such as Vareniye (my mom makes the best apricot and plum vareniye!) once the fruits and veggies are in season.
I absolutely ADORE Apple Pie!!! 😀 You did such a great job in explaining how to make it!! 😀 Thanks!! I have got to make this! 😀
xoxo
Kathleen
Thank you Kathleen! It was delicious. Next time I make it, I’ll use one of my readers suggestions and roll the dough between saran wrap. 🙂
Ah, yes, that good Irish cook, Joy O’Cookin’
That all sounds great. Thank you.
If I’m feeling lazy I’ll just grease the pan, put in filling, and top with biscuit dough rolled out thin. I find biscuit dough is much easier to make and roll out than pie crust. I;ve even docked it and blind baked it for the bottom crust. A bit odd the first time you try it, but pretty tasty.
That sounds like a great idea! With being in school and keeping very busy, I’m always trying to think up ways to speed up cooking. I’ll have to try that. Thanks Joe!
My pleasure, Ma’am. I even cheat and use self rising flour. Although, I have no idea WHY that seems to save time. Or why biscuits take me so much less time than pie crust.
What a beautiful pie! You have inspired me to make some apple pie! Buying ingredients this weekend and making some pie! Thanks for the recipe.
Looks very tasty! If you still want to use your pretty dish =-))… cut your ingredients, cool it if you wish, but then roll it out between two pieces of Saran Wrap. It rolls out easier, no mess, easy to transfer to the pie plate. When I make a crust, it takes me about 10 minutes, start to finish to have it ready… a little longer than defrosting one, but not by much! Also, remember that the less you work with the dough after you add the liquid, the flakier it will be.
I shall try your pie recipe soon! Thanks for posting it.
Thank you for your wonderful advice. I will definitely try that. If it cuts my time down to 10 minutes, I’ll take it! 🙂