
This post may contain affiliate links. Read my disclosure policy.
This is my mom’s method of making farmer’s cheese. Grandma made this cheese in Ukraine. It takes a few days, but the steps are easy and the results are wonderful. Not to mention you will feel like a ninja after you’ve made your own cheese.
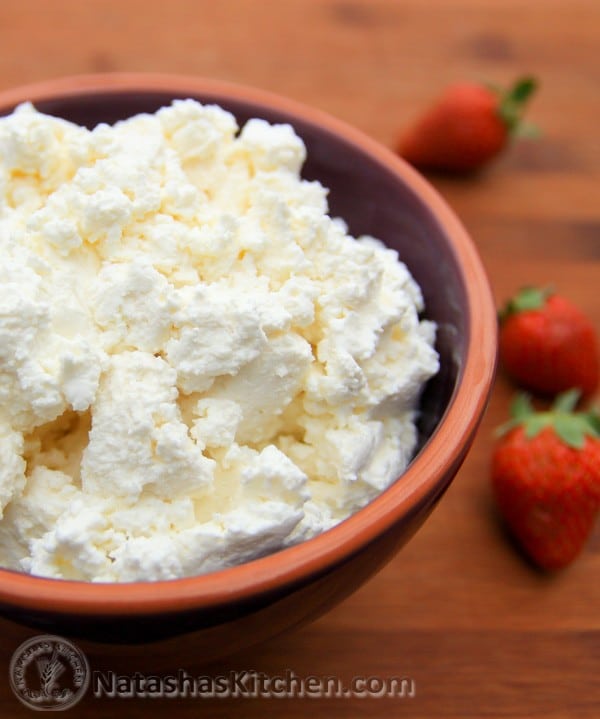
You end up with a good amount of farmers cheese and whey. Use organic milk for the best tasting cheese (I buy discounted organic milk that is about to expire just for this!). You can use the cheese to make syrniki or cheese crepes (nalesniki). Keep the whey (yellowish juice) to make bread.
Substitute water for whey and your bread will always taste better and it will be healthier since whey contains protein that is easy to digest. Are you a cheese ninja? How do you make your farmer’s cheese?
Ingredients for Farmers Cheese:
1 gallon whole milk (get the best quality you can; organic is best), At room temperature.
1/2 gallon Cultured low fat buttermilk, at room temp
What you will need:
4 layers of cheese cloth
Time to make:
3 days
Day 1:
1. Allow the milk gallon and buttermilk to come to room temperature on the counter (about 7 hours).

2. Pour milk and buttermilk into a large soup pot. Cover and place in a warm (100 ˚ F) oven for 1 hour or until mixture feels luke warm.


3. Remove from oven and place in a warm room (I put mine on the floor next to the heating vent in the laundry room) and let it sit for 24 hours. When it’s done, it should become the consistency of sweetened condensed milk. It pulls when you lift it up with a spoon and should not really stick to your spoon if you insert it vertically and remove it straight out. Do not stir.


Day 2:
4. Place on the stove again over LOW HEAT, UNCOVERED for 40 minutes or until it is WARM. Do Not Stir. You have to heat it up slowly, since high temperatures destroy the nutritious protein.

5. Remove from stove and place in a warm room for another 24 hours (again, next to the heating vent on the floor).
Day 3:
6. Place on the stove over medium/low heat UNCOVERED for 40 minutes or until hot (do not boil). The cheese will separate from the whey. Turn off the heat and let it sit covered for an hour (this helps for the curds to separate as well).

7. Place 4 layers of cheesecloth over a large colander set inside a large bowl.

8. Pour cheese mixture over the cheesecloth.


Here’s the Leftover whey. Refrigerate this stuff and use it for bread. There will be some settling on the bottom

9. You can tie a knot with your cheesecloth and hang it over your kitchen faucet for 8-10 hours OR place a cutting board either in a baking dish or in the sink. Put bag of cheese on top. Cover with another cutting board and place a heavy weight over the top (i.e. dutch oven filled with water or a large jug of water).

10. Remove cheese after 10 hours and make something tasty or refrigerate. You can let it sit longer if you want a drier cheese.


So, how do you make your cheese?
Farmer's Cheese Tvorog Recipe

Ingredients
- 1 gal whole milk at room temperature, organic is best
- 1/2 gallon Cultured lowfat buttermilk
What you will need:
- 4 layers of cheese cloth
Instructions
Time to make: 3 days
Day 1:
- Allow the milk gallon and buttermilk to come to room temperature on the counter (about 7 hours).
- Pour milk and buttermilk into a large soup pot. Cover and place in a warm (100˚ F) oven for 1 hour or until mixture feels luke warm.
- Remove from oven and place in a warm room and let it sit for 24 hours. When it's done, it should become the consistency of sweetened condensed milk. It pulls when you lift it up with a spoon and should not really stick to your spoon if you insert it vertically and remove it straight out. Do not stir.
Day 2:
- Place on the stove again over low heat, uncovered for 40 minutes or until it is warm. Do Not Stir. You have to heat it up slowly, since high temperatures destroy the nutritious protein.
- Remove from stove and place in a warm room for another 24 hours (again, next to the heating vent on the floor).
Day 3:
- Place on the stove over medium/low heat for 40 minutes or until hot (do not boil). The cheese will separate from the whey. Turn off the heat and let it sit covered for an hour (this helps for the curds to separate as well).
- Place 4 layers of cheesecloth over a large colander inside a large bowl.
- Pour cheese mixture over the cheesecloth. Tie the top of the cheesecloth and hang it over your kitchen faucet for 8-10 hours OR place a cutting board either in a baking dish or in the sink. Put bag of cheese on top. Cover with another cutting board and place a heavy weight over the top.
- Remove cheese after 12 hours and make something tasty or refrigerate. You can let it sit longer if you want a drier cheese.


Can you buy farmers cheese or is it homemade only?
Yes, you can buy it at grocery stores, but it’s less expensive to make your own 😉
Also, you can make several yummy spreads with the farmers cheese if you want to preserve the good bacteria in it that actual baking kinda destroys
Oh please share your spreads too! I can’t wait to try the other recipe you shared. Sounds delicious!
This recipe is like a chocolate & farmers cheese lovers dream! 🙂
Mix:
2.5 Cups Flour
2 TBSP Cocoa
1 TBSP Baking Soda
..& add to already mixed:
250g Butter
1 Egg Yolk
3 TBSP Milk
Mash dough with hand till fully combined.
Divide into 2 equal balls.
Stick in freezer for an hour.
Before hr is up…
Mix together with hand, or on very low speed:
1.5-2LB Farmers Cheese (I usually to 2lb)
1.5 Cups Sugar
4 Eggs + the 1 leftover Egg white
1-2 TBSP Starch
In a 13×9, or 15×10 size lined & sprayed pan:
Grate one ball of dough for the bottom layer
Spread cheese layer for middle.
Grate second ball of dough for top layer.
Bake at 375 for 30 min.(I used a 13×9 pan)
When you take out the cake the middle will still be jiggly.
Let it cool COMPLETELY
For the top Chocolate Glaze Combine & melt till one consistency:
1 Stick Butter
1Cup Sugar
1TBSP Cocoa
4TBSP water
Pour over cooled cake & let it set & cool completely. Enjoy!
I’ve printed out your instructions. Thank you so much for sharing! you are awesome!!
For those that are wondering if you can make the cheese with 2% milk, you can. My mother in law always does.
The reason why you should use whole milk is bc it was least processed/tampered with… When they process the milk they first take out all the fat & then for skim they don’t put much back in, for 1% put back more & so on for 2% a little more… Food wasn’t meant to be eaten this way & you need fat to absorb many vitamins. Stick to foods that are closest to their natural state. You don’t get fat from eating whole milk.
Oh, & I have a great great recipe I can share to make with the Farmers cheese!!!! I do a separate post with it…
That would be awesome! You can also email me if you wish 😉 natashaskitchen@yahoo.com
The vinegar method is just a fast way. But then it’s not as nutritious. The whole point is to let it stand longer so the good bacterias grow.
I make mine in a little over 24 hrs. You don’t have to have it stand for another 24 hrs after you put it on the heat. Save & refrigerate like 2 cups of the chunky milk, in a jar, before you boil it, & you can use that (“nachunka”) for your next time you make the cheese instead of the buttermilk.
All I do is pour a gallon of organic milk in a pot, add the 2 cups of “razhenka” or chunky milk from the last time. Let it stand on the stove for 24 hrs. Save 2 cups of that for next time. Heat it on low heat till it separates. Then strain it & you’re done!
That’s good to know! I’ve never tried making my own “buttermilk” 🙂 Thanks Olya! P.S. I now have a large batch of farmers cheese and am looking for something new to try with it. Any ideas? 🙂
I always make my own cheese , I cook so much wonderful things from it
Nalistniki, pirogi, vareniki, syrniki and my boys favorite ponchiki . When you
Have cheese in your fridge you have endless possibilities to
That perfect meal and deserts ! I have a base (zakvaska) that my friend broth from
Russia . And my tvorog always turns out great. And here is a trick
For whey use it as a rinse for your hair it’s the best treatment you can offer for your hairand also your body . try it you’ll love the way ot makes your hair and face look younger anda alife.
Hmmm. Interesting! Do you wash it out afterwards with shampoo and facewash or even water or is the whey the final rinse?
This is the colander I use to drain the cottage cheese
http://www.ikea.com/us/en/catalog/products/20027536/#
it’s so versicle..I use it to drain pasta to wash/drain veggies and fruits..love it! It’s only $6.99 in Ikea, my favorite gadget in the kitchen;)
This is my version that I have been making for years and I love it..I make lots of thing with it..make it about every 2 weeks..
2 gallons of whole milk
1 qt of butter milk (I like to use traders joes one)
pour into big pot (I don’t wait for milk to come to room temperature)
first I pour butter milk and then milk and I do have a little milk left over because my pot doesn’t fit it all, cover with lid and leave it on the counter or stove top for about 48hrs until it turns into yogurt consistency (it will become jiggly) then I take off the lid and place in the preheated oven at 250 degrees for 3 hrs and leave it until it cools..pour it into a small hole colander ( I have one from Ikea (stainless steel) and I love it, I don’t loose any curdles and it washes well) so after I transfer all he cottage cheese into the colander I leave it on the pot to drain for an hour and its ready…
don’t have to put into a cheese cloth or put pressure on it..all the liquid drains well, then I transfer to a storage container and mash it with a potato masher to separate the curdles..and it’s perfect every time:)
That sounds pretty straightforward. I’ll have to try your method. Thank you!!
Sorry that was supposed to be 2 gallons of whole milk not 4..oops
Oh, thanks Marina! 🙂
Natasha,
I finally finished making tvorog tonight and it’s a bit sour, is it supposed to be? Also, I let it boil both times that it was on the stove (I didn’t realize it was boiling), and it seems that the cheese separated already the first time it was on the stove, so I definitely messed this up but I still think it’s pretty good.
Thank you so much for all the recipes!
It is supposed to taste a little sour, but in a good way, not like a spoiled sour 🙂
Hello!
will 2%milk work well also?
I think you really need the fat from whole milk for it to work well.
I make mine only with 2% to reduce the calories and it works OK 🙂 but the fattier the milk, the better it tastes 🙂
That’s great to know! Thank you!
I did both whole milk and 2%, and whole milk does taste better and I think it makes more cottage cheese, because there is more fat..
Thanks for sharing! 🙂
Natasha, vy molochina. Ya ochen’ rada chto nashla vashu stranichku. Kak vy ostaetes takoy krasivoy i stoynoy pole vseh etix vkusnostey-a?
Thanks Maya 🙂 Took me a little while to read your comment, but it was very sweet 🙂 I think I burn a lot of calories at work 🙂
Hi! My oven doesn’t go to 100 degrees, should I just cut the time in half?
My starts at 170°, so just heat the oven to your lowest setting, turn it off and don’t change the time duration. Hope this helps.
I tried making tvorog by following this recipe and for some reason or another the tvorog has a bitter taste to it. Now I wonder whether I can still use it for baking or anything else.
I asked my mom about this, its her recipe, and she doesn’t have a good answer. Every time we made it, haven’t had a bitter taste. The only time she had that happen, was back in Ukraine when old milk was used. It also might be that something was added to the milk before it end up in the store. Cheese is not good to be used in the recipe when its bitter. Cheese should be a little sour not bitter. I’m sorry that it did not turn out. Was milk expired?
Actually while reading the recipe, I did think that with milk sitting out for this long (couple days), this might happen, but I guess most of the people didn’t have a problem, so I guess it depends.
The bitterness comes from milk sitting in a warm room for two long. I found that if I don’t make my tvorog within 24 hours (at most), it will turn into bitter cheese.
To avoid this, heat the milk, add buttermilk, let sit for 24 hours or until it thickens (sometimes it only needs 12-16 hours), heat it (to warm temp), let cool and drain through a cheesecloth, or a paper towel lined strainer. There really is no reason to leave it for another 24 hours after you heat it.
May be Natasha knows why it needs to stay at room temp for another 24 hours?
That’s interesting! My mom told me that it has more bitterness if it’s rushed. This recipe actually didn’t have any bitterness to it. A slight sourness, but nothing more than what is normal for this kind of cheese. 🙂
Great recipe! Since we’re working with live bacteria, one really needs to just watch the process and adjust. In the Soviet Union, we left unpasteurized milk out overnight, and it curdled thanks to bacteria in the milk and air at around 70 F. Then we heated it the next morning to separate the curds and whey and strained/pressed it as soon as it was cool. In this country, I have occasionally had trouble with bitter results from keeping the milk too warm.
My recommendation would be high-quality organic buttermilk or kefir to culture the milk. If the house is 69-74 F and the milk is room temperature, then I would skip raising the temperature. I have run into similar problems in baking and brewing. The “sweet spot” for these cultures (mesophilic bacteria) is right around 70 F. All the best!
I’ll give the organic kefir a try next time. I imagine it would taste even better! I have found that organic milk does taste a whole lot better than regular milk. I always keep an eye out for the organic milk that is on sale and close to it’s expiration date just to make this cheese 🙂
Is the lid supposed to be on the whole process?
Yes I would recommend it.
HI, quick question, my oven doesnt go as low as 100 F, so how else would i do this?
Use the lowest setting possible, most of the ovens start at 170F. Once the oven is preheated, turn it off and place the mixture in. Using oven thermometer might be a good idea. Hope this helps.
I love this. I have tried it both ways now and love it.. the quick method ends up getting made more often, bc of busy family life! I was wondering if anyone out there would please share their zapekanka recipe. My dearest friend in Kyiv made it often, and I can’t find the recipe that she gave me so long ago. She is not on the internet at all, so I can’t get it from her! Thanks!
Natasha, what kind of cheese should I use? Feta or..?
Thank you
Inga, I’m not sure I understand your question. This is the recipe to make farmers cheese. You just need milk and buttermilk to make it.
Ok- so is this a no cook method?
I am new to cheese making. (just recently have enough leftover goat milk to play with) It appears you only warm the milk after letting it sit ? this would indeed preserve the nutrients!! if this is the case I will be doing it YOUR way. The last batch of cheese I was sick at the thought of high heat or boiling the milk….what a waste is you dont have to.
Just learned to add whey to soaking beans to remove the acid….who knew.
Thanks!!
You do have to let it get fairly hot at the last step in order for the cheese to separate well from the whey. I agree, I think it’s a bad idea to boil when making this cheese.
Hi Natasha, I just discovered you site. This is amazing, so many recipes that I was looking for, for a long time. Thank you for all the hard work. You can also use whey for your cold soup Okroshka instead of water, as well as for a drink (something Scandinavian unfortunately I am not sure about the recipe)
I do have Okroshka posted but never thought to use the whey instead of water. That’s brilliant! Thank you Elena!
Instead of buttermilk, I use a culture given me by a Russian friend several years ago (called kefir- not to be confused with store-bought kefir drink!). I put it in the milk, leave it anywhere from 12 hours to 2 or 3 days (depending on how hot the house is, and how sour I want the kefir/cheese to be). Once it is thick, I take out the culture (putting it in another jar of milk for the next batch, or into milk and then into the ‘fridge to wait for next time), and then put the jar in a pot of water, bringing it to a boil. As soon as the water boils, but without boiling the milk, I turn off the stove and let the water and milk sit until it is cool. Then I drain in a small strainer for an hour or two until it is as dry as I want it. I have never pressed it- I think I will try that next time!
I love it served with a little sugar, sour cream and some soaked raisins! Also served plain with a dollop of fruit jam over it. And of course in sirniki 🙂 !
I have had the same culture for several years, taking it with me whenever I travel. When I do not want to make cheese out of it, or am traveling, I just drink the cultured milk plain, or add fruit to it and make a smoothie. It is very healthy, and I have never gotten sick when I traveled which I attribute to the good bacteria in the culture. The culture grows, so it is fun to share a piece of it with the couchsurfers that I stay with, or with those that stay with us.
Thanks, Natasha, for all the work you do on this website- I am so happy to see how it has grown!
Margo thank you so much for sharing! I will have to ask my mom where I can get a hold of kefir.
I did not see your reply last year… have you found kefir start? If not, let me know and I will send you up a start. It is like a plant- it grows, and then I am left having to find people to foist it off on… just can’t bring myself to ‘flush’ it! Email me if you would like a start. I have used kefir as my ‘secret weapon’ to avoid illness in the past few years, and I think I can truthfully attribute my lack of anything more than a 2-day cold to it. Besides, it’s good 🙂
Margo; how does it work? Does it turn milk into buttermilk? I’ll email you! 🙂
I make my Kefir, too! & I was able to share with some friends who grew up with it.
I’d never buy Tvorog from the store, but tried a farmer cheese (the brand that sell thoese ‘kefir’ drinks), so I don’t know if they are _exactly_ same or not. But the farmer cheese tasted very much like the kefir cheese I made by draining the kefir for a day or so. I think Margo’s method would speed things up if a larger quatity is needed.
Here is a very comprehensive website about Kefir. (wikipedia is pretty good introduction, too)
http://users.chariot.net.au/~dna/kefir-faq.html
Thank you for sharing May :).
you can buy Kefir and any cheese dry cultures from any online cheese suppliers or in special farmers shops.