

This post may contain affiliate links. Read my disclosure policy.
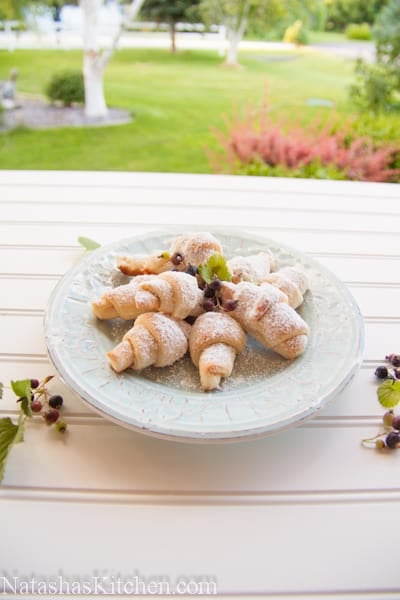
Blackcurrant Rugelach; it doesn’t get any better than this folks. My mom whips these up all the time; family dinners, church potlucks, parties, just for the heck of it. Making Rogaliki (Rugelach) was one of those things that seemed intimidating until I asked my mom how she does it. Happy News! They are really simple and quick to make! You don’t even have to wait for butter to soften; you melt it. Score!
I love these flaky, soft and perfect little Russian pastries. You can use any kind of preserves for the filling; Mom makes her own blackcurrant preserves and oh goodness if I could just let you lick the spoon (keep in mind I’ve probably licked it first).
There is a secret to making these; it’s the Canadian flour. Trust me. I tried twice with regular unbleached all-purpose and both attempts were sub-par. The Canadian flour makes them soft instead of cookie-like. I finally bit the bullet and bought 44 lbs of the stuff.
Everyone keeps saying it makes everything better! In this case, it proved to be true. I wonder if better for bread flour would have the same effect since they have a similar protein content?
Ingredients for Rugelach:
2 sticks unsalted butter (113g each), melted (not hot)
1 cup warm milk (1% or 2% milk will work)
4 cups CANADIAN all-purpose flour *measured correctly
3/4 Tbsp active dry yeast (Red Star Brand)
Sugar
Black current preserves OR your favorite preserves (raspberry, blackberry, etc).
Here’s the Canadian flour that we purchased at Cash & Carry. It’s wasn’t as pricey as I thought it would be.

How to Make the Best Russian Rugelasch/Rogaliki:
Preheat Oven to 360°F. (That’s right; 360°).
1. Melt your butter over low heat. Once it’s melted, transfer it to the bowl of your electric mixer. You want it to be warm, not hot.

2. In the bowl of an electric mixer using the whisk attachment on medium speed, combine 2 sticks of melted butter & 1 cup warm milk (I heated the milk in the micro for 45 seconds).


4. Switch to the paddle attachment and add flour mixture to the milk/butter mixture about 1/2 cup at a time and mix until it is an even consistency and no longer sticking to the walls of the bowl, scraping down the bowl as necessary. It only takes 3-5 minutes to get the flour mixed well. The dough should be soft and won’t stick to your hands.

5. Divide the dough into five even portions and cover them loosely on the counter with some plastic wrap until you are ready to use them.

6. On a smooth non-stick surface, roll a portion of the dough out into about a 11-inch circle. No need to flour the surface if it’s a good, smooth cutting board.

7. Sprinkle the top of the dough with sugar (this is important not to miss since the dough doesn’t have any sugar in it. And you wouldn’t want to disappoint your sweet tooth. I put this step in bold because I’ve missed it before.

8. Cut 6 strips through the center to make 12 cute ‘lil triangles. Add about a marble size amount of your favorite preserves to the center of the wide part of the triangles. I recommend using preserves instead of jam; you don’t want the filling to be too juicy and leak out.
Mom says the fastest way to apply the preserves is to fill a teaspoon and push off about a pea size amount onto each triangle. I haven’t discovered an easier way, but if you know, please share! Anyways, start rolling your rugelach toward the center. Push down the edges slightly after the first roll so the jam is less likely to sneak out.

9. Place the rolled rogaliki onto the prepared baking sheet with the end part facing down. Space them about 1/2 – inches apart. My mom has a fantastic baking sheet that fits all of these rogaliki. I need one! But it is ok to bake in 2 batches.

10. Let them rise in a warm oven (100˚F for 30-45 minutes). Or let them rise in a warm room till they are about 50% larger (could take as long as 2 hours or more at room temp).

11. Bake at 360°F for 20 minutes or until golden. Transfer to a bowl while they are still hot and sprinkle each layer generously with powdered sugar.


Russian Rugelach, Rogaliki

Ingredients
- 2 sticks unsalted butter, melted (not hot)
- 1 cup warm milk, 1% or 2% milk will work
- 4 cups CANADIAN all-purpose flour
- 3/4 tbsp active dry yeast
- Black current preserves
Instructions
Preheat Oven to 360°F
- Melt your butter over low heat. Once it's melted, transfer it to the bowl of your electric mixer. You want it to be warm, not hot.
- In the bowl of an electric mixer using the whisk attachment on medium speed, combine 2 sticks of melted butter & 1 cup warm milk.
- In a medium bowl, mix together the 4 cups flour and 3/4 tbsp yeast. Switch to the paddle attachment and add flour mixture to the milk/butter mixture about 1/2 cup at a time, and mix until it is an even consistency and no longer sticking to the walls of the bowl, scraping down the bowl as necessary. It only takes 3-5 minutes to get the flour mixed well. The dough should be soft and won't stick to your hands.
- Divide the dough into five even portions and cover them loosely on the counter with some plastic wrap until you are ready to use them.
- On a smooth non-stick surface, roll a portion of the dough out into about a 11-inch circle. No need to flour the surface if it's a good, smooth cutting board.
- Sprinkle the top of the dough with sugar and cut 6 strips through the center to make 12 triangles.
- Add about a marble size amount of your favorite preserves to the center of the wide part of the triangles. Anyways, start rolling your rugelach toward the center. Push down the edges slightly after the first roll so the jam is less likely to sneak out.
- Place the rolled rogaliki onto the prepared baking sheet with the end part facing down. Space them about 1/2 - inches apart.
- Let them rise in a warm oven (100 degrees for 30-45 minutes). Or let them rise in a warm room till they are about 50% larger (could take as long as 2 hours or more at room temp). Bake at 360° F for 20 minutes or until golden. Transfer to a bowl while they are still hot and sprinkle each layer generously with powdered sugar.


Hi Natasha! Any idea of store-bought preserves to use that shouldn’t leak out during baking?
Hi Yelena, look for thick preserves – definitely nothing loose and the best way to keep it from leaking out is not to overfill with preserves (it really only needs a little bit) and slightly push down the edges as you can see I’ve done in step 7 after folding the first bit of dough over the preserves.
I used organic strawberry preserves from Trader Joe’s. Surprisingly didn’t leak out! Thank you so much for your detailed reply.
Natasha, do you know how to get these to turn out soft rather than on the crunchy side?
Hi Irina, the type of flour you use with these makes all the difference. I’ve tested out so many different kinds and the Canadian one has just the right amount of gluten to make them work best. Also, even if you are using all-purpose American flour, bake them just until they are lightly golden. Overbaking can dry them out. They should normally be a soft cookie 🙂
Hi, I was just wondering how long do these keep for?
Hi Lisa, we haven’t tested the limits with these since they always get eaten within a couple of days. They are best and softest within the first couple of days, but I think they would be fine for 4 or 5 days.
I want to make these today (Saturday) and bring them to church tomorrow (Sunday). How should I store them until then? Thanks!
Let them come to room temp then dust generously with powdered sugar. Place in a bowl, cover with plastic wrap and keep in a cool dry place (room temp, away from humidity) until ready to serve the next day.
Thanks! The directions said to sprinkle with powdered sugar while they are still hot, or maybe I misunderstood.. Is it ok that I did that?
HI Anzhela, the powdered sugar sticks much better to the cookies if you put it on right away, but don’t put a cover over the cookies while still warm with the powdered sugar or it will turn sticky.
Thanks!
Hello Natasha
Thank you for these great recipes!
I was wondering if we can fill this dough with cheese or chocolate
Thank you
Hi Carla, I think it would be really good with chocolate and possibly cheese although I haven’t tried with cheese and if you’re making them savory, you probably want to omit the sugar.
Just made these using special biscuit/pastry flour and turned out beautiful. I did 2 batches and 1 was coated in powdered sugar and second was with a lemon glaze. The glaze really lifted the flavour. Only improvement I would make for next time would be trying to put more jam in the rogaliki.
Thank you for sharing your great review!
Hi Natasha,
I live in Australia. What flour would you recommend I use?
Hi Alicja, I wish I had a good answer for you but I don’t know how your flour compares. I think I’ll give this recipe a few more experiments with more different kinds of flour. I’m hoping to find something as good as Canadian and something that is more accessible!
Natasha, what is CANADIAN all-purpose flour? how is it different from American all-purpose flour? where do you buy your flower?
Thank you,
Svetlana
Hi Svetlana, Canadian flour is just flour made in Canada. It is sold in Cash and Carry and Winco and some European markets. From what I know, Canadian flour has a higher gluten content and therefore performs better in baking. I hate using specialty products and don’t use them unless we’ve tried other options and found that nothing else works better. In this case, that is definitely true. Some Walmarts even carry it but it varies by location: http://www.walmart.ca/en/ip/five-roses-never-bleached-all-purpose-flour/6000016945063
Very good and easy recepie. Thanks
I’m so happy you enjoyed that. Thank you for sharing that with us!
I think 5 stars is not enough! I want to put 10⭐️⭐️⭐️⭐️⭐️
I absolutely loved it!! This recipe is so easy!! Thank you thank you thank you!! My favorite!!😋😋
Diana, that’s just awesome!! Thank you for sharing your wonderful review 😁
I know sounds stupid but 2 sticks small or big?
Diana, recipe uses two small sticks of butter (113g each). I also updated the recipe. I hope you love them 😀
Ok. Thank you so much:)
I made these rogaliki today, turned out pretty yummy. I will save this recipe for sure. Very easy and fast to make. Thank you!
I’m so happy you enjoyed my Mom’s recipe :). Thanks Lena!
Hello Natasha! Your website is very inspiring. I never had time to do much outside of my full-time job in a corporate world. I just recently left my job to take care of my twin girls. I recently found your food blog and have to say it’s very impressive. I tried rogaliki recipe today. It’s a very easy recipe. I yeild about 50 rogaliki not 60. Perhaps mine are bigger. I will send you a pic. What else can you make out of this dough? I never though you could make a full -time career out of a blog. Wish you all the best! Good job!
I’m so happy you find my site inspiring. Thank you! 🙂 Did you cut less triangles with each round or make less balls of dough? It’s very likely yours were a little larger if you got 50, but as long as you loved them, it doesn’t really matter 🙂
Natasha…do you think I can try making these with pie dough??? Is it similar to the dough in your recipe. Just trying to find a shortcut:)))
It probably won’t work with pie dough – they are very different than pie dough. Have you tried making this dough? It’s actually pretty simple to make and work with. I think pie dough would be more difficult to make and roll out. I hope you love it 🙂 I can’t really think of a good substitute for the dough.
Hi Natasha..two questions, I am from Vancouver, Canada and we have traditional yeast that needs to be proofed and instant yeast that can be added to dry ingredients. Which yeast should I use? Also, can I freeze these and then add the powdered sugar when I want to serve them?
I am Ukrainian and love your recipes. I hope all is going well with the new baby.
Thank you Gloria :). Our baby girl is so sweet and we are just enjoying every moment with her :). Use the traditional yeast that needs to be proofed. I use the traditional one in all of my recipes. I haven’t tried freezing these because they always get eaten within a couple of days, but I think it’s worth a try. I would put the powdered sugar on after they are thawed or it might get gummy after the freezer.
Hi, I just made these rugelach yesterday and they taste divine. I was able to find some nice flour from shepherdsgrain.com at my local Cash and Carry store. I now have 50’# of it,but I will sell it to friends.In the recipe, it says to put 4 C. flour in a med. bowl with the yeast. Then it says to add 4 C. flour in and I did not add 4 C. flour to make it 8 C. flour.That’s what it sounds like needs to be done though. I just made it with 4 C. flour. Is it just the wording that makes it sound like 8 C. flour total? I used almond milk instead because I don’t have reg. milk at my house. I wasn’t sure if the casein in milk is needed, so I sprinkled a little dried milk into it in case. The walnut filling I used was:
1/2 lb. finely ground walnuts
1/2 C.white sugar
1/2 C. brown sugar
1/4 C. boiled milk of your choice(I used almond)
1/8 C. melted butter
Mix all together for a nice filling
You’re right, that wasn’t written very clearly. I have updated the recipe to fix it. It is only 4 cups flour. Thank you so much for sharing your nut filling! I’ll have to try that 🙂
Hi Natasha thanks for the wonderful recipe and illustrations. You had asked for an easier technique to fill jam. I just put mine in a zip lock bag and cut the corner and squeeze out as I need it. You can also use a pastry bag too but I don’t always have those laying around. I actually use this technique for the meat filling when I make pelmeni.
That is brilliant! I love the idea of using a ziploc bag for these and for pelmeni! That’s so much cleaner. Thanks for sharing your great tip!
These look wonderful, funny that I found your site from Pinterest. My oldest daughter and I were speaking aboutRussian food. I’m part Russian from my Mom side. Andbecausemy mom married and changed religions I feel I lost on a lot of heritage so I don’t know how to cook a lot of Russian food. So I’m glad to find this recipe can’t wait to try it. Thanks for sharing with love Janice
Welcome to the site Janice, I hope that you’ll find many new favorites :).
i also am half rusian on my fathers side my grandfather was an archbishop in the russian church many years ago i have pic of him in his robes ,i am 83 and still like finding new recipes. and like you i dont have any russian recipes .i do have a recipe similar to this one with a nut filling not russian as far as i know i am half russian and half italian
Hi Natasha!
I was reading through some of the comments here and just had to research to find the next best equivalent to Canadian flour. Apparently bread flour because both have about 13% gluten content. Have you tried that way? I will be teaching my high school classes tomorrow and that was the best alternative I could order through Sysco. Hoping for the best! Btw, congrats on a healthy delivery 🙂 I love following you on IG.
Thank you Inna :). I actually haven’t tested this recipe with bread flour but I am so curious. If you try it, do let me know how it works out.
Natasha there is no salt in this recipe, i thought may be salted butter will work, i felt like they definitely need salt?
Ana, you can add a pinch of salt, it wouldn’t hurt. But neither me or my mom have used it in this recipe.
Hi Natasha, I’m hoping to make these later today but all out of preserves. Will a poppy seed filling work instead? Without getting too dry?
Yes, a poppy seed filling should work just fine. I do like the tiny bit of tang that preserves add though, but poppyseed filling would taste great too.
Yes, a poppy seed filling should work just fine. I do like the tiny bit of tang that preserves add though, but poppyseed filling would taste great too.