
This Baklava is flaky, crisp, and tender, and easier to make than you think. I share my authentic Greek Baklava Recipe below with step-by-step directions that are easy to follow. Make this dessert and be prepared for oo’s and ahh’s, because this is the BEST baklava recipe I have ever tried.

This post may contain affiliate links. Read my disclosure policy.
Helpful Reader Review
“Love this recipe. I am Greek, but my baklava never turned out this good. I made your recipe for my husband’s family reunion. They were so impressed by how delicious it was. They said the syrup wasn’t too sweet like other baklava recipes and it’s the best they ever tasted.” – Tina ★★★★★
Baklava Video
Baklava can be a little tedious to make, but it’s truly simpler than you think. Watch my video, and you’ll be confidently buttering layers in no time! If you want a sneaky shortcut version, try my Baklava Cups.
Best Baklava Recipe
Store-bought baklava has nothing on this, and trust me, I’ve been around the block when shopping for baklava. This baklava recipe is well-loved wherever it goes, and with so many 5-star reviews, it is definitely a reader and family favorite! It’s also make-ahead and freezer-friendly, which is perfect for holiday baking.
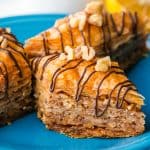
My baklava recipe comes out beautifully flaky, buttery, and crisp. The flavor is incredible, since this one is not too sweet. You will love the hint of mellow lemony flavor, which offsets the sweetness and complements the cinnamon. It also keeps well for over a week on the counter, making it a great option to make ahead.

Baklava Ingredients
While this recipe is a Classic Greek Baklava, other varieties, such as Lebanese and Turkish recipes, swap the walnuts for pistachios and include rose water. My Baklava recipe calls for simple ingredients, most of which you can find in your pantry.
- Phyllo (fillo) dough – one 16oz package should have about 40 total paper-thin sheets. Do not use the thick sheets of fillo dough for this recipe. They are sold in the freezer section of the grocery store. Thaw according to the package instructions.
- Unsalted Butter – don’t skimp here! This keeps the fillo dough from peeling away.
- Walnuts – finely chop. You can swap them for almonds, pistachios, or a mix of nuts.
- Cinnamon – adds a great hint of flavor that’s traditional for Baklava
- Syrup ingredients – sugar, lemon juice, water, and honey
- Garnish – drizzle with melted chocolate or Chocolate Ganache, and chopped walnuts

How To Make Baklava
While it takes time to brush each layer, the result is worth every moment! Don’t skim on the butter, and you will be rewarded.
- Thaw phyllo dough in the refrigerator per the package instructions, then place it covered on the counter for 1 hour to bring to room temperature.
- Trim the phyllo dough to fit your 9×13 pan, covering it with a damp (not wet) towel to keep from drying out.

- Grease – use butter to coat the sides and bottom of a 13×9 non-stick baking pan. You can line it with parchment paper so you don’t damage it with your knife when slicing later.
- Make the honey syrup – heat the syrup ingredients in a medium saucepan while stirring until it boils, and then reduce the heat to medium-low and allow to cook for 4 more minutes without stirring. Set aside to cool.

- Chop Walnuts – pulse walnuts in a food processor until finely chopped, and then mix with cinnamon.

How to Assemble the Baklava
- 10 Layers – Preheat oven to 325°F. Start layering the phyllo dough, brushing each sheet with butter as you place it in the pan. Repeat this until you’ve added 10 layers. Then sprinkle 3/4 cup of walnuts over the top.
- 5 Layers – add 5 more sheets, buttering between each one, and then another layer of walnuts. Repeat this 3 more times. Finally, add 10 more layers of buttered dough on top.

- Cut the dessert into strips using a sharp knife, and then cut across to make diamonds. Bake for 1 hour and 15 minutes.

- Add syrup – spoon cooled syrup over the Baklava right after removing it from the oven. It should sizzle. Leave it uncovered on the counter to cool completely (4 hours or overnight). Then store covered with a tea towel for up to a week.

Tips for Making the Best Baklava
Follow these simple tips to make homemade baklava easy.
- Use a 13×9 pan with straight corners that fits the pastry to the edges. Avoid pans with angled corners that fan out, as they can cause the syrup to pool at the edges and make the top of the baklava dry. If you choose a larger pan, increase the syrup amount by 25% so you don’t run out. You can also cut the recipe in half using an 8×8 pan.
- Don’t skimp on the butter, especially on the top layers, since that can cause them to flake off. You can melt a few more tablespoons if you run out.
- Sizzle – the sound you’ll hear when you spoon the syrup over the hot pastry. This keeps it from getting soggy.

My Baklava recipe has so many layers of irresistible textures and flavors! The crispy layers of dough are perfectly complemented by the honey syrup and crunchy nuts. I hope it becomes your new favorite dessert.

Baklava Recipe
Ingredients
- 16 oz phyllo dough, thawed by package instructions
- 1 1/4 cups unsalted butter, 10 oz or 2 1/2 sticks, melted
- 1 lb walnuts, finely chopped, about 4 1/4 cups unprocessed
- 1 tsp ground cinnamon
- 1 cup granulated sugar
- 2 Tbsp lemon juice, juice of 1/2 lemon
- 3/4 cup water
- 1/2 cup honey
- Melted chocolate chips & chopped walnuts for garnish, optional
Instructions
Preparation
- Thaw phyllo dough by package instructions (this is best done overnight in the fridge, then place it on the counter for 1 hr before starting your recipe to bring it to room temperature).
- Trim phyllo dough to fit your baking dish. My phyllo package had 2 rolls with a total of 40 sheets that measured 9×14, so I had to trim them slightly. You can trim one stack at a time, then cover with a damp towel to keep from drying out.
- Grease – Butter the bottom and sides of a 13×9 non-stick baking pan. Line the bottom with parchment if desired to protect the pan when cutting later.
- Make the honey syrup – In a medium saucepan, combine 1 cup sugar, 1/2 cup honey, 2 Tbsp lemon juice, and 3/4 cup water. Bring to a boil over medium/high heat, stirring until sugar is dissolved, then reduce the heat to medium/low and boil an additional 4 min without stirring. Remove from heat and let the syrup cool while preparing baklava.
- Chop walnuts – Pulse walnuts 10 times in a food processor until coarsely ground/ finely chopped. In a medium bowl, stir together: 4 cups finely chopped walnuts and 1 tsp cinnamon.
Assemble the Baklava
- 10 layers – Preheat the oven to 325°F. Place 10 phyllo sheets into a baking pan one at a time, brushing each sheet with butter once it's in the pan before adding the next (i.e., place phyllo sheet into pan, brush the top with butter, place next phyllo sheet in pan, butter the top, etc.). Keep the remaining phyllo covered with a damp towel at all times. Spread about 1/5 of the nut mixture (about 3/4 cup) over the phyllo dough.
- 5 layers – Add 5 buttered sheets of phyllo, then another layer of nuts. Repeat four times with the remaining layers of fillo, butter and nuts. Finish off with 10 layers of buttered phyllo sheets. Brush the very top with butter.
- Cut pastry into 1 1/2" wide strips, then cut diagonally to form diamond shapes. Bake at 325˚F for 1 hour and 15 min or until tops are golden brown.
- Add syrup – Remove from oven and immediately spoon cooled syrup evenly over the hot baklava (you'll hear it sizzle). This will ensure that it stays crisp rather than soggy. Let baklava cool and rest uncovered at room temperature 4-6 hours or overnight for the syrup to penetrate and soften the layers. Garnish with chocolate and nuts if desired.
Notes
- 10 buttered sheets, 3/4 cup nuts,
- 5 buttered sheets, 3/4 cup nuts,
- 5 buttered sheets, 3/4 cup nuts,
- 5 buttered sheets, 3/4 cup nuts,
- 5 buttered sheets, 3/4 cup nuts,
- 10 buttered sheets and butter the top.
Nutrition Per Serving
Filed Under

More Pastry Recipes
Homemade pastries always turn heads, so once you try this Baklava, don’t miss these other classic dessert recipes:
- Eclairs
- Croissants
- Cream Puffs
- Apple Turnovers
- Churros
- Fruit Tart
- Rugelach
- Palmiers
- Cheese Danish
- Apple Danish
- Apple Roses


Hi Natasha I’M from a very tiny island in the Caribbean, Trinidad. I saw your recipe and decided to try it for Eid, which is today. To your original recipe, I added a blend of walnuts and pecans, powdered cinnamon and powdered cardamom and powdered clove. Followed everything exactly as you demonstrated in the video. For the honey sauce, I threw in some grated ginger, cause I’m fancy like that lol and when it was finished I drizzled the honey sauce, as well as some pure honey over the flakes once almost fully cooled. It was perfect! Thank you so much for this recipe!
That sounds amazing Zoey! Thank you for sharing that awesome review with me!
Would pistachios or almonds work as a walnut substitute? We have walnut allergies in our house! Thank you!
Hi Kate, yes those should work. Many of our readers have shared other options in the comments also. I hope that helps
Natasha, I saw this only once somewhere on the internet that just blew me away. This method makes it SO easy to handle and butter filo dough:
FILO DOUGH BUTTERING HACK:
Count out and lift up as many sheets of Filo as your recipe calls for in the first batch of layers before you apply your filling – (ex: 10 sheets).
Fold the stack of filo dough in half, like a book
Then working like opening a book, fold open the “cover”, and butter the inside of the fly leaf.
Then fold page 1 open, like you are reading the book, butter the left side of the open book.
Take the next “page”, fold it open to the left, and butter it.
Keep repeating opening and buttering until you get to the middle and the pile is lying flat open.
Turn the whole pile 1/2 turn so the unbuttered sides are again to your left.
Begin opening the “book cover” as before, and butter it.
Open the next page, butter it, repeat, yada yada yada until the stack is buttered on both sides.
NO LIFTING OR RIPPING OF WHOLE FRAGILE SHEETS.
Place your buttered flat pile in your buttered pan, apply your nuts or filling whatever and start working on your next stack –
Count out your 6 or 8 sheets, lift off the pile and fold the pile in half again,
Repeat as above, place this buttered flat stack on top of your filling in the pan, repeat until
You have filled your pan with buttered sheet stacks and filling.
Thank you so much for sharing that Katya!
I love to bake this is the first time i have tried making this and it turned out awesome.Thank u for sharing and I will be making it again in the near future.
I’m so happy to hear that! Thank you for sharing that with me!
Looks great and I am now temped to try a recipe I have been thinking about, but avoiding. Is the referenced nonstick baking pan different? I thought you were supposed to avoid using metal utensils with nonstick surfaces to avoid damaging the surface and prevent ingestion of the nonstick material. If you have a method for a regular metal pan I would love to know about it.
Great question, Dan. We don’t cut all the way to the bottom so that should help with protecting the pan. One of our readers wrote the following after experimenting with a glass dish “. I just made two batches of baklava using a glass 13 x 9 inch Pyrex dish. I lowered the heat by 15 degrees. I also used the glass dish because I could cut the dough without scratching the bottom of my Teflon pan.” I hope that helps.
That’s great! I will try to reply after I make it. Thank you for the quick response, and my applogies for not reading all of the other comments before questioning.
Dan,
I have made this delicious Baklava many times and I never use a non stick pan and it always comes out without any difficulty. I think because of all the butter used.
Yes! The butter helps it quite a bit!
That is great to know! Thank you very much for you help.
How much does the Fillo Dough cost?
Hi Kayla, this may vary based on stores, brands, and location. We normally find a pack at $3-$5.
Where do you find the dough? A regular grocery store? Thank you!
Hi Kim, yes, most of our local grocery stores carry phyllo dough
As a Greek, I am a pretty harsh baklava critic! I’ve cooked many in my lifetime and thought, “sure, I’ll give this recipe a go, but seriously, how good can it be?” Well I am extremely happy to report this is THE BEST BAKLAVA RECIPE EVER! Baked the night before, the flavour developed overnight and if you follow the recipe exactly, you will be rewarded with bliss. I love how it’s not overly sweet and so crispy. Natasha, I have judged you on your baklava recipe and now bow to you (as well as subscribe to your you tube channel). I’m so looking forward to making and baking lots more of your creations. Many thanks from Melbourne, Australia xxxx.
Wow! Thank you for this thoughtful and amazing feedback! I’m so happy you enjoyed our recipe!
Very good! The only thing I changed was doubling the cinnamon to two teaspoons because I ended up with an extra cup of nuts for some reason. I also forgot to thaw the phyllo dough overnight, so I let it sit out on the counter at room temp for a few hours and it turned out fine. The brand I used was Fillo Factory.
I’m so happy you enjoyed that. Thank you for sharing your great review!
I first made this recipe a month ago (my first time EVER making baklava). In my 25 years of cooking, this is probably the best thing that’s ever come out of my kitchen. My mom is visiting next week and I wanted to make some for her (totally to show off). Yesterday, I made a practice pan just to be sure I had it down. The nut layers separated from the phyllo dough (not just the top layer). All the nut layers. And the bottom was super soggy. I followed your exact recipe both times. Help! I have no idea what I did wrong.
Hi Misty! It’s so hard to say without being there, it has never been soggy for me. Was it sizzling when you poured over the baked baklava?
Yep! Sizzled gorgeously. Lovely sound. It all came together just like the first time. Every single thing. I made it Wednesday night and today I finally just said I was going to toss it because the bottom is so soggy no one will eat it. Same pan. Everything. (Actually, the two things I did different are 1) used a ladle instead of a spoon to pour the syrup on, and 2) could not wait overnight and took a piece out of the corner after 2 hours.) Neither of those seem like they would make a difference. But, I wanted you to have all the info.
I was so massively overwhelmed with how good this was I did tweet a picture a couple of months ago and hashtagged it #natashaskitchen so you could see it. It was gorgeous. Completely gorgeous.
Awww that’s the best! Thank you so much for sharing that with me!
Hi , i`ve been making baklava for over 40 years and sold it commercially 1 year . make sure your syrup is cooked right and not too thin – also be sure the syrup is not much beyond room temp.when poured If the syrup is too hot or too watery – it can turn the phillo into something like wet toilet paper. too much syrup can make it soggy especially if the syrup is not quite right. Also , you need to have an extremely delicate touch when handling or cutting baklava so things wont fall apart as i`m sure you`ve figured out by now . so people will only cut baklava half way thru and then pour on syrup that way no soggy bottom then they wait awhile and cut it fully – eventually the rest of syrup will work it`s way to the bottom so the phillo on top and bottom are more evenly saturated .
Thank you so much for sharing that with me.
Made it for many years but never used lemon , can not wait to try , thank you ! A chef told me many years ago to put my melted butter into a spray bottle , it is so much easier than brushing and works great .
That’s a great tip, Doris! Thank you for sharing that with me!
Thanks Natasha! The 10 people I shared the baklava all said it was the best they’ve tried. followed the recipe exactly except I substituted vanilla extract when I realized I didn’t have a lemon. It was my first time working with phyllo. My only tip is to run the blade of your large knife under cold water before cutting the diamond pieces before baking. It will help keep the phyllo from tearing. Excellent recipe!
I’m so happy to hear that! Thank you for sharing your great review!
Eriau, I found that placing the pan in freezer for 30 min. before cutting keeps the pieces together and doesn’t affect the outcome of the Baklava. I agree this is the best recipe ever!
Hi Natasha
I made this baklava and it came out perfect! After couple days it had a sour taste probably because of the lemon juice in the syrup, can I skip it or use less lemon juice next time?
And can I make the same recipe with pistachio?
Thank you for your recipes 👌
Hi Katy! yes, pistachio would work great! The lemon helps balance the sweetness but it would still work if you replaced the extra lemon juice with water.
Do you cut the diamonds all the way thru to the bottom of pan? These look fantastic.
Hi Christine, yes cut all the way through.
I always wanted to make this my Husband loves it! So today I tried your recipe it was very easy and my Husband is eagerly awaiting to try it. If it’s a hit I will be making it again.
Awww that’s the best! Thank you so much for sharing that with me :).
Hi! Allergic to walnuts and LOVE baklava with pistachios (Turkish style). Since pistachio is a truly different flavor from walnut, Natasha, would you make any change to the recipe, specifally the inclusion or amount of cinnamon? Thanks so much! ♥️
Hi Jean! Does your allergy extend to pecans (I know they are closely related). You can replace them with different nuts or even use a combination like pistachios, cashews, almonds.
Absolutely amazing!! I LOVE balklava, but don’t like paying $3-5 for a piece. Your recipe is the very best! I work with a “foodie” group and they all say it’s the best they’ve ever had. Thank you thank you thank you.
*and i don’t change a thing in your recipe-ingredients or directions ☺️
Hi Liana! I’m so happy you love our recipes! Thank you so much for the fantastic review and your encouraging words. I am smiling big reading your comment 🙂
Do you think if I have only 18 sheets of phyllo would work. My phyllo pkg is 16oz but it has only 18 sheets. What should I do?
Thank you.
Hi Suj, I haven’t seen packaging like that so be sure the package says phyllo or fillo dough. Are the sheets super paper thin and slightly transparent? Are they much larger where you would need to cut them to the size of the pan? You might try looking for the packaging that I photographed in the recipe. If anyone else has encountered this, please share any advice you have and thanks in advance!
Hi, butting in here again a little after the fact – yes the fillo factory makes 1 Lb. phillo dough – 18 or 19 sheets – I believe 18 x 13 inches and i swear it is thicker than other super market brands designed for 9 x 13 inch pans even though they say it is # 4 thickness which i believe is the thinnest gauge phillo dough made . I use 2 boxes per batch for my 17 x 12 pan.
Thank you so much for sharing!
Yes, 18 sheets will work. My box of phyllo is only about 18-20 sheets. I’ve never seen a box that has 40. I use half of it, 9-10 sheets at the bottom, then the nuts, then the rest of the 9-10 sheets on the top. Now if you want to get your baklava to have 40 sheets then you’ll need to buy 2 boxes of phyllo but I never do. Trust me, I do it all the time, my family loves it. 1 box of about 20ish sheets, whether it is for my baklava, spanakopita or tyropita.
I just put my first attempt at baklava in the oven! It’s my husband’s belated birthday dessert/dessert for Easter dinner tomorrow. I think I may have overdone it on the butter, as I ran out of it pretty quick and had to melt more 😬 but I can’t wait to see how it turns out! Thanks for sharing a recipe and tips that made this undertaking seem doable!
I hope you love it, Kristin!
My box of phyllo is only about 18-20 sheets. I’ve never seen a box that has 40. I use half of it, 9-10 sheets at the bottom, then the nuts, then the rest of the 9-10 sheets on the top. Now if you want to get your baklava to have 40 sheets then you’ll need to buy 2 boxes of phyllo but I never do. Trust me, I do it all the time, my family loves it. 1 box of about 20ish sheets, whether it is for my baklava, spanakopita or tyropita.
Thank you for sharing that with us!
The perfect baklava! First time ever making baklava and I used this recipe. Tasted better than anything store-bought/restaurant. My husband loves pistachios so I did 3 cups of pistachios and 1 cup of walnuts. It was my first time using phyllo dough and the damp cloth I placed on top end up snagging a few of the top layers (turned them into mushy balls), so I ran out and skipped a layer, but still turned out great.
Definitely saving this recipe and making again. Thank you!
I’m so happy you enjoyed that! Thank you so much for sharing that with me :).
Hi! Three university students from Kingston, Ontario, Canada here, and we tried this recipe because we had a late night hankering for baklava yesterday night. It turned out AMAZING today, and are having a hard time not eating the entire thing! So easy to follow, so tasty and not too sweet, just perfect. Thank you!!
Thank you for sharing this awesome review with me, Sonya!! I’m so happy you enjoyed that!
Thank you for this fantastic recipe! I do a ton of baking but I had never tried to make baklava until yesterday and picked your recipe after all the great reviews. I live in FL near a very prominent greek area and my friends all said this was better than any they had gotten at a restaurant. I did it with pistachios and it was lovely!
That’s just awesome!! Thank you for sharing your wonderful review 🙂
My daughter asked for baklava as her birthday dessert. My first thought was “you’ve got to be kidding me”. My second was “maybe I can cheat and buy it”. Then I found your blog and recipe and it sounded so doable I decided to try it. Your instructions were SO easy to follow and very straightforward that I had no problem putting it together (bit time consuming, but I expected that). I did have the problem a few others had with the upper layers not sticking and I thought the bottom layers weren’t quite moist enough (easily fixed with a little extra syrup next time, I think) but OH MY GOODNESS IT WAS SO FREAKING DELICIOUS! Crispy yet moist, sweet, but not cloying. My daughter specifically asked that it not have an overpowering honey taste and your syrup mix with the lemon was perfect for us. Thank you so much for a delicious recipe that I will absolutely make again and for helping a Mom make a wonderful homemade birthday dessert!
Thank you so much for your thoughtful review! I’m so happy you found this recipe!!