
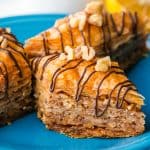
This Baklava is flaky, crisp, and tender, and easier to make than you think. I share my authentic Greek Baklava Recipe below with step-by-step directions that are easy to follow. Make this dessert and be prepared for oo’s and ahh’s, because this is the BEST baklava recipe I have ever tried.

This post may contain affiliate links. Read my disclosure policy.
Helpful Reader Review
“Love this recipe. I am Greek, but my baklava never turned out this good. I made your recipe for my husband’s family reunion. They were so impressed by how delicious it was. They said the syrup wasn’t too sweet like other baklava recipes and it’s the best they ever tasted.” – Tina ★★★★★
Baklava Video
Baklava can be a little tedious to make, but it’s truly simpler than you think. Watch my video, and you’ll be confidently buttering layers in no time! If you want a sneaky shortcut version, try my Baklava Cups.
Best Baklava Recipe
Store-bought baklava has nothing on this, and trust me, I’ve been around the block when shopping for baklava. This baklava recipe is well-loved wherever it goes, and with so many 5-star reviews, it is definitely a reader and family favorite! It’s also make-ahead and freezer-friendly, which is perfect for holiday baking.
My baklava recipe comes out beautifully flaky, buttery, and crisp. The flavor is incredible, since this one is not too sweet. You will love the hint of mellow lemony flavor, which offsets the sweetness and complements the cinnamon. It also keeps well for over a week on the counter, making it a great option to make ahead.

Baklava Ingredients
While this recipe is a Classic Greek Baklava, other varieties, such as Lebanese and Turkish recipes, swap the walnuts for pistachios and include rose water. My Baklava recipe calls for simple ingredients, most of which you can find in your pantry.
- Phyllo (fillo) dough – one 16oz package should have about 40 total paper-thin sheets. Do not use the thick sheets of fillo dough for this recipe. They are sold in the freezer section of the grocery store. Thaw according to the package instructions.
- Unsalted Butter – don’t skimp here! This keeps the fillo dough from peeling away.
- Walnuts – finely chop. You can swap them for almonds, pistachios, or a mix of nuts.
- Cinnamon – adds a great hint of flavor that’s traditional for Baklava
- Syrup ingredients – sugar, lemon juice, water, and honey
- Garnish – drizzle with melted chocolate or Chocolate Ganache, and chopped walnuts

How To Make Baklava
While it takes time to brush each layer, the result is worth every moment! Don’t skim on the butter, and you will be rewarded.
- Thaw phyllo dough in the refrigerator per the package instructions, then place it covered on the counter for 1 hour to bring to room temperature.
- Trim the phyllo dough to fit your 9×13 pan, covering it with a damp (not wet) towel to keep from drying out.

- Grease – use butter to coat the sides and bottom of a 13×9 non-stick baking pan. You can line it with parchment paper so you don’t damage it with your knife when slicing later.
- Make the honey syrup – heat the syrup ingredients in a medium saucepan while stirring until it boils, and then reduce the heat to medium-low and allow to cook for 4 more minutes without stirring. Set aside to cool.

- Chop Walnuts – pulse walnuts in a food processor until finely chopped, and then mix with cinnamon.

How to Assemble the Baklava
- 10 Layers – Preheat oven to 325°F. Start layering the phyllo dough, brushing each sheet with butter as you place it in the pan. Repeat this until you’ve added 10 layers. Then sprinkle 3/4 cup of walnuts over the top.
- 5 Layers – add 5 more sheets, buttering between each one, and then another layer of walnuts. Repeat this 3 more times. Finally, add 10 more layers of buttered dough on top.

- Cut the dessert into strips using a sharp knife, and then cut across to make diamonds. Bake for 1 hour and 15 minutes.

- Add syrup – spoon cooled syrup over the Baklava right after removing it from the oven. It should sizzle. Leave it uncovered on the counter to cool completely (4 hours or overnight). Then store covered with a tea towel for up to a week.

Tips for Making the Best Baklava
Follow these simple tips to make homemade baklava easy.
- Use a 13×9 pan with straight corners that fits the pastry to the edges. Avoid pans with angled corners that fan out, as they can cause the syrup to pool at the edges and make the top of the baklava dry. If you choose a larger pan, increase the syrup amount by 25% so you don’t run out. You can also cut the recipe in half using an 8×8 pan.
- Don’t skimp on the butter, especially on the top layers, since that can cause them to flake off. You can melt a few more tablespoons if you run out.
- Sizzle – the sound you’ll hear when you spoon the syrup over the hot pastry. This keeps it from getting soggy.

My Baklava recipe has so many layers of irresistible textures and flavors! The crispy layers of dough are perfectly complemented by the honey syrup and crunchy nuts. I hope it becomes your new favorite dessert.

Baklava Recipe
Ingredients
- 16 oz phyllo dough, thawed by package instructions
- 1 1/4 cups unsalted butter, 10 oz or 2 1/2 sticks, melted
- 1 lb walnuts, finely chopped, about 4 1/4 cups unprocessed
- 1 tsp ground cinnamon
- 1 cup granulated sugar
- 2 Tbsp lemon juice, juice of 1/2 lemon
- 3/4 cup water
- 1/2 cup honey
- Melted chocolate chips & chopped walnuts for garnish, optional
Instructions
Preparation
- Thaw phyllo dough by package instructions (this is best done overnight in the fridge, then place it on the counter for 1 hr before starting your recipe to bring it to room temperature).
- Trim phyllo dough to fit your baking dish. My phyllo package had 2 rolls with a total of 40 sheets that measured 9×14, so I had to trim them slightly. You can trim one stack at a time, then cover with a damp towel to keep from drying out.
- Grease – Butter the bottom and sides of a 13×9 non-stick baking pan. Line the bottom with parchment if desired to protect the pan when cutting later.
- Make the honey syrup – In a medium saucepan, combine 1 cup sugar, 1/2 cup honey, 2 Tbsp lemon juice, and 3/4 cup water. Bring to a boil over medium/high heat, stirring until sugar is dissolved, then reduce the heat to medium/low and boil an additional 4 min without stirring. Remove from heat and let the syrup cool while preparing baklava.
- Chop walnuts – Pulse walnuts 10 times in a food processor until coarsely ground/ finely chopped. In a medium bowl, stir together: 4 cups finely chopped walnuts and 1 tsp cinnamon.
Assemble the Baklava
- 10 layers – Preheat the oven to 325°F. Place 10 phyllo sheets into a baking pan one at a time, brushing each sheet with butter once it's in the pan before adding the next (i.e., place phyllo sheet into pan, brush the top with butter, place next phyllo sheet in pan, butter the top, etc.). Keep the remaining phyllo covered with a damp towel at all times. Spread about 1/5 of the nut mixture (about 3/4 cup) over the phyllo dough.
- 5 layers – Add 5 buttered sheets of phyllo, then another layer of nuts. Repeat four times with the remaining layers of fillo, butter and nuts. Finish off with 10 layers of buttered phyllo sheets. Brush the very top with butter.
- Cut pastry into 1 1/2" wide strips, then cut diagonally to form diamond shapes. Bake at 325˚F for 1 hour and 15 min or until tops are golden brown.
- Add syrup – Remove from oven and immediately spoon cooled syrup evenly over the hot baklava (you'll hear it sizzle). This will ensure that it stays crisp rather than soggy. Let baklava cool and rest uncovered at room temperature 4-6 hours or overnight for the syrup to penetrate and soften the layers. Garnish with chocolate and nuts if desired.
Notes
- 10 buttered sheets, 3/4 cup nuts,
- 5 buttered sheets, 3/4 cup nuts,
- 5 buttered sheets, 3/4 cup nuts,
- 5 buttered sheets, 3/4 cup nuts,
- 5 buttered sheets, 3/4 cup nuts,
- 10 buttered sheets and butter the top.
Nutrition Per Serving
Filed Under

More Pastry Recipes
Homemade pastries always turn heads, so once you try this Baklava, don’t miss these other classic dessert recipes:
- Eclairs
- Croissants
- Cream Puffs
- Apple Turnovers
- Churros
- Fruit Tart
- Rugelach
- Palmiers
- Cheese Danish
- Apple Danish
- Apple Roses


This is the 3rd year I have made it and I stick to your recipe without adding or substituting and it always turns out great. Everyone loves it. I have made it 3 times (so far) during the Holidays this year. My daughter makes cookies trays for friends and co workers and this year she asked me to make Baklava to include with her cookies. I think I’ve said it before but again Thank You for sharing this recipe and Merry Christmas!
That’s so great, Diane! Sounds like you found a new Holiday tradition & favorite recipe! Thank you for that wonderful review, Merry Christmas!
Just made this with my 21 year old son. Terrific recipe!! Thank you!!
I’m so happy you enjoyed that. Thank you for sharing that with us!
Super easy to make and tastes amazing!!! The syrup was a little honey heavy/too sweet for me but will definitely make this sometime again
I’m so glad you liked that, thank you for sharing that with me, Emma!
Just got it out of the oven and it smells so good. Did have one problem. When I was cutting the diagonals, the top layers started to peel back. Any suggestions on how to keep this from happening?
Hi Diane, It helps to hold down the layers gently with your fingertips as you slice. It also helps to have a very sharp knife.
I put it in the freezer for about 20 minutes before cutting and it works well for me. I saw a comment about this last year and decided to try and it works.
That’s just awesome!! Thank you for sharing your wonderful review
Diane thanks for the suggestion about the freezer. It cut so much easier this time around and it looks like my top layers stayed better connected than they did the first time.
Does this help it stay together?
Baked this before and find it to be the best recipe I’ve ever tried Thanks If I bake it in a 10” round pan next time, do you think I’d have to alter the recipe?
Sounds like you found a new favorite, Tom! That’s so great! I have not tested that in a 10″ pan to advise, if you experiment, let me know how you liked the recipe.
Can’t wait to try this recipe
I made this for the first time in September 2019, and my oh my, was I impressed with myself, lol.
This was the best Baklava I’ve ever had, and I love this treat and have had a lot! I made it for a party, now people request me to make it. LOL!!!
It’s definitely not the easiest dish, but WOW is it just sooooooo good!
I’m so happy to hear that! Thank you for sharing your great review!
Hi Hana, we have always stuck with the traditional form, adding a drizzle of chocolate to the top. I think it would be an excellent experiment. From a quick google search, the top result for chocolate baklava has 1 cup of Nutella warmed for 30 seconds to melt it and they drizzle on each layer before adding the nuts over the drizzled nutella. If you test that out, please let me know how it goes. A chocolate baklava would be so yummy!
Hi Natasha. Thanks so much for this recipe. I’m about to make it for a Christmas party. Can I add chocolate chips to the nut mixture to make it a Chocolate Baklava? I’ve also seen that I can add Nutella at the bottom to make it a Chocolate Baklava? Please let me know. Thanks!
I haven’t tried the recipe yet but I was thinking that I would toast the walnuts before chopping them for extra flavor. any thoughts?
Hi, I haven’t found it necessary but you could if you prefer the toasted flavor.
Hi Natasha my name is Rose and I tried your recipe for the baklava and I want to thank you so very much because everybody I let try absolutely loved it!! It’s great that you write down the recipe the way you do step by step and you have a video available to watch. Thank you so much once again I bring it out for Thanksgiving and everybody wants me to make it for them over and over I showed them your recipe but they don’t have the time or patience LOL.
It takes a-lot of it take make and a lot of patience not to eat it before serving lol. So glad you liked this recipe, Rose! Thank you that wonderful review.
This is absolutely delicious! A win win for sure! Thank you for sharing!
You’re welcome! I’m so glad you enjoyed that!
Made this baklava for the first time last year. It couldn’t have come out any better – so delicious!! My best friend is Greek and her brother in law was a pastry chef in Greece and she said Andreas would be so proud of you! I must say it did come out SLAMMIN! Well here we are again – Thanksgiving and I am making it again – 2 pans this time so that I have enough for the demand (and I would like some for my family and myself as well). Anyway – thank you so much for the recipe Natasha – I can’t wait to try your other dishes as well <
That’s just awesome!! Thank you for sharing your wonderful review, Marcia!
So, so good! Made this recipe last night and it was a huge hit this morning. We have about 8 pieces left. Lol! That’s how good it is! I improvised a little bit on the layering because I got tired of layering (Missing one layer). Smh. I also used three sticks of butter because I clarified it. Then, I used the trick of not cutting it all the way through. It still turned out super tasty. Will definitely keep this recipe and make it again!
That’s just awesome!! Thank you for sharing your wonderful review, Aja!
I have a pan of Baklava in the oven now! This is the third year I have made this delicious recipe. I make it with the ingredients exactly as is. I have been reading some comments and decided to try the butter in the spray bottle. It does make it a lot easier and faster. Also I put the pan in the freezer about 15 min. before cutting and the knife just slid right through!
Thank you so much for sharing that with me.
The best tasting & easiest recipe ever!
I’m so glad you enjoyed that, AJ! Thank you for that great review!
When you say let sit 4 to 6 hours or overnight – is that before adding the chocolate and do you cover it during this time period? Thank you!
Hi Cheri, Once it’s cooled completely to room temperature, that 4-6 hr resting period is before adding the chocolate. We cover with a tea towel, or loosely with plastic wrap.
I’ve made this 3 times. After the second time I thought that putting the melted butter in a spray bottle might work so I tried it the 3rd time. I got a small spray bottle at the dollar store and poured melted butter into it. It took about an hour off of my prep time!! I live in a dry climate so it helped with the phyllo that it took me so much less time. Make sure to shake the butter in the bottle or you end up with only the watery part at the bottom. I didn’t have to reheat the butter or put it in a hot water bath as someone suggested but it would have been easy enough to stick it in the microwave for a few seconds. I used the same amount of butter with both methods. I’m so excited about this method because it takes so much of the effort out and I will want to make it more often. Do make sure to thoroughly clean the spray bottle and sprayer after use so it doesn’t mold between uses. I sprayed a mild bleach solution through it. But for $1 you can always buy another one.
I’m so happy you enjoyed it. Thank you so much for sharing that with me.
Have a question .. i see that lot of recipes use vanilla extract in the syrup part .. is there a reason u didn’t ? is it not work with the syrup ?
Hi Anita, I don’t use it here because it doesn’t meld as well with the lemon and the lemon and honey add enough flavor.
Where do you get your filo dough from?
Hi Kelsey, we purchase that at our local grocery store
Hi Natasha, am going to make this baklava tomorrow for a dinner party, just wondered if when cutting it, does it not scratch the bottom of the non stick pan?
Thank you
Jean (from France)
Hi Jean, We don’t cut all the way to the bottom so that should help with protecting the pan. One of our readers wrote the following after experimenting with a glass dish “. I just made two batches of baklava using a glass 13 x 9 inch Pyrex dish. I lowered the heat by 15 degrees. I also used the glass dish because I could cut the dough without scratching the bottom of my Teflon pan.” I hope that helps.
Going to try this one.
I hope you love it, Carol!