
My easy Pumpkin Cheesecake recipe yields a perfectly spiced, creamy cheesecake nestled in a buttery homemade crust. It’s a fan-favorite that looks impressive on a plate, but it is easy to make (no water baths here!).

This post may contain affiliate links. Read my disclosure policy.
Helpful Reader Review
“Hands down the best cheesecake recipe. I will use any excuse, any holiday as an occasion to make this. Everyone in my family loves it.” – Alex ★★★★★
Pumpkin Cheesecake Video
Pumpkin Cheesecake has been one of the most popular recipes on my blog for years (the reviews speak for themselves!) I added a video tutorial and added some great tips to prevent cracks without using a water bath.
Easy Pumpkin Cheesecake Recipe
Pumpkin Cheesecake recipe mixes Cheesecake (the creamy filling and crunchy buttery crust) with Pumpkin Pie (the iconic pumpkin and fall spices) for the ultimate dessert.
This pumpkin cheesecake is so easy and delicious by itself, but it is just over-the-top impressive when you add some of my easy Butterscotch Sauce or Caramel and rum-infused Whipped Cream. Make this velvety-smooth pumpkin cheesecake up to 5 days ahead for easy holiday entertaining.

Ingredients for Pumpkin Cheesecake Crust
- Crackers – You can buy graham cracker crumbs, or crush 13 whole graham crackers for 1 1/2 cups of crumbs. You can substitute with gingersnap cookies, Vanilla wafers (Nilla Wafers), Shortbread cookies, or Biscoff (speculoos) cookies.
- Add-Ins – unsalted butter, sugar, and cinnamon

Pumpkin Cheesecake Ingredients
For consistent results, use room-temperature ingredients to get that velvety pumpkin cheesecake texture.
- Cream cheese – room temperature – to warm it up quickly, cut the cream cheese into small cubes, place them on a plate, and let sit at room temperature for 15–20 minutes
- Brown sugar – Use packed light brown sugar. “Packed” is when it holds its shape as it comes out of the measuring cup
- Pumpkin puree – I prefer Libby’s 100% pure pumpkin because (see why below). A well-drained homemade pumpkin puree will work. I’ve also tested this with canned pumpkin pie mix with great results.
- Eggs – To quickly bring to room temperature, set eggs in a bowl of warm water for 10 minutes.
- Sour cream – cuts the heaviness of the cream cheese, while giving a creamy texture
- Flour – acts as a stabilizer to give the cheesecake strength and prevent cracking, measure correctly
- Flavorings – Use store-bought or make your own Pumpkin Pie Spice and Vanilla Extract.

Pro Tip:
The best pumpkin filling for my cheesecake recipe is Libby’s brand because other brands tend to be too watery and lighter in color. This is the brand I recommend for all of my pumpkin recipes, from my Pumpkin Roll to Pumpkin Pancakes.

How to Make a Graham Cracker Crust
- Prep – Preheat Oven to 350˚F. Pulse graham crackers in a food processor until fine crumbs form. You could also put graham crackers in a large zip-top bag and use a rolling pin to crush them into fine crumbs.
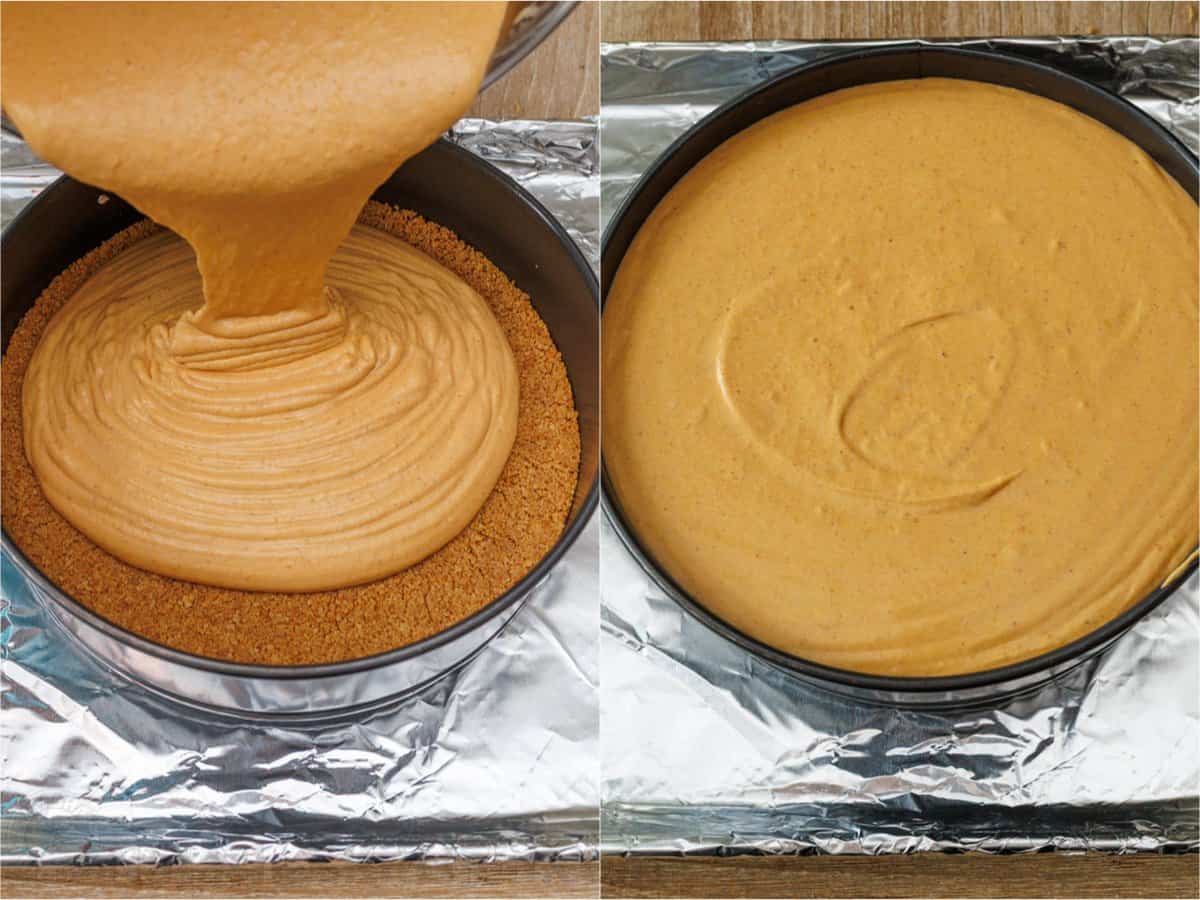
- Bake – mix the crust ingredients together in a bowl, and then press into a 9-inch springform pan. Place on a foil-lined baking sheet (to catch butter drips), and bake at 350˚F for 8 minutes. Transfer to a wire rack to cool. Reduce the oven temp to 325˚F.

How to Make a Pumpkin Cheesecake
- Beat the cream cheese and brown sugar for 5 minutes, scraping down the bowl as needed (Now it’s similar to a yummy frosting!)

- Make Pumpkin Filling – Whisk together the remaining filling ingredients, and add them to the cream cheese mixture on low speed until just combined.

- Bake – Pour the filling into the cooled pie crust, then tap it several times on the counter to release any bubbles. Place a loaf pan half-filled with water next to the cheesecake on the center rack and bake for 50-60 minutes. When the edges are set, but the center 3 inches is still wobbly, turn off the oven and prop the door open with a wooden spoon to let the cheesecake cool for 30 minutes. Note: If you have a gas oven, you can leave the door closed and turn the oven off since gas ovens cool much faster.
- Chill – Remove from the oven and run a knife around the edges to release tension and cool to room temperature on a rack, then cover and chill for 4 hours, or overnight.

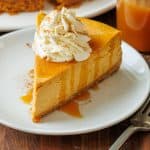
- Serve – Remove the springform pan and slice the cake. The cheesecake itself is not too sweet, so the toppings complement it nicely. I start with a drizzle of Caramel Sauce or Butterscotch Sauce on each slice, pipe on Whipped Cream, and dust with pumpkin spice.
Pro Tip:
I love serving pumpkin cheesecake with festive Rum-infused Whipped Cream (1 cup cream, 2 Tbsp sugar, & 1 tsp of rum instead of vanilla).

How to Prevent Cracks in Pumpkin Cheesecake?
- Reduce bubbles – Avoid overmixing or mixing on high speed, which creates air bubbles, and tap the filled pan on the counter to release air.
- Add water – Adding steam will keep the cheesecake moist to prevent cracks.
- Keep the oven closed – If you open the oven too early or too often, it creates temperature swings, which contribute to cracking.
- Avoid overbaking! This is HUGE – bake until the cheesecake is still wobbly in the center 3″. Since not all ovens are created equal, check for doneness in the last 10 minutes.
- Cool slowly – propping the door open with a wooden spoon prevents sudden temperature changes and prevents cracks.
- Loosen the cheesecake from the pan as soon as it comes out of the oven to reduce tension.
Sometimes, even if you’ve done everything right, you might get a tiny crack. If it does happen, cover the top with Caramel Sauce, Candied Pecans, Ganache, or whipped cream. It will still taste great!

Make-Ahead and Storage
Once the pumpkin cheesecake has cooled to room temperature, cover and chill until cold and fully set (at least 4 hours or overnight).
- To Refrigerate: Keep leftovers tightly covered in the fridge for up to 5 days. It keeps best if stored without toppings.
- Freezing: Tightly wrap the cheesecake in plastic wrap and foil and store in the freezer for up to 3 months. Thaw in the fridge overnight and add your toppings just before serving.

Everyone loves my popular pumpkin cheesecake recipe because the cheesecake is velvety and smooth with a buttery graham cracker crust. Top with caramel sauce and homemade whipped cream for the ultimate Thanksgiving dessert!
Pumpkin Cheesecake
Ingredients
For the Crust:
- 1 1/2 cups graham cracker crumbs, from about 13 whole graham crackers
- 6 Tbsp unsalted butter, melted
- 1 Tbsp granulated sugar
- 1/2 tsp cinnamon
For the Pumpkin Cheesecake:
- 24 oz cream cheese, room temperature
- 1 1/2 cups packed light brown sugar
- 15 oz pumpkin puree, Libby's brand, or well-drained homemade puree*
- 4 large eggs
- 1/4 cup sour cream
- 2 Tbsp all-purpose flour
- 2 1/2 tsp pumpkin pie spice, plus more to dust
- 1/4 tsp salt
- 1 Tbsp real vanilla extract
Optional Toppings:
Instructions
Make the Crust:
- Prep – Preheat Oven to 350˚F. Pulse graham crackers in a food processor until fine crumbs form.
- Bake – In a medium bowl, stir together the crust ingredients – graham cracker crumbs, sugar, cinnamon, and melted butter. Transfer into a 9-inch springform pan with 3" tall walls and use a large spoon to press crumbs into the bottom of your springform pan, going about 1/2" up the sides of the pan. Place on a foil-lined sheet pan to catch any drippings and bake at 350˚F for 8 minutes. Remove from oven and cool to room temperature.
Make the Pumpkin Cheesecake:
- Beat the cream cheese– Preheat to 325°F. In the bowl of your mixer with the paddle attachment, beat softened cream cheese and brown sugar on med speed until light and fluffy and without lumps (5 min), scraping down the bowl once to make sure you don't have chunks of cream cheese.
- Mix the pumpkin – In a separate bowl, using a whisk, stir together pumpkin puree, eggs, sour cream, flour, pumpkin pie spice, salt, and vanilla extract. Mix until well combined. Add this mixture to the cream cheese filling and continue mixing on low speed just until well combined, scraping down the bowl as needed.
- Bake – Transfer the filling into the pre-baked and cooled crust, and then tap the pan on the counter 15 times to release air bubbles. Place a loaf pan half filled with hot water (steam helps prevent cracks), and your cheesecake on the center rack and bake at 325˚F for 50-60 minutes* or until the edges are set and there is a slight wobble in the center 3" of the cheesecake when you jolt the pan. Turn the oven off and prop the door open with a wooden spoon for 30 minutes to cool slowly. Note: If you have a gas oven, turn the oven off and leave the door closed since gas ovens cool much faster.
- Chill and Serve – Once the cheesecake is out of the oven, run a knife around the edges of the pan (helps release tension), then cool on a rack until room temperature; about 2 hours. Wrap in plastic wrap and refrigerate for at least 4 hours or overnight. To serve, carefully remove chilled cheesecake from the springform pan, cut into slices, and add your desired toppings.
Notes
*Bake Times: Not all ovens are created equal so check your cheesecake for doneness before pulling it out of the oven. If your oven doesn’t preheat fully, it may take 60-70 minutes in the oven. Storage and Make-Ahead Tips:
- Make Ahead – bake and cool the cheesecake. Cover tightly and chill for up to 5 days in the fridge. Add toppings when ready to serve.
- Freeze – wrap the chilled cheesecake (I keep it in the mold), or individual slices in plastic wrap and foil, or place in a freezer-safe ziptop bag in the freezer for up to 3 months. Thaw in the fridge overnight and add toppings just before serving.
Nutrition Per Serving
Filed Under

More Fall Baking Recipes
Fall always puts me in the mood to bake, so here are a few of my favorite recipes we repeat each year.
- Apple Pie
- Pumpkin Bread
- Mini Pumpkin Pies
- Apple Turnovers
- Baklava
- Carrot Cake
- Apple Crisp
- Baked Apples
- Cinnamon Rolls


It turned out perfect! I baked in a water bath for exactly 1 hour at 350! I am soooo pleased. I used pumpkin purée because that’s what I had and I added 1 1/2 tsp of cinnamon. It’s not as dense of a cheesecake as I usually make. It’s much lighter and fluffier like a mousse. It’s great!
I’m so happy you loved it, Mary! Thank you so much for sharing that with me.
Wasn’t sure where to post this, so I figured I would post it on the next Natasha’s recipe I plan on making…..Sooooo, I received your cookbook today and it is absolutely stunning!!! So many of my families favorites recipes are in there!!! It is beautifully designed, good quality and you and your family are so lovely😁
And best of all is I know that no matter what I choose to make from your cookbook I will be AMAZING!!! God has truly blessed you and I am so happy for you!!! Congratulations on your cookbook!!!!
Thank you so much, Renee!
Wondering if you have any thoughts on substituting a gluten free flour for the 2TBSP of all purpose flour?
Hi Carolyn! I don’t have much experience with GF baking. I think it could work, but have not tested it myself.
I find Bob’s Red Mill Gluten Free Baking Flour in the light blue bag works great!
Cup4Cup GF Flour is what I used & nobody even realized it was GF – including the other desserts I’ve made using it. Bob’s Red Mill is a little more gritty & the change in texture is more noticeable – in my opinion.
Hi there. What is pumpkin pie mix. Usually I see pumpkin pie filling or pure pumpkin. Never seen anything named pumpkin pie mix. Thanks!
Hi Andrea, the pumpkin pie mix already has spices and sugar added to it whereas pumpkin puree does not, we find it in our local grocery store.
I had the same question as Andrea. So it is pre-made pumpkin pie filling in the recipe.
Hi Anne! Yes, that’s correct. You can reference the image above to see the can that I used for this recipe.
An hour is not long enough. Cracked. I bake a lot of cheesecakes. This is the first time I’ve had one undercooked after following the direction (added more time, I think it’s too much for a 9” pan) and the only time I’ve had one crack. won’t be making again…
Hi M, did you make sure your oven was fully preheated? I suggest investing in an oven thermometer to make sure your oven is preheating adequately. Also, make sure you are allowing it to cool slowly in the oven per the instructions which is important to finish setting the cake.
Oh right! When I was filling the pan I thought it was too much filling for a 9” as well! It filled the pan to the top! so I scooped out until it was about an inch from top of pan. (I quickly made a companion taster! ) But glad I did because mine baked perfectly in exactly an hour. I also baked in a water bath and no cracks!
Same thing happened to me. I bake cheesecakes all the time. Was a little unsure about no water bath and followed the directions to a t. The whole top of mine cracked. Not happy.
Hi Mary Lyn! Cracks are often caused by drafts and temperature changes or over-mixing of the batter. You can also try to release the cheesecake from the pan after you remove it from the oven by running a knife or offset spatula around the edges of the cake pan. This will prevent it from sticking to the sides. As the cheesecake cools, it will contract and pull away from the sides of the pan and this often causes it to crack. I highly recommend the use of an internal oven thermometer to see how your oven heats. If it runs too hot, it can cause cracks. I hope that helps.
Your recipe looks delicious. I was wondering if it can be done in advance and frozen?
Hi Patricia! I’m glad to hear that. Most cheesecakes can be frozen for longer storage (1-2months). I haven’t tested it with this specific cheesecake. If you freeze, let it thaw in the refrigerator.
I’ll be making this for the upcoming holidays and am very excited about it. The reviews are fantastic, hence the reason I am choosing this recipe. I did notice several people mentioning that their cheesecake cracked. I love making cheesecake and I always bake them in a water bath. I could try to explain it here but the easiest thing to do is to do an internet search and find thorough directions there. For instance: https://www.bakedbyanintrovert.com/prevent-your-cheesecake-water-bath-from-leaking/
Happy baking everyone and thank you Natasha for this wonderful recipe!
This looks very good. I usually use my canned pumpkin for pies and bars. Can I just use the pumpkin pie recipe I use to make pie? I raise what I eat for the most part. Know what I am getting.
Hi Randy! You’ll have to experiment with it. If it works in your pies and bars, I don’t see why it wouldn’t work here but without having tested this specific “homemade pumpkin pie mix” myself, I can’t advise.
Hello, I wanted to make this recipe for a family member’s birthday, however she has celiac disease and can’t eat the flour in the recipe. Is there any substitutes that could be used instead of the flour (such as cornstarch or another type of flour)?
Hi Tori, I have not tested a GF alternative to advise on the outcome, but one of my readers mentioned using King Arthur cup for cup GF flour successfully. Let us know how it turns out if you try.
We are a celiac family, I will be using Bobs Red Mill 1:1 AP flour. I think you could also use GF oat flour as well. Also be sure to use GF graham crackers for the crust. I typically use a blend of gf graham crackers and pecans for the crust and its amazing. I have also done a pecan/walnut crust using a bit of flour and butter, pressed in like the graham crust and its delicious in a cheesecake.
Thank you so much for sharing that with us, Stephanie! I hope you love it!
Hi Stephanie! I want to make this for Thanksgiving. My daughter-in-law is has cekuac;s. Can you please advise what ratio gf crumbs to pecans you use? Thank you!
If I’m working with pure pumpkin instead of “pumpkin pie mix/filling”, what should I add to the pumpkin purée to make it my own homemade version of pumpkin pie mix?
Hi Tj, Here’s what one of my readers wrote: “I used pumpkin puree not the pumpkin pie filling and it was fine! The added sugar from the pumpkin pie filling was not needed” Personally, I use pumpkin pie mix. You could also make this work with a good concentrated pumpkin puree such as Libbys with a little extra pumpkin spice.
I am going to attempt this recipe. I am knew to baking and seeing that with water bath, you recommend 70 minutes/50 minutes. Please explain what that means. Thanks
Hi Jerry! This recipe is adjusted to not need a water bath. You can view my other cheesecake recipe for the water bath process/instructions.
I hope you love the recipe!
I am now to the cooling stage and the pumpkin cheese cake looks so yummy. I have two questions, do I spray pan with cooking spray before making crust? My cheesecake cracked, did I do something wrong? How do I prevent that from happening next time?
Hi Michelle! Cracks are often caused by drafts and temperature changes or over-mixing of the batter. You can also try to release the cheesecake from the pan after you remove it from the oven by running a knife or offset spatula around the edges of the cake pan. This will prevent it from sticking to the sides. As the cheesecake cools, it will contract and pull away from the sides of the pan and this often causes it to crack. I highly recommend the use of an internal oven thermometer to see how your oven heats. If it runs too hot, it can cause cracks. I hope that helps.
I made this yesterday morning, including the easy caramel sauce. Dessert was a huge hit!!! I received many compliments.
***Great recipe***
That’s wonderful! I’m so glad to hear that, Dee!
Thank you Natasha!! I did this recipe and it is awesome!! My family loved it!
That’s wonderful! Thank you for sharing.
My hubby saw this recipe, and being a lover of all things pumpkin, he asked if I could try to make it for Christmas. I used canned pumpkin (not the mix) and added 3 teaspoons extra of pumpkin pie spice with no added sugar, and it turned out perfect! Very pumpkiny. Keep in mind, I have never made a cheesecake before! My hubby said it was the best cheesecake he’s eaten, and my son loved it as well. It paired very well with the caramel sauce! Thank you for posting this recipe!
That is a delicious choice for a Christmas dessert and I am so happy you loved it!
Awesome recipe! I haven’t made the caramel sauce or whipped cream yet, but the cheesecake alone is phenomenal! Thank you for sharing!!
You’re welcome, Stephanie. I hope you’ll love both recipes!
Thank you for this recipe. I made it following your instructions, but even after the hour at 350° plus the 45min with the oven cracked, it still wasn’t done. I just baked it for another 50min after it had cooled for an hour in the fridge (after getting to room temperature) and it still looks uncooked all the way. I’m not experienced with making cheesecakes, though. Should I bake the next batch for 90min then 45min venting? I used a 10″ springform pan and single batch recipe. Thank you!
Hi Nikki! I make this in a 9” springform pan and do not have any issues. If you’re using a larger pan, it may actually get done faster, not take longer.I would look over the recipe again to make sure you did not miss anything or do anything differently.
Be sure to bake on conventional mode and not convection. Every oven bakes differently so I also highly recommend using an internal oven thermometer and fully preheating your oven before baking. I hope you have better results on the next batch.
Hi! This is my fav recipe ever!! The first time I made it it was perfect. I just made again and it sunk? Any suggestions? I made sure all ingredients were room temp.
Hi Merissa, was the oven fully preheated? Also, did you make sure to let it cool per the instructions? Lastly, make sure it’s on regular bake mode and not convection which would cause it to become overbake – if it’s overbaked, it’s more likely to sink.
WOW! The sweet & savory cheesecake, paired with the salty caramel sauce, is the perfect combo!! Everyone loved it! My cheesecake had a big crack in it after baking but we covered the whole thing with homemade whipped cream to hide it 🙂 I’ll be passing this recipe on & saving it for sure, it’s a definite winner! Thanks!
You’re welcome, Kelly. Thank you for your good comments and review!
Just made this for Thanksgiving and it was a hit! Turned out delicious. I did double the recipe for the sweet potatoes and kept everything the same. One important point. I used pumpkin puree not the pumpkin pie filling and it was fine! The added sugar from the pumpkin pie filling was not needed. Only issue is the cheesecake did crack even though I opened the oven slightly. No biggie, just covered it with whipped cream at the end.
This is my family’s FAVORITE cheesecake recipe! My sister and I have made this for various family/holiday functions and it’s consistently the star of the show!
That’s just awesome! Thank you for sharing your wonderful review!