
This easy Rugelach Cookies recipe makes flaky, soft, and perfect crescent-shaped pastries filled with sweet jam and dusted with powdered sugar. They are really simple and quick to make; in fact, you don’t even have to wait for butter to soften. Make these cookies for your Holiday cookie platter, or any time!

This post may contain affiliate links. Read my disclosure policy.
Helpful Reader Review
“Thank you so much Natasha for your website, I love Rogaliki (rugelach) but never could make them myself. And I just did it and can’t stop eating them!” – Olga ★★★★★
Rugelach Video
Rugelach cookies are classic Holiday cookies from Eastern Europe that are loved all over the world. They may look sophisticated, but watch the video to see how easy they are to make.
Easy Rugelach Recipe
My mom calls this rugelach recipe “Rogaliki” and whips them up all the time, especially during the holidays and for special occasions. Since it’s so much a favorite, I even featured it in my Natasha’s Kitchen Cookbook.
My mom makes her own blackcurrant preserves for the filling (oh goodness, if I could just let you lick the spoon), but you can use raspberry, strawberry, or any flavor you prefer.

Rugelach Cookie Ingredients
You’ll need just a few simple ingredients to make this rugelach cookie recipe, but they will surely become a favorite Holiday cookie recipe in your house.
- Flour – all-purpose works just fine here, but be sure to measure it correctly to ensure the pastry has the best texture.
- Rapid rise yeast – also called instant yeast. No need to proof this yeast; just make sure it’s not expired and was sealed properly.
- Unsalted butter, melted and then cooled, to easily incorporate into the dough. You can partially melt in the microwave, then stir to melt and cool at once.
- Whole milk – warm to 110°F to help activate the yeast. Make sure it’s not too hot or it can deactivate the yeast.
- Sugar – granulated sugar to sprinkle over the dough before rolling. Don’t forget powdered sugar for dusting the top since the cookies don’t contain much sugar without it.
- Jam – any flavor of your choice, but be sure to choose a thicker-textured jam so it won’t run out of the sides of the cookie. An even consistency jam works best.

Rugelach Variations
Classic rugelach cookies come in so many flavors, oftentimes with nuts or fruit mixed in. Here are a few ideas to finely chop with a food processor before sprinkling over the dough:
- Nuts – try almonds, pecans, or walnuts for Walnut Rugelach
- Dried Fruit – cranberries or raisins
- Chocolate rugelach – mini chocolate chips or chocolate shavings, or swap the jam for chocolate hazelnut spread
How to Make Rugelach Cookies
A stand mixer with a paddle attachment is easiest, but you can use an electric hand mixer to mix the cookie dough.
- Whisk together the flour, yeast, and salt in a small bowl and line two cookie sheets with parchment.
- Make the Dough – use a stand mixer or electric hand mixer to combine the butter and milk, and then reduce the speed to medium-low and add the flour mixture a little at a time. Switch to the dough hook and continue mixing in the stand mixer or knead by hand for 3 minutes until very soft, but not sticky. Rest on the counter for 30 minutes.

- Roll the dough – Divide the rugelach dough into 5 pieces, and then cover 4 pieces with plastic wrap while rolling out the one piece to about a 10″ circle with a rolling pin.

- Make the cookies – sprinkle 1/2 Tbsp of sugar over the dough disk, then use a pizza cutter to cut into 12 slices. Add a small dollop of jam (about the size of a marble) to the large side of each triangle and then roll each triangle up, starting from the jam side. Place on the cookie sheet tail-end-down, then repeat with the other 4 pieces of dough.

- Proof in a warm place (<100°F) for 30 minutes in a warmed oven or until puffed. Do not overheat, or you will exhaust the yeast. You should see them visibly puff, but not double (see the photo below for before and after). Preheat oven to 350°F.

- Bake for 25 minutes, or until they just begin to turn golden, rotating the cookie sheets halfway through baking, then cool on the baking sheets for 10 minutes. DO NOT OVERBAKE. You can also flip them to see if they are turning golden brown on the bottom.
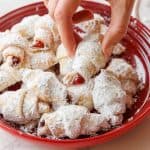
- Add the confectioners sugar – generously roll the WARM cookies in a bowl of powdered sugar and set on a serving tray. The powdered sugar will stick better if the cookies are warm.

Pro Tip:
Don’t skip that confectioner’s sugar step! The Rugelach cookie dough doesn’t have any sugar besides the little bit we sprinkled on the dough, so it isn’t very sweet and can use a bit of powdered sugar to round out the flavor.

More Christmas Cookie Recipes
‘Tis the season for baking! Once you make these Rugelach cookies, round out your cookie tray with these festive Holiday Cookie Recipes:
- Almond Snowball Cookies
- Palmiers Cookies
- Angel Wing Cookies
- Christmas Sugar Cookies
- Gingerbread Cookies
- Cranberry Cookies
- Russian Tea Cakes
- Chocolate Crinkle Cookies
- Baklava

I hope you fall in love with my Mom’s classic Rugelach cookie recipe. These tasty treats are some of my favorites to make and share with friends. The rolled shape, sweet jam filling, and buttery dough make for a beautiful and delicious cookie. Add these rugelach cookies to your Holiday baking list!
Rugelach Cookies
Ingredients
- 4 cups all-purpose flour, plus more as needed
- 2 teaspoons rapid rise or instant yeast
- ½ teaspoon fine sea salt
- 1 cup unsalted butter, (2 sticks), melted and cooled to 110˚F
- 1 cup whole milk, warmed to 110˚F
- 2½ Tablespoons granulated sugar, divided
- 1 cup berry jam or blended preserves, preferably a thick consistency
- 1 cup confectioners’ sugar, for finishing
Instructions
- Prep – Line two rimmed baking sheets with parchment paper and set aside.
- Make the dough – In a medium bowl, whisk together the flour, yeast, and salt and set aside. In the bowl of a stand mixer fitted with the paddle attachment or in a large bowl with a hand mixer, combine the butter and milk. With the mixer on medium-low speed (or speed level 2 if your mixer has this setting), add the flour mixture 1 cup at a time, letting it incorporate with each addition and scraping down the bowl as needed. Continue mixing for another 3-5 minutes, or knead by hand. The dough will be soft and won't stick to hands or the mixing bowl. If the dough is still sticking to your fingertips, add more flour, 1 tablespoon at a time. Cover the dough with plastic wrap and let it rest at room temp 30 minutes.
- Roll the dough – Divide the dough into five equal pieces and loosely cover them with plastic wrap. On a clean, smooth surface, use a rolling pin to roll one piece of the dough into a 10-inch circle, less than ¹⁄8 inch thick.
- Make the cookies – Sprinkle ½ tablespoon of the granulated sugar over the entire surface of the dough disk. Using a pizza cutter, cut the dough into 12 even triangle slices (as you would cut a pizza). Add a marble-size portion of the jam over the wider part of each dough triangle, then roll up the dough from the jam side, keeping a fairly tight roll as you go. Place the rolled rugelach tail side down on the prepared baking sheet, about 1 inch apart. Repeat with the remaining dough.
- Proof – Let the rugelach proof in a warm place (not hotter than a 100°F oven) for 30 to 45 minutes (or at room temperature 60-90 minutes), until they have visibly puffed. Place the oven racks in the top and bottom thirds of the oven and preheat the oven to 350°F.
- Bake the rugelach for 25 to 30 minutes, or until the tops are just starting to turn lightly golden, rotating the baking sheets halfway through. Let the rugelach rest for 10 minutes on the baking sheets.
- Add confectioners’ sugar to a medium bowl. Roll the warm rugelach, a couple cookies at a time, in the confectioners’ sugar and transfer them to a large serving tray – it's ok to stack them. Don’t be tempted to skip the confectioners’ sugar step; the rugelach aren’t overly sweet, and it helps round out their flavor.
Notes
- Store baked cookies in an airtight container at room temperature for 3–4 days. The powdered sugar will soften slightly over time, which is normal.
- To freeze baked cookies, cool completely, then freeze for up to 3 months. Thaw at room temperature and dust with more powdered sugar if needed.
- For make-ahead, shape and proof the cookies. Freeze unbaked cookies on a parchment-lined baking sheet until firm, then store in a freezer-safe container for up to 3 months. Bake directly from frozen, adding 2–4 minutes to the bake time.
Nutrition Per Serving
Filed Under


Do you think I could spread brown sugar on the disks of dough and sprinkle with cinnamon before rolling? Then omit the icing sugar?
BTW: Love your recipes!
Hi Pat! I think that could work. Let us know if you test it.
I did! They turned out pretty good! I would make them again, using a little more brown sugar, or sprinkle them with sugar before baking? (I used almost 1 tbsp per dough disk!) Taste like mini cinnamon rolls! The dough was a dream to work with. Can’t wait to make them again.😋
Hi Natasha I absolutely love your recipes. Could share more of Ukrainian recipes with us. Thank you
Hi there! You can check the recipes here.
Can this recipe work if you cut it in half?
Hi Christina! Yes, it will still work.
I hope you love the recipe.
Wow! You actually answered me yay. I make a lot of your recipes
I’m so glad you loving my recipes, Christina!
Excellent recipe and your instructions are so easy to follow. I put the exact amount of preserves in each one but the preserves all melted out. Any suggestion on what I might have done wrong.
I’m so happy to hear the instructions were helpful. We recommend a thick consistency preserve, the thin ones could melt out as you mentioned and that is the likely culprit here.
Hi can you use almond flour for gluten free
Hi JoAnn, I have not tried that to advise, if you experiment, please let me know how you like it.
Best homemade cookies I have ever made. I just made them right now. So delicious.
So happy you loved them!