
This post may contain affiliate links. Read my disclosure policy.
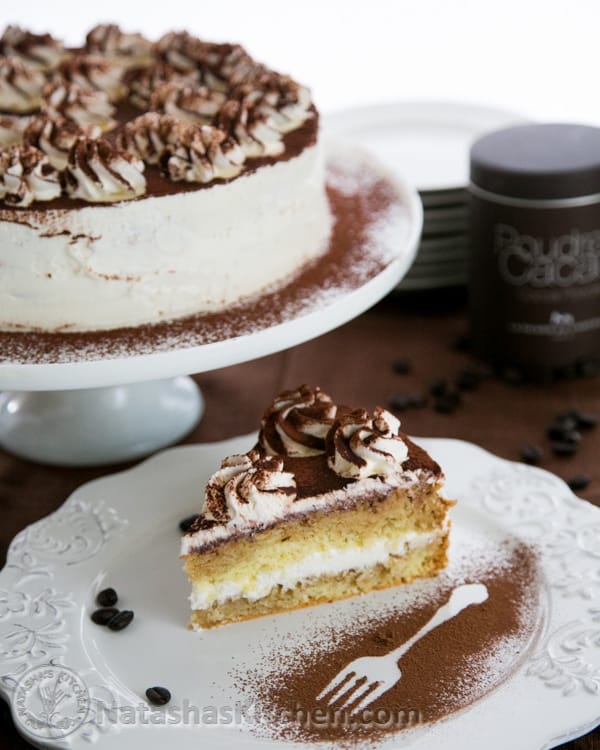
Clearly tiramisu is an Italian dessert. I’d call this the Russian adaptation. What makes it so? Instead of ladyfingers, I’m using a basic biskvit cake recipe (you may know it as biscuit). Biskvit is an excellent European sponge cake and it doesn’t get mushy or soggy.
The ingredients are so easy and practical (a non-mascarpone version) and it turns out delicious. The frosting is light and fabulous. This version actually tastes good for a couple of days after it’s made. Hope you enjoy it, my family loves it!
Ingredients for Biskvit Tiramisu Cake:
6 large eggs, room temp
1 cup all-purpose flour, sifted *measured correctly
1 cup granulated sugar
1 tsp vanilla extract
Ingredients for Tiramisu Frosting:
1.5 cups heavy whipping cream, very cold
1 (8oz) stick cream cheese, room temperature
1/2 cup granulated sugar
Ingredients for Tiramisu Coffee Syrup & Topping:
1 1/2 cups Strong coffee, room temperature or cold
2 Tbsp granulated sugar
2 tsp rum
1 Tbsp unsweetened Cocoa Powder for dusting the finished cake
Watch How to Make Tiramisu Cake:
Here’s what the previous tiramisu looked like before I updated pictures:
 And now, the new and improved:


If you bake this cake, please do tag me on Facebook or Instagram so I can see your beautiful creations! Happy Baking and I hope you enjoyed the video!
Russian Tiramisu Recipe

Ingredients
Ingredients for Biskvit Cake:
- 6 large eggs, room temp
- 1 cup all-purpose flour, sifted
- 1 cup granulated sugar
- 1 tsp vanilla extract
Ingredients for Tiramisu Frosting:
- 1.5 cups heavy whipping cream, very cold
- 1 8oz stick cream cheese, room temperature
- 1/2 cup granulated sugar
Ingredients for Tiramisu Coffee Syrup & Topping:
- 1 1/2 cups Strong coffee, room temperature or cold
- 2 Tbsp granulated sugar
- 2 tsp rum
- 2 Tbsp unsweetened Cocoa Powder for dusting the finished cake
Instructions
How to Make the Biskvit Cake:
- Preheat the Oven to 350˚F. Butter the bottom of a 9" springform mold and line the bottom with parchment paper (note: you can use two 9" cake pans, but keep in mind 2 pans will take less time to bake). Sift your flour.
- In the bowl of your stand mixer, add 6 eggs and beat on high speed with the whisk attachment for 1 min. With the mixer on, add the sugar in a steady stream and continue to beat on the highest speed for 8 min. The egg mixture should be thick, pale yellow and tripled in volume.
- Add 1 tsp vanilla and sift the flour into your batter. Fold the flour in with a spatula just until all of the flour is incorporated. Scrape from the bottom of the bowl to make sure you don't have pockets of flour trapped on the bottom. Be careful not to over-mix since you are relying on the fluffiness of the eggs for volume. Transfer the batter to your prepared pans.
- Bake 30 minutes or until the tops are golden brown and a toothpick comes out clean. Remove from the oven and let cool down 10 minutes, then remove cake from the pan and let cool on a wire rack. Once the cake is at room temperature, you can cut it in half to make two cake layers then remove the parchment paper. It should peel back easily.
How to Make Tiramisu Frosting:
- Beat 1.5 cups heavy whipping cream on high speed until stiff (mine took about 2 minutes with the whisk attachment). Don't over-beat it or it will be buttery. Transfer whipped cream to a medium bowl and refrigerate until ready to use.
- In the same bowl (no need to do the dishes yet), beat softened cream cheese and sugar on medium/high speed until smooth and creamy, scraping down the bowl as necessary to prevent rebel clumps of cream cheese.
- Use a spatula to fold whipped cream into the cream cheese mixture until well blended and refrigerate the frosting until ready to use. Fold until you no longer see streaks of cream cheese.
How to Make Coffee Syrup:
- Mix 1 1/2 cups strong coffee with 2 Tbsp sugar and stir until sugar dissolves. Stir in the rum.
Assembling the Tiramisu Cake:
- Place one of the cakes on a cake platter (note: use the prettiest, flattest side for the top of the cake)
- Brush half of the coffee syrup over the bottom layer (a brush provides for the most even distribution of syrup).
- Spread 1/3 of the frosting over the first cake layer. At this point, you can sift 1 Tbsp cocoa powder over the frosting
- Center the second cake layer over the frosting and brush the remaining half of the syrup over the second cake layer and spread the remaining frosting over the top and sides of the cake.
Decorating Your Cake:
- Decorate to your hearts delight. I used the Wilton Open Star 1M frosting tip for the remaining forsting and piped little designs all over the top then dusted generously with a good quality unsweetened cocoa. You could just dust the top with cocoa powder and add chocolate shavings. Chocolate coffee beans would be amazing as well.
Notes


Hi Natasha. Could i use a 9.5 inch spring form pan? Also how manycups of the frosting can i get from this recipe?
You could use a 9.5″ springform pan. Are you planning to put the cake into two pans or into 1 springform and cut it in half? You will get about 3 cups of frosting.
I plan to bake it in 1 springfrom pan then cut in half
That should work fine 🙂
I made this cake today, and it had a really overwhelming taste of egg. My mom didn’t enjoy it. Can you give me a tip on how I can improve this recipe?
Hi Jasleen, did you happen to watch the video recipe for this cake to make sure you are beating the eggs long enough to incorporate enough air into them? If you don’t beat long enough, they can be more dense and “eggy.” I hope that helps.
Can the cake layers be made ahead and frozen? If so how long would you thaw them for before frosting?
Yes! They freeze very well. Just put parchment or wax paper between the layers then wrap loosely in plastic wrap. They can thaw in about 45 min – 1 hr at room temp.
Is it possible to whip the egg whites separately and then fold them in last to make it fluffier?
You could and I used to do that but I’ve found that I have fluffier results when I just beat the whole eggs together. The only down-side is that you have to beat them longer than if you beat the whites and then blended them in. The first sponge cake I posted used that method. Here is a link if you want to take it for a spin: https://natashaskitchen.com/2010/08/02/biskvit-russian-cake-recipe/
Could this be made in a 9×12 pan? Recipe as far as measurements stay same? Any advice?
For a 9×12, I would use the cake base portion of this recipe: https://natashaskitchen.com/2013/01/15/strawberry-layer-cake-recipe/ because the recipe for the tiramisu will be too small to make a substantial looking cake in a 9×12. I’d recommend increasing the rest of the ingredients for the tiramisu 1 1/2 times. I hope that makes sense.
Hi Natasha! This cake looks delicious!!!! i am planning on buying the frosting bag+tips. I see you like the Ateco but use Wilton 2D ,1M, Do the Wilton tips work with Ateco bags? Does the Ateco set(with the 9″ pan on amazon) not have a similar star/flower tip? Thanks so much:) I love all your recipies:):):)
Hi 🙂 My Ateco set comes with the small star tip so I purchased the Wiltom 1M and 2D separately. I pretty much just use those two tips for most of my decorating. They aren’t an ideal fit in the bags but they work. I think Ateco makes the large tips too but when I was buying the larger tips, the Wilton ones were the ones in stock so I bought them. 🙂
hi i want to mak tiramuse and i dnt lik cream chees so wit out using creem chees can i mak ths ot instude of tat can i use anything else plz
im waitng for ur reply
You can use a different frosting if you like. I’ve had some readers make this with mascarpone instead and reported great results. Without testing the substitution myself, it’s difficult to say exactly how much you should substitute with.
hello dear, ivr got a question, should i have to set the cake in fridge for a night or should i have to serve it direct?
and can you write your recipe in grams and ml because i dont know how much 8oz or 1,5 cup is :/
thankx for your answer ♥
Without re-making the cake and weighing out the ingredients, I hesitate to try to approximate the grams. For liquids, 8 oz is 240 ml. You can either refrigerate overnight or serve it directly (right away). It will taste great both ways :).
can you substitute heavy whipping cream with whipping cream Or will the cake not turn out
Whipping cream does not whip up as well as heavy whipping cream and won’t hold it’s form as well. I’d suggest the heavy whipping cream for best results.
The recipe proved to be the BEST as all Natasha’s recipes. The biskvit was really easy to do. I didnt soak it very much because the cake was for kids mainly. Nevertheless, it is very tasty and smells so good. I really loved lightly sweetened frosting. Thank you Natasha!!!
I’m so glad you liked the cake. Thank you Oksana for your great review! 🙂
I would never had the guts to try making tiramisu until I came across this recipe. Made it once for my partner’s birthday a while ago & although the sponge deflated a little in the middle (probably due to something I stuffed up) I salvaged it with more frosting…he didn’t seem to notice/care. Given the picky-eaters in my small family, it disappeared within two days! I’m attempting it again tomorrow for dad’s birthday so here’s hoping I’m 2nd-time lucky!
Thanks for all the time & effort you put into your videos & comments Natasha! None of your recipes have failed me & it really helps to be guided through so well!
I am so glad you are enjoying the recipes!. I have recently discovered that it also helps if you do not grease the sides of the pan. That way the cake doesn’t pull away from the sides and stays more uniform in size and shape.
I don’t have a stand mixer. Can I still make this using a hand mixer?
Yes, ofcourse. 🙂 It’s just a little tedious by hand, but definitely ok to use a hand mixer.
Thank you for responding! =) I am going to make this for Valentine’s Day for my hubby. I must admit I converted him to loving coffee. Before he refused to go near it! =) I’ll let you know how it turned out! =)
It was a fail. Twice. I watched your video and my batter did look like yours but it still didn’t turn out right. =(
Did you bake it right away? What was it like that it didn’t turn out? Can you describe it? I’d love to help you trouble shoot.
The batter was still light and fluffy when I poured it into my prepared pan both times. The first time, the batter sunk in the center horribly and the cake was burnt after only 20 minutes and I didn’t open the oven door at all. So, I thought maybe if I lowered the temp to 325°the second time it wouldn’t burn. After 20 minutes, I checked on the cake and although it wasn’t burnt like the first time, the center was still sunk in but not nearly as bad as the first time. The second time I beat the egg mixture longer (15 minutes) because the first timr I only beat it for 7 minutes. I’m so embarassed and sad. =(
Oh man what a bummer. I’ve never had the cake burn at 350˚F though. Did you use a standard sized oven in bake mode? (not convection?). And you baked in the center of the oven?
Yes, it is a standard oven. And yes, I baked it in the center of the oven both times. The taste was great but the cake itself flopped on me. It looked nice after I used extra frosting to fill in the sunken areas haha.
I’m still not sure why it would have sunken in the center? I’m glad you were able to salvage it with frosting. 🙂
Hi Natasha.
Thanks for your beautiful recipe. Just found it and definitely gonna try this cake.
I have one question. What if I use 8″ pan for the cake? Do I have to bake longer with higher temperature? Or what should I do to make perfect biskvit cake in smaller pan (mine is 8″x3″)?
Looking forward for your reply.
Thanks! 😀
You can put it into an 8″ pan and bake at the same temperature for a few minutes longer. You will just have a slightly taller cake. 🙂
thanks for your answer. if you dont mind, one more question.. is it too much if I put a little amount of Rum and vanila extract for extra flavor in the frosting?
I think that is a great idea! I love it! 🙂
Natasha.. i had an embarassing moment, my family came from another state to vist and i made this cake… but the bottom was so dense and rubbery like overcooked omlette or something, hard to cut through wit a fork.. and it had clumps of flour in the dough. Lol. I was being so careful mixing the flour into the eggs so they wouldn’t collapse, was i too careful. Oh my… :(((
Did you possibly wait to bake the layer? It’s best to bake it right away and not let it sit too long on the counter after the batter is made. The most likely culprit is not beating the egg portion long enough – this is what gives volume to the cake. You might beat the egg portion longer next time before folding in the flour. Also, when folding in the flour, be sure to scrape the bowl from the bottom up so you don’t get any hidden clumps of flour in the batter. Have you watched the video I created for this cake to compare your cake batter to what I had?
Hi Natasha! I made this cake yesterday, 5 days after my third son was born. Kind of post factum (postpartum?) birthday cake.. I’d like to send you the picture of my design… The cake turned out great, moist and tasty. My only question is – what can be a substitute to the cream cheese, except mascarpone? My husband doesn’t like cream cheese…
I guess you could just make a whipped cream frosting by itself. That would still probably taste great. I’d love to see your cake! Could you share it on my facebook page? Or email me: natashaskitchen @ yahoo.com (no spaces). Thanks so much for writing Maria 🙂
what do you think about sour cream instead of cream cheese? My husband wants this cake again (actually even with cream cheese)..
I think the sour cream would be too loose for the frosting and it wouldn’t stay put very well. You probably wouldn’t be able to pipe any of the frosting design onto the cake. I’m so happy your husband liked it (even with the cream cheese) :).
Mmm,I actually don’t want to pipe, just spread it on the layers and sprinkle with shredded chocolate.Hope it will hold.
That should work fine 🙂
I made this cake for Christmas party and this cake was so delicious.Everyone loved it.Thank you Natasha for wonderful recipe.
I’m so so happy you all loved it! 🙂
I just wanted to thank you for the recipe! I made this cake for my boyfriend’s Thanksgiving dinner last night and it was a huge success. There were a lot of desserts but this cake disappeared within minutes! I was showered with compliments. And it was so easy to make! I completely forgot to add vanilla to either batter or the cream and used Malibu coconut rum because that’s the only thing I had on hand and the cake turned out delicious! Thanks again, and keep posting!
I’m so happy it was a hit at your party! I love the idea of adding the coconut rum; I’m sure it was incredibly tasty! Thanks for sharing your great review 🙂
Yummy! Love this cake, and it’s so easy to make! Wish my decoration looked as neat as yours, but it was still yummy 🙂
I’m so glad you enjoyed it and I’d still love to see it if you posted a pic online. I’m sure it was gorgeous! 🙂
Hi Natasha, and thanks for the lovely and clear quick directions for your Tiramisu cake. I will be attempting to make it for a dinner party. I like baking but don’t do it often enough :). This recipe seems easy enough for me. I’m surprised that the cake part has so little ingredients and no baking powder or salt. I guess, I’m worried about how it’s going to turn out for the dinner. Anyway, I’m going to make it! I’ll post a picture and the comments I hear at the dinner party. Thanks.
I can’t wait to see the photo! As long as you beat the eggs long enough and don’t overmix after adding flour, your cake will rise and become a lovely sponge cake. That really is all you need for this traditional European sponge cake. I hope you LOVE it! 🙂 P.S. Did you watch the video I posted for this one?
Hi, yes, I watched the video, it’s perfect! 🙂 I have a picture of the cake and will try to post it. We haven’t cut into yet! How do I attach a pic.? I beat the eggs exactly as you instructed and it was fine.Thanks
Thank you Barbara 🙂 Unfortunately there’s no way to attach a picture on my blog; but that would be a cool feature! You could share the picture on my facebook page or tag me if you share it on your facebook page or Instagram so I could see it.
Hey Tash. Just made a very similar version of this cake. Didn’t have rum, so I used Jack Daniels whisky instead. I used half measurements because it’s just for me and my mommy. The sponge came out flat (my eggs weren’t great), so I made a second sponge in the form of a conventional chocolate choc sponge. I Can’t wait for tomorrow to do the taste test. Thanks for an amazing recipe. 😀
Let me know how it turned out! Did your batter look the same as mine before you put it in the oven? It should have been thick and fluffy before baking, otherwise, it probably means you should have beat the eggs larger. Did you have a chance to watch the video tutorial for this cake?
It came out great. I’ll try send a pic. I saw the recipe on you tube for the first time, That’s where I discovered your awesome blog. I used a one-legged hand mixer…lol, So you are right I should have beaten the eggs for longer. Thanx again.
I was wanting to make this for a special occasion. This recipe sounds really good. Was wondering how much cocoa to add to make this a chocolate cake?
Hi Lizzy, You can substitute 2-3 Tbsp of cocoa for flour, so remove 2-3 Tbsp flour and add 2-3 Tbsp cocoa.