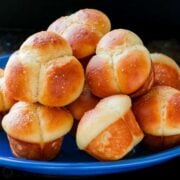
It’s hard to resist these pillow-soft and buttery Cloverleaf Rolls. These are made with milk dough which has an unbelievably soft and cloud-like texture. You’ll love the delicious layers when you pull the 3 clover leaves apart.
Homemade Cloverleaf Dinner Rolls is the perfect side for your holiday table and they always get compliments even when they’re competing with the Christmas Prime Rib or Thanksgiving Roast Turkey. After all, you definitely need a roll to soak up the Turkey Gravy.

This post may contain affiliate links. Read my disclosure policy.
There’s something so comforting about home-baked bread from Focaccia Bread to Banana Bread and even Pita Bread. If you love a warm and ultra-soft dinner roll, this recipe is a must-try!
Watch the video tutorial and see how easy it is to make these clover rolls.
Cloverleaf Rolls Video Tutorial
If you enjoyed this video for Cloverleaf Rolls, make sure to subscribe to our Youtube Channel and click the BELL icon so you can be the first to know when we post a new video.
What is Milk Bread?
Milk bread is white bread that is made with milk, egg, and butter to form a tender crumb with a rich buttery flavor. Milk bread has the most satisfying texture and it’s easy to make, which is why it’s our preferred dough for making cloverleaf rolls.

Ingredients for Cloverleaf Rolls
- Water – start with warm filtered water (110-115˚F) to activate your yeast
- Active dry yeast – you’ll need 1 packet or 2 1/4 tsp of yeast
- Milk – use warm low fat milk (whole milk will also work)
- Butter – either melted and cooled or very soft butter
- Granulated sugar – feeds the yeast to make the rolls rise beautifully
- Egg – use a large, room temperature egg
- Salt – we use fine sea salt
- Bread Flour – has a higher protein content to produce a softer bread. Also, make sure to measure flour correctly.

Common Questions
This recipe works best with active dry yeast and that is the yeast we recommend. Instant yeast will work, but it will speed up the rising process and the texture won’t be quite the same.
Yes, dinner rolls are freezer friendly and if you freeze them the day they are baked, they will taste fresher when they are thawed. See instructions for freezing in the “make-ahead” section below.
It’s best to use bread flour because of its higher protein content which helps to develop the gluten in the dough, resulting in a softer dinner roll.

Make-Ahead
- Overnight rolls – Once you have placed the oiled plastic wrap over the pan of dinner rolls, set the pan in the refrigerator overnight. A couple of hours before baking, remove the rolls from the refrigerator, let them come to room temperature and rise until visibly puffed, then butter and bake as directed.
- Freezing – Baked dinner rolls freeze really well. Let them cool to room temperature then transfer to a freezer safe zip bag, remove any excess air, and freeze for up to 2 months. If you freeze them the same day they are baked, they will taste fresh when thawed.

Tips for Making the Best Dinner Rolls
- Check the yeast – the reason for initially mixing the yeast with 3 Tbsp of warm water is to activate the yeast as well as to make sure it is still working. If you don’t see a foamy layer on your mixture after 7 minutes or so, you should buy new yeast and start over.
- Ingredient temperatures – make sure your liquid ingredients are warm when added (between 110-115˚F) for the dough to rise properly. Colder ingredients will take longer to get the yeast working.
- Proofing – proof dough in a warm place that is at least 75˚F but not more than 110˚F (high heat will kill your yeast). Putting it in the oven with the light on works well. Also, you can microwave a damp kitchen towel for a minute then turn it off and place the bowl of dough inside the warm microwave. The warm steamy environment is ideal for dough proofing.

Serve with
Sometimes all you need is to spread on Cranberry Sauce or whipped Honey Butter, but if you’re looking to pair this with a meal, here are our favorite recipes to serve with dinner rolls:
- Sweet Potato Soup
- Cabbage Soup
- Vegetable Soup
- Roasted Sweet Potato Salad
- Creamy Tomato Soup
- Chicken Pot Pie Soup
Golden, puffed, buttery, and super soft – these Cloverleaf Rolls will be the talk of your holiday table.
Cloverleaf Dinner Rolls Recipe

Ingredients
Cloverleaf Rolls:
- 3 Tbsp warm water, (115˚F)
- 2 1/4 tsp active dry yeast, (1 packet yeast)
- 1 cup low-fat milk, warm (105-110˚F)
- 5 Tbsp unsalted butter, melted or very soft, plus more for the pan
- 3 Tbsp granulated sugar
- 1 large egg, room temperature
- 1 tsp fine sea salt
- 3 1/2 cups bread flour, divided (add an extra 1/4 cup if needed)
For the Topping:
- 3 Tbsp unsalted butter, divided, melted
- 1 tsp kosher salt
Instructions
- In the bowl of a stand mixer, add 3 Tbsp very warm water (115˚F). Sprinkle the top with 1 packet of yeast, whisk to combine, and let rest uncovered for 7 minutes until foamy on top.
- Add warm milk, melted butter, sugar, egg, and salt. Whisk until blended, then gradually whisk in 2 cups of flour then switch to the dough hook attachment and add the remaining 1 1/2 cups of flour in thirds, letting it incorporate with each addition. Add more flour a little bit at a time until the dough feels moist to the touch, but it shouldn’t stick to clean/dry fingertips.
- Knead 10 minutes on speed 2 of a stand mixer, or knead by hand. The dough should pull away from the sides of the bowl as it kneads and will be smooth and elastic.
- Transfer dough to a large oiled bowl, turning the dough to coat in oil. Cover the bowl with plastic wrap and let rise in a warm place (90-100˚F) for 1 to 1 1/2 hours or until doubled in volume.
- Transfer dough to a smooth, clean work surface. You should not need any additional flour at this point. Divide the dough into 12 even pieces then divide each piece of dough into 3 small pieces. Cup your hand over each of the small pieces and roll over work surface to form a ball. Butter a 12-count muffin pan and place 3 little balls of dough into each muffin cup.
- Oil a sheet of plastic wrap and place the oiled side loosely over the rolls. Let rest in a warm place for 30-45 minutes until visibly puffed. Meanwhile, preheat the oven to 425˚F with a rack in the center.
- Once rolls have risen, brush the tops with 2 Tbsp melted butter and bake in a preheated oven at 425˚F for 13-15 minutes or until golden brown. As soon as they are out of the oven, brush with more melted butter and sprinkle with kosher salt. Transfer to a wire rack to cool for 15 minutes and serve warm.
My mom was old school. I never remember seeing her use a recipe. She made THE fluffiest, best tasting rolls ever. Although she showed me step by step, I’ve never been able to get that flavor. My wife made your clover leaf rolls (and I helped!) These taste like Mom’s. My eyes got all misty. 🙂
I’m so glad this recipe was helpful, Rick!
What size rectangle do you shape to get the right size for 12 rolls?
I made these today and they turned out massive. Are use my bread maker – dough cycle. I made them up I will put in my oven to rise. I cooked them at 375 for 15 minutes.
Verdict: huge! But really good.
I think that’s great and I’m glad you liked it!
Hi Natasha,
I made these rolls for dinner last night. I followed the directions to a “T”. They looked great until I lifted them up from the pan. The outside of the rolls were burnt. The tops looked fine. I cooked them according to your directions. I did use a dark non-stick muffin pan. Wondering if this is where the problem lies? Have any suggestions? Should I turn the oven temperature down? The inside of the rolls tasted great. Would like to try making them again without the burnt outside edges. Any help would be greatly appreciated! I scrolled through all the comments, but I guess I am the only one who has had this issue.
Hi Silene, I haven’t had that happen – did you possibly bake on convection mode? In that case, you would need to make adjustments and I haven’t tested this on convection oven settings.
I really do think it was due to the dark muffin pan. I made your soft dinner rolls and they were a huge hit! I used a clear glass pyrex dish and turned the oven down 25 degrees. It seemed to do the trick. Unfortunately both of my muffin pans are dark, non-stick. I really enjoy your recipe’s as they are pretty easy to follow. Have you thought of making a cook book? I would love to purchase one! Thank You
That could be it, thanks for sharing and good to know that you’re enjoying my recipes. I am already working on my cookbook, I’ll definitely share it with everyone when it’s ready. Thank you for asking!
Hi Natasha…I love and have made many of your recipes…but I don’t have a fancy mixer or food processor…for recipes such as this is it possible to give a quick instruction on how to make without the appliances…such as this recipe not having a mixer with a dough hook?
Hi Dianne, you can knead the dough by hand without a stand mixer. Do everything in a large mixing bowl and then knead by hand. It’s just a little more effort but will work fine.
Made these rolls on this wintery day. Absolutely delicious!!!!!!
Thank you
That’s awesome, Tammy. Thanks a lot for the great feedback!
Hi Natasha. I am vegetarian. What would happen if I exclude the egg in the recipe?
Hi Davita, I haven’t tried this recipe without eggs so I’m not so sure how it would turn out. If you do an experiment, please share with us how it goes.
I’m in my 60’s and have never had success in making dinner rolls until now. This is the easiest recipe I’ve found for the BEST dinner rolls. I’ve made them over and over. Thank you for the video and the recipe. You are my favorite❤️
Aww, that’s the best! Thank you so much for sharing that with me, Nan. I’m all smiles
Oh my word. I tried to make these today Natasha. It was like a good fail. They over rose when I had the three balls in the muffin tins then when I made them they rose to high and were hard. I have no clue what I did wrong but I need to master this because I hate failing. I never make rolls from scratch so I have a mission to accomplish. I wish I could attach photos to show you what they looked like to get tips. I did everything you suggested. They rose in the microwave for an hour and a half. Spooned the measurements correctly. Used the right temperature milk and water. Rolled them perfectly into three balls then placed in the tins. No idea what I did wrong
Hi Angela, if they rose too high, that probably means they were overproofed. If you overproof a dough, it exhausts the yeast and then it doesn’t bake up properly. I hope that helps to troubleshoot.
Hi Natasha,
Is it possible to make only half as there are only two of us? Not sure they would freeze well, and certainly wouldn’t be as good as when first made.
If you have any suggestions, I would greatly appreciate them.
I have made a lot of your recipes and haven’t found one yet that we didn’t put into our rotation book.
Thank you in advance
Hi Susan, I found that if I freeze bread (loaves and rolls) as soon as they are cooled too room temperature (fresh and the same day they are baked), they are just as good then when they are thawed and warmed slightly in the oven.
Hello Natasha this recipe must be another winner. Can you pls tell me how much flour in grs I need. Can wait to try this recipe
Ty
Hello Elizabeth, you may convert the ingredients in the recipe into grams/metric. If you are at the recpe you can click Jump to recipe then Metric to convert them.
Natasha,
What would happen if I used while milk? Asking for a friend… lol.
Hi KJ, we have this note in the recipe: “Milk – use warm low-fat milk (whole milk will also work)” I hope that helps.
Hi Natasha, I have tried many of your recipes and they never disappoint!
I can’t eat butter, could I use olive oil instead?
Thank you
Hi Christine. I have not tested that. You would have to experiment. The butter helps to form a tender crumb with a rich buttery flavor so I’m not sure what the texture would be like without it. Let us know your results if you experiment.
Made this last night as a test run for Christmas Day. House smelled like a bakery as you said! Easy to do, spot on. I did find when I rolled the dough, it didn’t form so easily.. so I rolled them and then pulled and pinched the bottom and formed the a perfect round ball. (if you can picture when you see fresh mozzarella being made). They are light and airy and once again your recipe is SPOT ON! Can’t wait to serve in a week at Christmas!
Thank you so much for sharing that with me, Emily! I’m glad it worked out! I love the smell of fresh-baked dinner rolls, too, so perfect for Christmas!
Thank you ! Happy Holidays ! Keep your incredible recipes coming. All the best !
Thank you, Emily. Happy Holidays!
I made these a few weeks ago and they turned out PERFECT! SO delicious with the added butter and salt after baking. YUM! My husband is a bread FREAK and this one was a hit with him. I stored the leftovers in a heavy duty bread bag and, let’s just say, they didn’t last long. They are so GOOD!! Thank you for sharing this recipe!
Hi Natasha. I had been wanting to make these for weeks. Sooo I gave them a try. I had a lot of trouble with the yeast. Went through 5 packets. Finally realized you heat water to 115 THEN let cool down to 110 and add yeast. S o I was frustrated but finally got it. Everything went smooth after that. Followed all your tips. Unfortunately, they didn’t look anything like yours. They did not look clover like. No definition. I think they got to big in mircrowave when proofing final stage. Again, I should have read your directions better, you said rise till puffy. The texture was not like yours either. Your inside was smooth and white, mine had a lot of air bubbles. They were yummy though. Going to give another try. Any suggestions would be appreciated.
Thank you so much for sharing that with me, Susan! It sounds like you’re on the right track! I hope you give this another try soon!
What type/brand of temperature gauge do you use? Rolls were delicious!
Hi D! I use this Thermapen here for an instant read.
I made these for my family’s Thanksgiving this year. We usually use store bought rolls. I am pretty intimidated with making bread. But they turned out great and everyone loved them.
Nice to know that everyone loved these dinner rolls. I’m also glad that you tried making this recipe and enjoyed it!
These turned out very well on my first attempt – easy to follow recipe with great results. Thanks again for this wonderful recipe!
Thanks for the great comments and feedback, Maria. Glad you enjoyed it!
I made the Cloverleaf dinner rolls for yesterday when i had company for lunch. They were delicious as everyone was eaten.
That’s so great! Thank you so much for sharing that awesome review with me, Wanda!
Natasha i just found out the metric tab is missing will you please be able to add it.
Hi Ranuth, We are currently working on adding metric measurements to all of our recipes, but it is taking some time to add them one at a time. Thank you so much for being patient! In the meantime, check out our post on measuring which should help.
This recipe produces a very light roll. I think I may have gone too light on the salt because there was very little flavor. I’m going to try them again and see if the salt amount was the reason.
Don’t you just love it?! I hope you give it another try soon, Gail! I always recommend trying the recipe as written the first time around and then adjusting to your liking. 🙂