
My easy Pumpkin Cheesecake recipe yields a perfectly spiced, creamy cheesecake nestled in a buttery homemade crust. It’s a fan-favorite that looks impressive on a plate, but it is easy to make (no water baths here!).

This post may contain affiliate links. Read my disclosure policy.
Helpful Reader Review
“Hands down the best cheesecake recipe. I will use any excuse, any holiday as an occasion to make this. Everyone in my family loves it.” – Alex ★★★★★
Pumpkin Cheesecake Video
Pumpkin Cheesecake has been one of the most popular recipes on my blog for years (the reviews speak for themselves!) I added a video tutorial and added some great tips to prevent cracks without using a water bath.
Easy Pumpkin Cheesecake Recipe
Pumpkin Cheesecake recipe mixes Cheesecake (the creamy filling and crunchy buttery crust) with Pumpkin Pie (the iconic pumpkin and fall spices) for the ultimate dessert.
This pumpkin cheesecake is so easy and delicious by itself, but it is just over-the-top impressive when you add some of my easy Butterscotch Sauce or Caramel and rum-infused Whipped Cream. Make this velvety-smooth pumpkin cheesecake up to 5 days ahead for easy holiday entertaining.

Ingredients for Pumpkin Cheesecake Crust
- Crackers – You can buy graham cracker crumbs, or crush 13 whole graham crackers for 1 1/2 cups of crumbs. You can substitute with gingersnap cookies, Vanilla wafers (Nilla Wafers), Shortbread cookies, or Biscoff (speculoos) cookies.
- Add-Ins – unsalted butter, sugar, and cinnamon

Pumpkin Cheesecake Ingredients
For consistent results, use room-temperature ingredients to get that velvety pumpkin cheesecake texture.
- Cream cheese – room temperature – to warm it up quickly, cut the cream cheese into small cubes, place them on a plate, and let sit at room temperature for 15–20 minutes
- Brown sugar – Use packed light brown sugar. “Packed” is when it holds its shape as it comes out of the measuring cup
- Pumpkin puree – I prefer Libby’s 100% pure pumpkin because (see why below). A well-drained homemade pumpkin puree will work. I’ve also tested this with canned pumpkin pie mix with great results.
- Eggs – To quickly bring to room temperature, set eggs in a bowl of warm water for 10 minutes.
- Sour cream – cuts the heaviness of the cream cheese, while giving a creamy texture
- Flour – acts as a stabilizer to give the cheesecake strength and prevent cracking, measure correctly
- Flavorings – Use store-bought or make your own Pumpkin Pie Spice and Vanilla Extract.

Pro Tip:
The best pumpkin filling for my cheesecake recipe is Libby’s brand because other brands tend to be too watery and lighter in color. This is the brand I recommend for all of my pumpkin recipes, from my Pumpkin Roll to Pumpkin Pancakes.

How to Make a Graham Cracker Crust
- Prep – Preheat Oven to 350˚F. Pulse graham crackers in a food processor until fine crumbs form. You could also put graham crackers in a large zip-top bag and use a rolling pin to crush them into fine crumbs.
- Bake – mix the crust ingredients together in a bowl, and then press into a 9-inch springform pan. Place on a foil-lined baking sheet (to catch butter drips), and bake at 350˚F for 8 minutes. Transfer to a wire rack to cool. Reduce the oven temp to 325˚F.

How to Make a Pumpkin Cheesecake
- Beat the cream cheese and brown sugar for 5 minutes, scraping down the bowl as needed (Now it’s similar to a yummy frosting!)

- Make Pumpkin Filling – Whisk together the remaining filling ingredients, and add them to the cream cheese mixture on low speed until just combined.

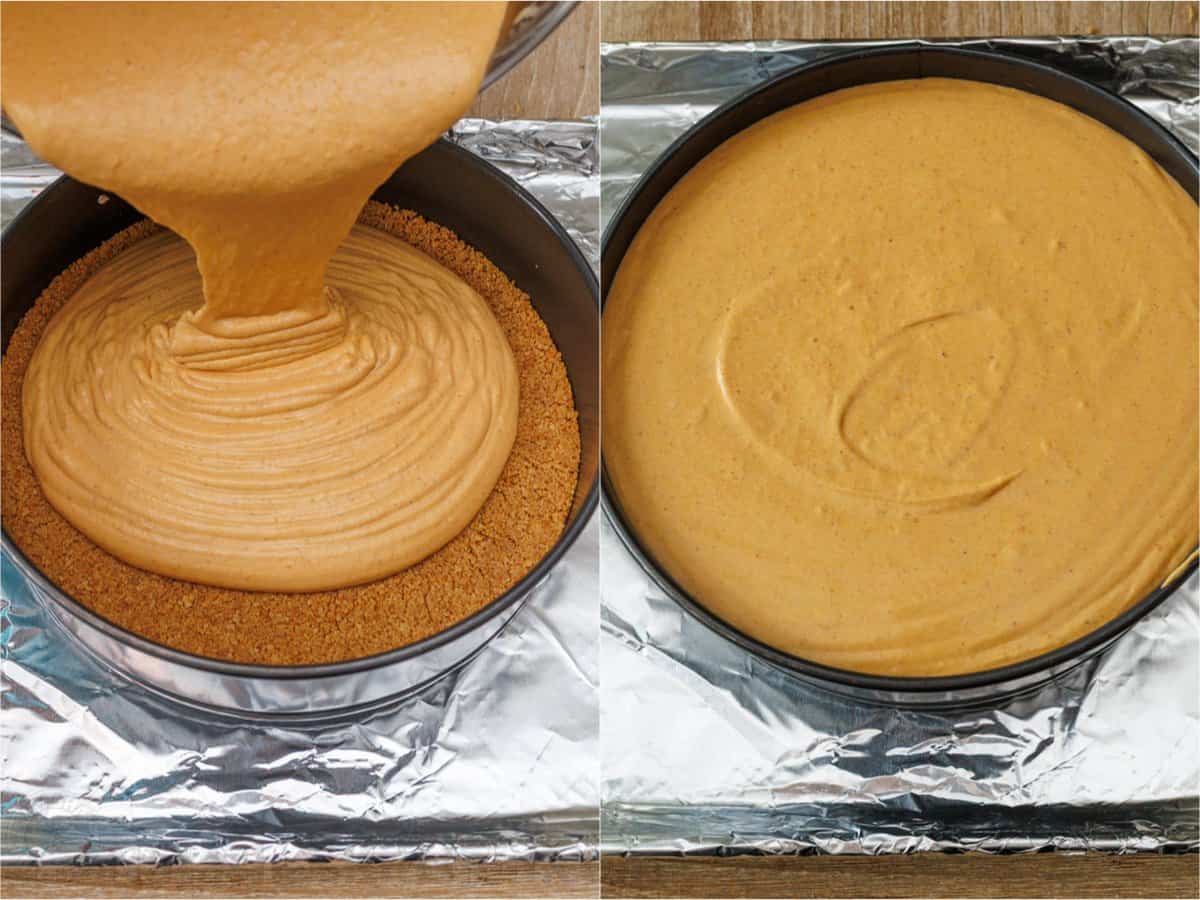
- Bake – Pour the filling into the cooled pie crust, then tap it several times on the counter to release any bubbles. Place a loaf pan half-filled with water next to the cheesecake on the center rack and bake for 50-60 minutes. When the edges are set, but the center 3 inches is still wobbly, turn off the oven and prop the door open with a wooden spoon to let the cheesecake cool for 30 minutes. Note: If you have a gas oven, you can leave the door closed and turn the oven off since gas ovens cool much faster.
- Chill – Remove from the oven and run a knife around the edges to release tension and cool to room temperature on a rack, then cover and chill for 4 hours, or overnight.

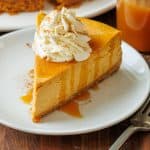
- Serve – Remove the springform pan and slice the cake. The cheesecake itself is not too sweet, so the toppings complement it nicely. I start with a drizzle of Caramel Sauce or Butterscotch Sauce on each slice, pipe on Whipped Cream, and dust with pumpkin spice.
Pro Tip:
I love serving pumpkin cheesecake with festive Rum-infused Whipped Cream (1 cup cream, 2 Tbsp sugar, & 1 tsp of rum instead of vanilla).

How to Prevent Cracks in Pumpkin Cheesecake?
- Reduce bubbles – Avoid overmixing or mixing on high speed, which creates air bubbles, and tap the filled pan on the counter to release air.
- Add water – Adding steam will keep the cheesecake moist to prevent cracks.
- Keep the oven closed – If you open the oven too early or too often, it creates temperature swings, which contribute to cracking.
- Avoid overbaking! This is HUGE – bake until the cheesecake is still wobbly in the center 3″. Since not all ovens are created equal, check for doneness in the last 10 minutes.
- Cool slowly – propping the door open with a wooden spoon prevents sudden temperature changes and prevents cracks.
- Loosen the cheesecake from the pan as soon as it comes out of the oven to reduce tension.
Sometimes, even if you’ve done everything right, you might get a tiny crack. If it does happen, cover the top with Caramel Sauce, Candied Pecans, Ganache, or whipped cream. It will still taste great!

Make-Ahead and Storage
Once the pumpkin cheesecake has cooled to room temperature, cover and chill until cold and fully set (at least 4 hours or overnight).
- To Refrigerate: Keep leftovers tightly covered in the fridge for up to 5 days. It keeps best if stored without toppings.
- Freezing: Tightly wrap the cheesecake in plastic wrap and foil and store in the freezer for up to 3 months. Thaw in the fridge overnight and add your toppings just before serving.

Everyone loves my popular pumpkin cheesecake recipe because the cheesecake is velvety and smooth with a buttery graham cracker crust. Top with caramel sauce and homemade whipped cream for the ultimate Thanksgiving dessert!
Pumpkin Cheesecake
Ingredients
For the Crust:
- 1 1/2 cups graham cracker crumbs, from about 13 whole graham crackers
- 6 Tbsp unsalted butter, melted
- 1 Tbsp granulated sugar
- 1/2 tsp cinnamon
For the Pumpkin Cheesecake:
- 24 oz cream cheese, room temperature
- 1 1/2 cups packed light brown sugar
- 15 oz pumpkin puree, Libby's brand, or well-drained homemade puree*
- 4 large eggs
- 1/4 cup sour cream
- 2 Tbsp all-purpose flour
- 2 1/2 tsp pumpkin pie spice, plus more to dust
- 1/4 tsp salt
- 1 Tbsp real vanilla extract
Optional Toppings:
Instructions
Make the Crust:
- Prep – Preheat Oven to 350˚F. Pulse graham crackers in a food processor until fine crumbs form.
- Bake – In a medium bowl, stir together the crust ingredients – graham cracker crumbs, sugar, cinnamon, and melted butter. Transfer into a 9-inch springform pan with 3" tall walls and use a large spoon to press crumbs into the bottom of your springform pan, going about 1/2" up the sides of the pan. Place on a foil-lined sheet pan to catch any drippings and bake at 350˚F for 8 minutes. Remove from oven and cool to room temperature.
Make the Pumpkin Cheesecake:
- Beat the cream cheese– Preheat to 325°F. In the bowl of your mixer with the paddle attachment, beat softened cream cheese and brown sugar on med speed until light and fluffy and without lumps (5 min), scraping down the bowl once to make sure you don't have chunks of cream cheese.
- Mix the pumpkin – In a separate bowl, using a whisk, stir together pumpkin puree, eggs, sour cream, flour, pumpkin pie spice, salt, and vanilla extract. Mix until well combined. Add this mixture to the cream cheese filling and continue mixing on low speed just until well combined, scraping down the bowl as needed.
- Bake – Transfer the filling into the pre-baked and cooled crust, and then tap the pan on the counter 15 times to release air bubbles. Place a loaf pan half filled with hot water (steam helps prevent cracks), and your cheesecake on the center rack and bake at 325˚F for 50-60 minutes* or until the edges are set and there is a slight wobble in the center 3" of the cheesecake when you jolt the pan. Turn the oven off and prop the door open with a wooden spoon for 30 minutes to cool slowly. Note: If you have a gas oven, turn the oven off and leave the door closed since gas ovens cool much faster.
- Chill and Serve – Once the cheesecake is out of the oven, run a knife around the edges of the pan (helps release tension), then cool on a rack until room temperature; about 2 hours. Wrap in plastic wrap and refrigerate for at least 4 hours or overnight. To serve, carefully remove chilled cheesecake from the springform pan, cut into slices, and add your desired toppings.
Notes
*Bake Times: Not all ovens are created equal so check your cheesecake for doneness before pulling it out of the oven. If your oven doesn’t preheat fully, it may take 60-70 minutes in the oven. Storage and Make-Ahead Tips:
- Make Ahead – bake and cool the cheesecake. Cover tightly and chill for up to 5 days in the fridge. Add toppings when ready to serve.
- Freeze – wrap the chilled cheesecake (I keep it in the mold), or individual slices in plastic wrap and foil, or place in a freezer-safe ziptop bag in the freezer for up to 3 months. Thaw in the fridge overnight and add toppings just before serving.
Nutrition Per Serving
Filed Under

More Fall Baking Recipes
Fall always puts me in the mood to bake, so here are a few of my favorite recipes we repeat each year.
- Apple Pie
- Pumpkin Bread
- Mini Pumpkin Pies
- Apple Turnovers
- Baklava
- Carrot Cake
- Apple Crisp
- Baked Apples
- Cinnamon Rolls


I’ve made this recipe for 3 straight Thanksgivings, and I love it! Can I incorporate bourbon into the recipe?
Hi Carlos! I haven’t tested it in the cheesecake, but it may work. You can add it to infuse the whipped cream frosting if you plan to add this on top of the cheesecake.
This is the second time I have made this. I made sure I mixed everything well and there were no clumps or anything and I used the exact pan and did the wooden spoon method and it still cracked ! Middle was very jiggly so had to cook 75 min total. I have a 2 year old Kitchen Aid oven that has never had an issue underbaking. I think the water in the loaf pan is not enough to ensure it won’t crack. May need to dry a different method or recipe next time.
Hi Kris, did you make sure the oven was fully preheated? Mine says it’s preheated but is actually off by 25 degrees so I use a oven thermometer to double check. The #1 culprit for a cracked cheesecake is overbaking so I suspect the 75 minutes may have been a little too long? You can use a water bath here if you prefer.
Yes , it was preheated for at least 20 minutes before I was ready to put it in.
Ok- I would also verify that you’re not beating in too much air when you’re making the filling. You want everything to be mixed well, but if there are too many air pockets it can cause cracks. Having the eggs and cream cheese at room temperature should help them incorporate well without mixing too aggressively. I hope that helps.
What does prop the oven door open with a wooden spoon mean? Crack it a tiny bit to accommodate the width of the spoon handle, or somehow prop the oven door somehow with the length of the wooden spoon?
Hi Nancy! The oven door just needs to be cracked. Open a few inches to slowly release heat and for the cheesecake to slowly cool down to avoid cracks. The wooden spoon acts like a wedge to keep it open. You can also use a folded towel or something else to create a few inches of space for air to escape.
I don’t think it’s safe to turn off a gas oven and leave the door ajar due to potential for CO poisoning…..ok to just take out the cake??
Hi Lorraine, For gas ovens: it’s totally fine to remove the cheesecake and let it cool on the counter.
The cracked-oven method isn’t necessary and doesn’t offer an advantage with gas since electric ovens cool slowly while gas ovens cool quickly.
So not even worth leaving in a turned off cracked open gas oven for even 15 minutes? Even though the gas oven cools quicker?
Hi Lorraine, with a gas oven, I read that you could just turn it off and leave it in there since it cools down much faster than an electric oven.
I had to bake about 25 min longer to get to set to 3in of wobbly in center. At 50 min was way underbaked. I baked at 325. Maybe I did not have high enough on racks? All I can think. Hope it comes out good.
I’ve made this recipe twice and both time I got a giant crack in the middle. The 2nd time, I cooked 10 minutes less (50 minutes) even though it seemed more wobbly than it should be and put 2 loaf pans of water in the oven. As soon as I turn off the oven to let it slowly cool, the crack started to form. Any suggestions to prevent this? The cheesecake tastes great!
Hi Rachel, I’m so glad you enjoyed the flavor, but sorry you ended up with a crack. I’m happy to help troubleshoot; did you possibly have your oven set to convection mode? The #1 culprit to a crack in the cheesecake is over-baking but and a convection over needs adjustments in temp or time. Also, if you have a gas oven, it cools down faster than an electric one which could be a culprit. Lastly, check my section titled “How to Prevent Cracks in Pumpkin Cheesecake?” above which will be helpful.
Hi Natasha! I made ur pumpkin cheesecake, it tastes amazing, but there is a huge crack in the middle. And this was meant to be made for someone else’s party! I googled how to fix a crack, and there a suggestion of dipping an offset spatula in warm water, and then smoothing the crack on the cheesecake, but I don’t know if it will work with pumpkin cheesecakes, as the top is…wiggly, and not as firm in the top. also, because of the crack, I got to see the inside. There are some white spots in the cheesecake. Is that normal? Thanks in advance.
Hi Aisha, it sounds like possibly it was not mixed well enough, you should not have white spots in it. I would be sure all of your ingredients like the cheesecake are at room temperature.
Ok. But what about the crack? Can I do something about it??
The best way to hide the crack would be to decorate the top with whipped cream.
Just made this the other day and it is SO DELICIOUS!! I got a huge crack but I don’t care, it’s rustic looking! I will definitely make this every year now!! Thanks!!
Hi Jess! I’m so glad you enjoyed it. Cracking is very common, hopefully my tips above will help avoid this in the future for you.
Any suggestions on cook time if I only have a 10 inch springform pan?
Hi Marybeth! I don’t have the precise time for that. I would start checking earlier, 40/45mins and look for signs I provided in the instructions to check for doneness.
Thank you Natasha! It turned out perfectly.
That’s wonderful to hear!
I made this and when baking it baked above the pan rim and started cracking all around near the pan…? What happened???
Hi Aly! What size is your spring form pan? Mine is 9” and 3” deep. Cheesecake rises a little in the oven, then shrinks as it cools. If you’re using the correct size pan, it shouldn’t be filled to the brim like this or overflow. Is your pan more shallow?
My pan could only hold half the filling. I am so confused. I’ve never made a cheesecake before, and when the filling was at the top with some leftover, I googled & read that it should only be half-two thirds full. So I scooped some out. What did I do wrong???It’s in the oven right now. I’ll let you know.
Hi Pam! Is your spring pan more shallow? Mine is about 3” deep. It’s a 9” spring form pan.
3″ but I did make more crust because I really love it. Maybe it was thicker than I thought, but even so, I had a LOT of extra. For the next time, how close to the top of the pan can the uncooked filling safely go?
That could very well be it since it leaves less room in the pan for the filling.
See the images above for reference so you can see how full my pan was.
Hi! I love your recipe and have been using it for nearly a decade now! I was wondering if you’ve made any small alterations to your recipe over the years here? Thank you for this amazing recipe, I make multiple because my family looks forward to it every year.
Hi Audriana! The recipe is the same, I just added new photos and also a video tutorial to make the process easier.
Can I substitute plain greek yogurt for the sour cream?
Hi Julee, that would be fine.
Can I use gluten free flour in place of the regular flour?
That would be fine. I hope you love the recipe!
Hi Natasha, I followed the recipe to the letter and even after 50 minutes the entire cake shook and jiggled so I kept it in a little longer. It wasn’t just the center that jiggled but the whole cake did not sure what I did wrong. This is my first try at this cake. Hopefully, my sister and family will enjoy it all the best.
Hi Ralph. Did you preheat the oven fully before hand? If not, this will take significantly longer to bake. I like to use an internal oven thermometer (affiliate link) to verify my ovens temperature.
Where am I supposed to place the pain of hot water in the oven and does it have a loaf pan? My guess is it’s supposed to be put beneath the cheese cake and middle rack but the instructions don’t say that. Thanks for clarifying.
Hi there! It doesn’t have to be a loaf pan, but I placed it next to my cheesecake in the oven. See the image above for reference. I hope you love the recipe!
Hey Natasha! How many slices will this cheesecake serve?
Hi Aisha! The serving size can be found on the printable recipe card, towards the bottom of the post. Simply click “Jump to recipe” and it will take you there. This cheesecake serves 12 slices.
OK, thanks! I am going to make this for a party, and just wanted to know how many slices this will serve!
Hello, I was wondering if I can use a water bath with this recipe? The last time I tried and my crust burnt. The first time it was perfect but I cannot remember if I used the water bath.
Hi Kim, this recipe doesn’t require a water bath. A water bath changes the consistency and texture of a cheesecake. Using a pan with water fills the oven with steam, which keeps the environment moist and the oven temperature more even so it bakes without cracks or a dry top. But this recipe should not crack as is if you are using normal bake mode.
I don’t have the spring pan. Is it possible to make with a normal glass pie dish?
Hi Carrie! A glass is more shallow and this recipe would be too much. It also bakes differently and it would require modification all around to make it work in a glass dish.
I make this every year. I was wondering what the cook time would be if I made them into cupcakes?
Hi Jennifer! It would likely bake similar to my
Mini Cheesecakes Recipe here.
Hi, my husband has made this cheesecake about 5 times and it is always one of our favorites! I was curious though, the cooking time seems to be significantly longer for us. We do live at higher elevation, about 3,600 feet above sea level. Do you think we should increase the cooking temperature?
Thank you!
Mike and Madie
I’m glad it’s a huge hit! I wouldn’t raise the oven temperature for cheesecake even in high elevation as it may cause cracking. You may keep the same oven temperature and use an oven thermometer to ensure your oven isn’t running cool.
This was easy to follow and I love the flavor. I baked about 5 minutes extra fearing it was too jiggly in the center. Chilled overnight (did the oven cool, etc. as written)and the center is still slightly softer than the rest. Is there something I should watch for or change? I know everyone will devour it even if it’s soft at the center on Thursday though!
Hi Michele! I’m sorry it’s not perfectly baked. It sounds like it may have needed to bake a little longer, even after the added time. Be sure to fully preheat your oven prior to baking and follow the instructions in step 3 to know when it’s ready. It should continue to set while it cools in the oven and even more after refrigeration.
Did you use homemade pumpkin puree? If so, strain it well through a mesh cloth. I like to use Libby’s brand if I’m using canned because of its texture and flavor.